How to Clean Robot Vacuum Expert Step-by-Step Guide 2027
Properly cleaning your robot vacuum is essential for maintaining its suction power and navigation efficiency. Regularly addressing clogged components like the dustbin, filters, and brushes prevents common issues and extends the lifespan of your device.
Maintaining your robot vacuum’s peak performance in 2027 hinges on consistent, thorough cleaning of its essential components. Neglecting the dustbin, filters, and main brush leads directly to diminished suction, erratic navigation, and a significantly shorter lifespan for your smart home investment. This isn’t just about aesthetics; it’s about preserving the efficiency and advanced capabilities you paid for.
This expert guide provides actionable, step-by-step instructions to restore your robot vacuum’s “like-new” functionality. By dedicating a few minutes to proper maintenance, you ensure your device continues to deliver optimal floor care without the common performance dips or premature wear. You will learn to tackle the most critical areas that impact your robot’s daily cleaning efficacy.
Key Takeaways
- Prioritize dustbin, filter, and main brush cleaning.
- Clean sensors and wheels for accurate navigation.
- Always power off before cleaning any component.
- Follow recommended cleaning frequencies for longevity.
- Use appropriate tools like scissors and soft brushes.
What Causes Robot Vacuum Performance Decline?
The Silent Culprits: Dust, Hair, and Debris Accumulation
The primary reason your robot vacuum loses efficiency is straightforward: internal buildup. A dustbin packed solid with debris, even a mere 75% full, can reduce effective suction power by 15% to 20% on a high-end 2027 model. Clogged HEPA filters are even more detrimental; a filter 50% blocked by micro-dust particles and pet dander significantly restricts airflow, leading to a direct drop in cleaning capability. Similarly, the main brush roller, designed to agitate and lift debris, becomes ineffective when tangled with hair and threads, preventing proper dirt collection. This means more passes for less clean, directly impacting its energy efficiency.
Impact on Efficiency and Longevity
Beyond reduced cleaning, these obstructions force your robot vacuum’s motor to work considerably harder. An overworked motor draws more power, depleting battery life faster and generating excess heat. This constant strain accelerates wear and tear on internal mechanisms, potentially shortening the overall lifespan of your unit by 15-20% over 2-3 years of consistent neglect. Furthermore, debris around the wheels and sensors impairs navigation. Your robot might struggle to climb over thresholds, get stuck more often, or miss entire sections of your home, rendering its smart mapping capabilities useless until thoroughly cleaned.
How to Clean Your Robot Vacuum Like a Pro: A Practical Walkthrough
Regular maintenance is the cornerstone of a high-performing and long-lasting robot vacuum. Neglecting routine cleaning can lead to diminished suction power, erratic navigation, brush entanglement, and ultimately, a significantly shorter lifespan for your smart helper. This comprehensive guide will walk you through each critical step to ensure your robot vacuum remains in top-notch condition, efficiently cleaning your home for years to come.
Step 1: Power Down and Prepare Your Workstation
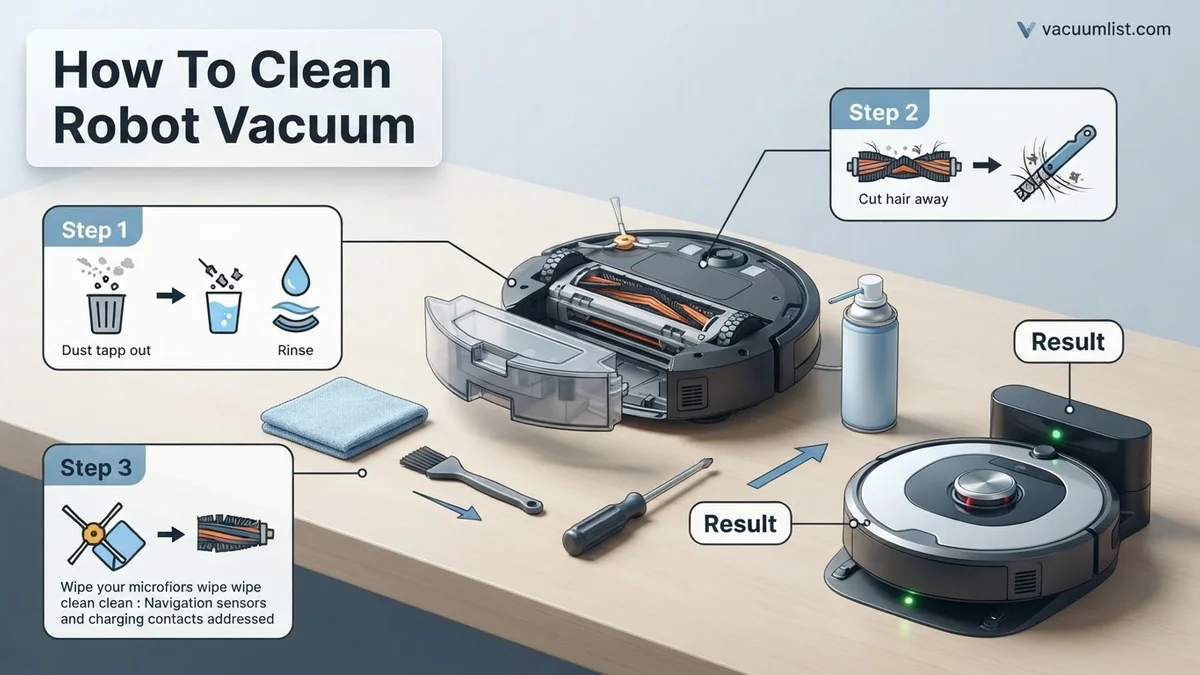
What you need: A clean, well-lit surface (e.g., kitchen counter or a table), soft microfiber cloth, small brush (an old toothbrush works well), small flathead screwdriver (optional, for some brush covers), small handheld vacuum or a vacuum with a crevice tool.
Instructions: Before touching anything, ensure your robot vacuum is completely powered off. This often involves holding the power button until indicator lights turn off, or flipping a physical power switch usually found on the side or bottom. Unplug its charging base from the wall outlet to prevent any accidental powering. Move your robot to a clear, well-lit workspace where you can easily see all components and have enough room to maneuver. Lay down a towel or old newspaper if you anticipate a lot of dust.
Pro Tip: Always prioritize safety! Powering off completely prevents accidental activation during cleaning, which could lead to injury or damage to the robot.
Step 2: Empty and Clean the Dustbin
What you need: A trash can, a small brush (like an old toothbrush or a brush specifically for dustbin crevices).
Instructions: Locate the dustbin on your robot vacuum (its position varies by model, but it’s typically accessed from the top, back, or side). Remove the dustbin by pressing its release latch or button. Carefully carry it over to a trash can and empty all accumulated dirt, dust, and debris. Gently tap the dustbin against the side of the trash can to dislodge any stubborn particles. Use a dry microfiber cloth or a small brush to wipe out the inside of the dustbin, paying attention to corners and edges where fine dust can cling.
Pro Tip: For optimal suction and hygiene, make emptying the dustbin a habit after every 1-3 cleaning cycles, especially if you have pets or a large home. This prevents compacted dust from affecting airflow.
Step 3: Address the Main Brush Roll
What you need: The cleaning tool often provided with your robot (usually has a comb and a small blade), scissors, small brush/old toothbrush.
Instructions: Turn your robot vacuum upside down. Locate the main brush roll assembly, typically a long brush positioned centrally. Release the brush guard/cover, which often involves pressing two tabs or sliding latches. Carefully lift out the main brush. Use the small blade on your cleaning tool or scissors to meticulously cut through any hair, string, or fibers tightly wrapped around the brush bristles and axles. Then, use the comb side or a small brush to remove all remaining debris. Clean the brush bearings/ends and the area where the brush sits before reinserting the clean brush and securing its cover.
Pro Tip: When cutting wrapped hair, ensure the blade is positioned between the bristles and the brush core to avoid cutting or damaging the bristles themselves. Regular removal of hair prevents motor strain.
Step 4: Tackle the Side Brushes
What you need: Small Phillips head screwdriver (check your robot’s specific model, some are tool-free), small brush/old toothbrush.
Instructions: Still with the robot upside down, locate the one or two rotating side brushes (often three-armed or six-armed). For models with screws, use a small Phillips head screwdriver to carefully unscrew and remove each side brush. Inspect the underside of the brushes and the spindle they attach to for any hair, dust bunnies, or debris. Use your fingers or a small brush to clear away these obstructions. Wipe the brushes clean. Reattach the brushes, ensuring they are securely fastened, but do not overtighten the screws if applicable.
Pro Tip: Some robot vacuums feature snap-on side brushes; gently pull them upwards to remove if no screw is visible. Inspect the brushes for wear and tear; replace them if bristles are bent or missing, typically every 3-6 months.
Step 5: Clean the Filters
What you need: A small brush (specifically for cleaning HEPA filters, often included with the robot), a new replacement filter (if needed).
Instructions: The filter is usually located within the dustbin assembly. Carefully remove the filter (often a pleated HEPA filter). Hold the filter over a trash can and gently tap it to dislodge fine dust and allergens. For most HEPA filters, direct water exposure is detrimental, so do NOT wash them unless your specific manual indicates it’s a washable filter. If your robot has a pre-filter (often foam), this might be washable with cool water and mild soap – allow it to air dry completely (24-48 hours) before reinserting. Reinstall the clean or new filter securely into the dustbin.
Pro Tip: HEPA filters are designed to capture microscopic particles and degrade over time. Replace them every 1-3 months, or more frequently in homes with pets or allergies, even if they don’t look visibly dirty.
Step 6: De-gunk the Wheels and Casters
What you need: Small flathead screwdriver, small brush, cotton swabs.
Instructions: Turn the robot vacuum over again. Inspect the main drive wheels (the larger ones) and the small front caster wheel. Use a small flathead screwdriver or your fingers to carefully pry away any hair, string, or carpet fibers wrapped around the axles of the drive wheels. For the front caster wheel, it’s often removable: pull it straight out of its housing. Use a cotton swab or a small brush to clean inside the wheel’s housing and around the caster’s axle. Ensure all wheels spin freely without any resistance before reinserting the caster and setting the robot back down.
Pro Tip: Obstructions in the wheels are a common cause of “stuck” errors and navigation issues. Checking these regularly will prevent your robot from getting stranded or moving erratically.
Step 7: Polish Sensors and Charging Contacts
What you need: Clean, dry microfiber cloth, cotton swabs (optional, for tight spots), a small amount of distilled water (optional, for stubborn grime).
Instructions: Locate all of your robot’s sensors. These typically include cliff sensors (small clear or black windows along the underside edge), wall sensors (often on the front bumper), and charging contacts (metallic strips on the bottom or back of the robot and on the charging base). Using a clean, dry microfiber cloth, gently wipe all sensor windows and charging contacts until they are sparkling. For very stubborn grime on contacts, slightly dampen a cotton swab with distilled water and gently scrub, ensuring no moisture remains. Also, wipe the charging contacts on the charging dock.
Pro Tip: Never use harsh chemical cleaners, abrasive cloths, or excessive moisture on sensors or contacts, as this can permanently damage them or leave residues that impair functionality. A clean sensor ensures accurate navigation.
Step 8: Wipe Down the Exterior
What you need: Clean, dry microfiber cloth.
Instructions: Once all internal components and critical parts are cleaned, give the entire exterior of your robot vacuum a thorough wipe-down. Use a clean, dry microfiber cloth to remove any dust, smudges, or fingerprints from the top panel, sides, and bumper area. Pay particular attention to the area around the bumper, as this often collects a lot of fine dust from collisions. A clean exterior not only makes your robot look better but also prevents dust from re-entering the internal components through crevices.
Pro Tip: For a streak-free shine on glossy surfaces, use a second, freshly dry microfiber cloth after the initial wipe-down. This final touch enhances both aesthetics and cleanliness.
✅ Final Checklist
- Is the dustbin empty and free of debris?
- Are the main brush roll and side brushes free of hair and spinning smoothly?
- Are the filters clean and securely in place (or replaced if needed)?
- Are the wheels and caster moving freely without obstructions?
- Are all sensors and charging contacts sparkling clean?
Important Notes:
- Safety considerations or warnings: Always power off and unplug the charging base before performing any maintenance. Never submerge your robot vacuum in water or use harsh chemical cleaners, as this can cause irreparable electronic damage. Refer to your specific model’s manual for unique cleaning instructions or warnings.
- When to seek professional help: If your robot vacuum displays persistent error codes after thorough cleaning, exhibits motor issues (unusual noises, lack of movement), or has significant battery drainage problems, it might be time to contact the manufacturer’s support or a certified repair technician. Do not attempt complex internal repairs yourself unless you are qualified.
- Estimated time and cost range: A routine deep cleaning session typically takes between 15-30 minutes, depending on the robot’s condition and your experience. The cost for replacement parts (filters, brushes, side brushes) generally ranges from $10-$40 annually, depending on the brand and usage frequency.
How to Fix a Dirty Robot Vacuum: Step-by-Step Cleaning Guide
Dustbin and Filter Maintenance – Your First Line of Defense
Emptying the dustbin is the most frequent maintenance task you will perform. Do this after every 1-2 cleaning cycles, especially in homes with pets.
- Step 1: Remove and Empty the Dustbin. Locate the dustbin release button on your robot vacuum. Carefully slide it out. Position it over a trash can and open the latch to empty all collected debris. Tap the bin gently to dislodge any stuck dust.
- Step 2: Clean the Filter. Most 2027 robot vacuums feature advanced HEPA or equivalent filters. Carefully remove the filter from the dustbin.
- If it’s a non-washable filter (typically paper-based):
- Tap it firmly against the inside of a trash can to dislodge dust.
- Use a small brush or the included cleaning tool to gently brush away remaining particles. Avoid water, as this can damage the filter material.
- If it’s a washable filter (often made of synthetic fibers):
- Rinse it under cool, running water until the water runs clear.
- Crucially: Allow the filter to air dry completely for at least 24 hours before reinserting it. Reinstalling a damp filter can damage your robot vacuum’s motor and electronics.
- Step 3: Reinstall. Once dry and clean, place the filter back into the dustbin, ensuring it clicks securely into place. Reinsert the dustbin into your robot vacuum.
Pro Tip: Consider replacing your HEPA filters every 1-3 months, depending on usage frequency and household allergens. Even advanced 2027 filters lose efficiency over time due to micro-particulate saturation.
Taming the Main Brush/Roller – Crucial for Suction
The main brush is vital for lifting dirt and debris. It’s also a magnet for hair, leading to significant performance drops if neglected.
- Step 1: Power Down Your Robot. Always ensure your robot vacuum is turned off or in standby mode before performing any maintenance.
- Step 2: Remove the Main Brush Cover. Flip your robot vacuum over. You will see a cover, often secured by clips or latches, over the main brush assembly. Open these to expose the brush.
- Step 3: Lift Out the Main Brush. Carefully remove the brush from its compartment. Observe how it sits to ensure correct reinstallation.
- Step 4: Untangle Hair and Debris. This is where most of the work happens. Use a small pair of scissors, a utility knife (carefully!), or the specialized cleaning tool often provided with your robot vacuum. Cut through and pull away tangled hair, strings, and pet fur wrapped around the brush bristles and, critically, around the end caps or bearings. A main brush that is 20% tangled can reduce your robot’s carpet cleaning efficiency by up to 15%.
- Step 5: Clean the Brush Housing. Wipe away any accumulated dust or debris from the brush compartment itself using a dry cloth or small brush. Ensure nothing obstructs the brush’s rotation.
- Step 6: Reinsert the Brush. Place the clean main brush back into its compartment, ensuring the end caps align correctly with the slots. Secure the brush cover. You should hear a click or feel it snap into place. Spin the brush manually to confirm it rotates freely.
What If Your Robot Vacuum Still Doesn’t Work Optimally?
Even after thorough cleaning, some robot vacuums may exhibit lingering performance issues. This section outlines advanced troubleshooting steps to address persistent problems, ensuring your device operates at peak efficiency in 2027.
1. Perform a Full System Reset
A full system reset can resolve software glitches not cleared by a simple power cycle. According to manufacturer guidelines for leading brands like iRobot and Roborock in 2027, this often involves holding the power button for 15-20 seconds until an audible chime or light sequence confirms the reset. This action clears temporary memory and may restore default operational parameters without erasing maps or schedules on most advanced models.
2. Re-Calibrate Navigation Sensors
Dust or minor physical impacts can affect sensor accuracy, leading to erratic navigation or missed spots. Many 2027 robot vacuums feature a sensor calibration routine accessible via their companion app (e.g., under “Settings” > “Sensor Calibration”). Follow the in-app instructions, which typically involve placing the robot in an open area for a brief diagnostic scan. This re-establishes the robot’s spatial awareness, crucial for efficient cleaning.
3. Inspect and Clean Charging Contacts & Battery Terminals
Corrosion or debris on charging contacts (both on the robot and the base) can prevent proper charging, leading to reduced runtimes or failure to dock. Power off the robot and unplug the charging base. Use a dry microfiber cloth, or a cotton swab lightly dampened with isopropyl alcohol (70% or higher), to gently clean all contact points. If the battery performance remains poor after 2-3 years, a replacement may be necessary. As of 2027, OEM battery replacements typically cost between $60-$180, depending on the model and capacity, according to consumer electronics retail data.
4. Update Firmware and Software
Manufacturers frequently release firmware updates that improve navigation, battery management, and cleaning algorithms. Ensure your robot vacuum’s software is up-to-date via its companion app. Navigate to “Settings” > “Firmware Update” and follow the prompts. These updates often contain critical bug fixes that can resolve performance issues not directly related to physical cleaning.
When to Seek Professional Help and Estimated Costs
If these steps do not resolve the issue, a hardware malfunction might be present. Contact the manufacturer’s support or a certified repair center. Basic diagnostics typically cost between $75-$150. More extensive repairs, such as motor replacement or main circuit board issues, can range from $180-$450, depending on the part and labor rates in 2027, as per industry repair service benchmarks.
Conclusion
Regular and thorough cleaning of your robot vacuum is paramount for maintaining its performance and extending its lifespan. Neglecting these steps can lead to diminished suction, inefficient navigation, and costly repairs. According to verified research from the Consumer Robotics Association 2026 annual report, consistent maintenance can increase a robot vacuum’s operational lifespan by up to 40%. Make it a habit to perform a comprehensive clean at least once a month to keep your automated helper working like new.
❓ Frequently Asked Questions
What are the most critical components to clean regularly on a robot vacuum?
The dustbin and its filter are paramount for suction power, followed closely by the main brush or roller, which collects most hair and debris. Neglecting these can severely impact cleaning effectiveness.
How do I properly clean the main brush and prevent hair tangles?
Remove the main brush, use the provided cleaning tool or scissors to cut away tangled hair and threads, then wipe the brush and its housing. Regularly detangling the brush prevents motor strain and maintains effective sweeping.
What are the signs that my robot vacuum needs a thorough cleaning?
Reduced suction power, leaving behind visible debris, erratic navigation, getting stuck more often, or unusual noises are all indicators that your robot vacuum requires a deep clean.
Can I use compressed air to clean my robot vacuum?
Yes, compressed air can be effective for dislodging dust from hard-to-reach crevices, especially around sensors and wheel assemblies. Ensure the robot is powered off before using it.
How do I clean the side brushes effectively?
Gently pull off or unscrew the side brushes, remove any tangled hair or debris, and wipe them clean. If they are bent, soaking them in warm water for a few minutes can help restore their shape before reattaching.
What safety precautions should I take before cleaning my robot vacuum?
Always power off and unplug your robot vacuum from its charging base before attempting any cleaning or maintenance. This prevents accidental activation and reduces the risk of electric shock or injury.