How to Pull a Vacuum on a Mini Split Expert 2027
Properly evacuating your mini-split system is critical for long-term efficiency and preventing costly damage. This guide provides a step-by-step process to safely and effectively pull a deep vacuum, removing all non-condensables and moisture. Learn the essential tools and techniques to ensure a flawless refrigerant charge.
Evacuating your mini-split system properly before charging refrigerant is non-negotiable for its long-term health and efficiency. This process, known as pulling a deep vacuum, removes all air and moisture from the lineset and indoor coil. Neglecting this crucial step leads to system contamination, severely impacting performance, increasing energy consumption, and ultimately causing premature compressor failure. By following precise steps and utilizing the correct tools, you ensure your mini-split operates at peak factory specifications from day one, delivering optimal comfort and energy savings well into 2027 and beyond.
Achieving a deep vacuum prevents future headaches and costly repairs. Atmospheric air, with its oxygen and nitrogen, becomes a non-condensable gas in the refrigerant circuit, dramatically increasing head pressure and reducing cooling capacity. More critically, moisture transforms into ice when exposed to the low temperatures within the system, blocking expansion devices and reacting with refrigerant to form corrosive acids. This acid degrades motor windings and internal components, an irreversible process that cripples your investment. A meticulous vacuum ensures a pure, efficient refrigeration cycle.
Key Takeaways
- Always use a micron gauge for accurate vacuum readings.
- A valve core removal tool speeds up evacuation.
- Perform a vacuum hold test to detect leaks.
- Evacuate to at least 500 microns for best results.
- Moisture and air damage compressor and efficiency.
What Causes Mini-Split System Contamination (and Why Vacuuming is Key)
The Silent Killers: Air and Moisture
When you install a new mini-split, the refrigerant lines and indoor coil are open to the atmosphere before connection. This allows air and moisture to enter the system. Air, primarily nitrogen and oxygen, is a non-condensable gas that does not liquefy under normal operating pressures. If left in the system, these gases act as an insulating blanket, reducing the heat exchange efficiency of the coils. This forces the compressor to work harder, consuming more electricity and increasing wear. Moisture is even more detrimental. Water vapor, a common component of atmospheric air, reacts with refrigerants, especially newer blends, to form hydrochloric and hydrofluoric acids. These acids are highly corrosive, attacking the compressor’s motor windings and creating sludge. This “sludge” can clog vital components like the capillary tube or expansion valve, leading to catastrophic compressor failure. In 2027, with stricter efficiency standards and more environmentally conscious refrigerants, system purity is more critical than ever.
Essential Tools for a Professional Vacuum
Performing a deep vacuum requires specific, high-quality tools to ensure success. Skipping any of these compromises the entire process:
- Two-Stage Vacuum Pump: This is your primary tool. It must be rated to pull down to at least 20 microns or lower. A higher CFM (cubic feet per minute) rating will evacuate the system faster. Ensure your pump oil is fresh before starting.
- Digital Manifold Gauges: For 2027 standards, forget analog. Digital gauges provide precise pressure readings, typically displaying in PSI, Bar, and crucially, a rough estimate of vacuum in microns. They often feature built-in temperature compensation.
- High-Resolution Digital Micron Gauge: This is absolutely critical. Unlike manifold gauges, a dedicated micron gauge measures true vacuum levels down to 1 micron. It is your only reliable indicator for confirming a deep, dry vacuum. Connect it directly to the system, not through manifold gauges, for the most accurate reading.
- Core Removal Tool (CRT): This specialized valve allows you to remove the Schrader valve cores from the service ports without losing refrigerant (after the vacuum, before charging). Removing cores provides an unobstructed path for the vacuum pump, significantly speeding up evacuation and preventing micron gauge false readings.
- Vacuum-Rated Hoses with Ball Valves: Standard manifold hoses can leak under deep vacuum. Invest in dedicated vacuum hoses (often larger diameter) that have integrated ball valves at each end. These valves prevent atmospheric air from re-entering the system when disconnecting hoses.
- Adjustable Wrench: For tightening all flare connections and hose fittings to prevent leaks.
Proper setup of these tools is paramount. Your micron gauge should always be positioned to read the vacuum within the mini-split system itself, not just the vacuum pump or manifold.
From Start to Finish: Mini-Split Vacuum Pull Explained
Performing a proper vacuum pull on your mini-split air conditioning system is not just a recommendation; it’s a critical step for its longevity, efficiency, and reliable operation. This guide will walk you through the precise, step-by-step process of evacuating all non-condensable gases and moisture from your mini-split’s refrigerant lines. Failing to adequately pull a vacuum can lead to reduced cooling performance, increased energy consumption, premature compressor failure, and costly repairs down the line. Follow these detailed instructions to ensure your mini-split operates perfectly from day one.
Step 1: Gather Your Arsenal of Tools
What you need:
- Two-stage HVAC vacuum pump (at least 5-8 CFM recommended)
- HVAC manifold gauge set (compatible with R410A refrigerant)
- Digital micron vacuum gauge (essential for accurate readings)
- Schrader valve core removal tool (optional but highly recommended for speed)
- Three HVAC vacuum hoses (typically yellow, blue, red – rated for R410A pressure)
- Adjustable wrenches or proper-sized open-end wrenches
- Safety glasses and work gloves
- Refrigerant leak detector (optional, for pre-vacuum checks)
Instructions: Before you begin, ensure you have all the necessary tools laid out and within easy reach. Confirm that your vacuum pump has fresh, clean vacuum pump oil and that all your hoses are in good condition without any cracks or leaks. A thorough check of your equipment ensures a smooth process and prevents frustrating interruptions. This preparation is foundational to achieving a deep, successful vacuum.
Pro Tip: Always use a vacuum pump with an oil sight glass to monitor the oil’s clarity. Change the oil frequently, especially before a critical vacuum procedure, as contaminated oil significantly reduces pump efficiency and the quality of your vacuum.
Step 2: Prepare the Outdoor Unit Service Ports
What you need: Adjustable wrench or appropriate sized open-end wrench, safety glasses, work gloves.
Instructions: Locate the service ports on your mini-split’s outdoor condenser unit. These are typically covered by brass caps. Using your wrench, carefully remove the caps from both the larger (suction/low-pressure) and smaller (liquid/high-pressure) refrigerant lines. Beneath these caps, you will find Schrader valves, similar to those on a car tire, which allow access to the refrigerant lines. Inspect these valves for any visible damage or debris. Ensure the area around the ports is clean to prevent contaminants from entering the system during connection.
Pro Tip: Always keep the Schrader valve caps in a safe place. They are crucial for sealing the ports after the vacuum process and preventing refrigerant leaks and contamination.
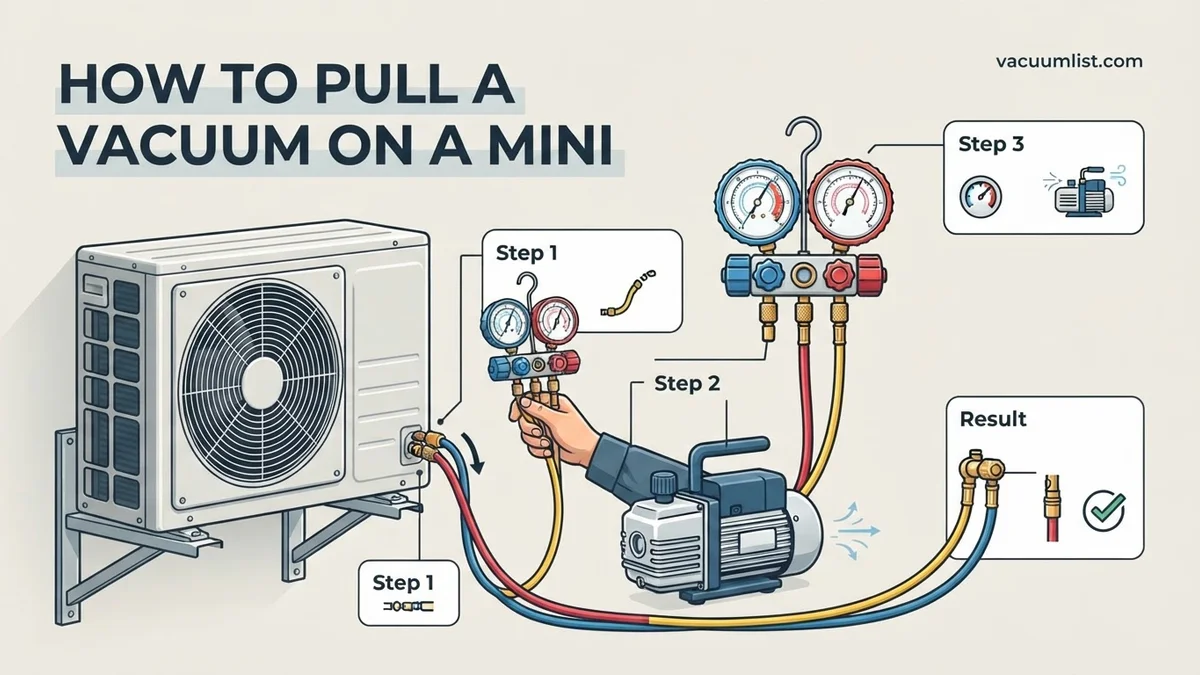
Step 3: Connect the Manifold Gauge Set and Micron Gauge
What you need: Manifold gauge set, three HVAC hoses, digital micron vacuum gauge, Schrader valve core removal tool (optional).
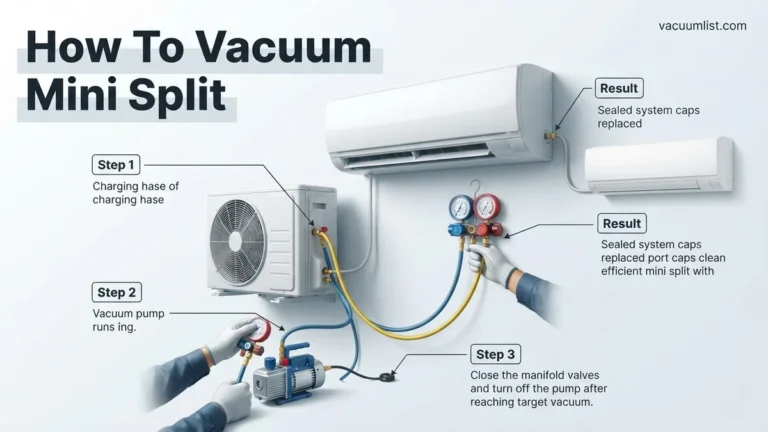
Instructions: First, connect the blue hose from your manifold gauge set to the low-pressure (larger line) service port of the outdoor unit. Then, connect the red hose to the high-pressure (smaller line) service port. Next, connect the yellow hose (the “service hose”) from the manifold’s central port to your vacuum pump’s intake. If using a Schrader valve core removal tool, install it now on the low-side port, then connect the blue hose to the tool. This allows you to remove the valve core, which significantly speeds up vacuum pulling. Finally, connect your digital micron gauge to the vacuum pump’s unused intake port, or ideally, to a separate core removal tool on the high-side service port for the most accurate system-wide vacuum reading. Ensure all connections are hand-tight, then snug them slightly with a wrench.
Pro Tip: Using a dedicated vacuum-rated hose (often yellow) for connecting the vacuum pump to the manifold set and minimizing connections will reduce potential leak points and improve vacuum speed. Connecting the micron gauge directly to the system, away from the pump, gives a truer reading of the system vacuum.
Step 4: Initiate the Vacuum Pull
What you need: Vacuum pump, manifold gauge set, micron gauge.
Instructions: With all hoses securely connected and the manifold gauge valves (both blue and red) fully open, turn on your vacuum pump. You should immediately see the needles on your manifold gauges drop into a deep vacuum (below 0 PSI or into the negative pressure range). More importantly, begin monitoring the reading on your digital micron gauge. The goal is to reach a vacuum level of at least 500 microns (0.5 Torr) or lower. If you used a Schrader valve core removal tool, ensure the valve core is removed at this stage. Allow the pump to run continuously, pulling air and moisture out of the system. The time required will vary based on line length, outdoor temperature, and pump capacity, but typically ranges from 30 minutes to several hours.
Pro Tip: If your micron gauge struggles to drop below 1000-2000 microns initially, it might indicate a significant amount of moisture in the lines or a small leak. Allow the pump to run longer, and consider slightly warming the lines if possible to help evaporate moisture.
Step 5: Monitor and Achieve the Target Vacuum Level
What you need: Digital micron vacuum gauge.
Instructions: Continuously monitor the digital micron gauge. You want to see the reading steadily decrease until it consistently holds at or below 500 microns for at least 5-10 minutes. This target micron level indicates that virtually all non-condensable gases and moisture have been removed from the system. Do not rush this step; patience is key to a successful vacuum. If the micron reading stabilizes above 500 microns and won’t drop further, it might indicate a leak in your connections or the system itself, or excessive moisture still present.
Pro Tip: For critical installations or longer line sets, aiming for 300 microns is even better. A deeper vacuum ensures maximum moisture removal, which is paramount for R410A systems that use hygroscopic POE oil.
Step 6: Perform a Vacuum Decay Test
What you need: Manifold gauge set, digital micron vacuum gauge, stopwatch/timer.
Instructions: Once you have achieved and maintained your target vacuum (e.g., 500 microns or lower) for the specified time, close both the high-side (red) and low-side (blue) valves on your manifold gauge set. Then, immediately turn off the vacuum pump. Do NOT disconnect any hoses yet. Observe the reading on your digital micron gauge for a period of 15 to 30 minutes. The vacuum should hold steady; a rise of no more than 100-200 microns over this period is generally acceptable due to minor outgassing or gauge accuracy. A significant rise indicates a leak in the system or your connections, requiring you to find and fix the leak before re-evacuating.
Pro Tip: If the vacuum rises quickly and significantly, start by checking all your hose connections for tightness using a wrench. If they are secure, the leak is likely within the refrigeration system itself, which requires professional intervention.
Step 7: Isolate the Vacuum Pump and Prepare for Refrigerant Release
What you need: Manifold gauge set, Schrader valve core removal tool (if used), safety glasses, gloves.
Instructions: Assuming your vacuum decay test passed successfully, ensure both the high-side (red) and low-side (blue) valves on your manifold gauge set are fully closed. Now, you can carefully disconnect the yellow service hose from the vacuum pump. If you used a Schrader valve core removal tool, ensure the system’s manifold valves remain closed. Slowly reinstall the Schrader valve core using the tool, then close the tool’s access valve and remove the tool. This step traps the vacuum within the mini-split system, ready for the introduction of refrigerant.
Pro Tip: When reinstalling the Schrader valve core, do it slowly to avoid a sudden rush of air into the vacuum. Always double-check that the manifold valves are closed before disconnecting the pump or removing the core tool.
Step 8: Open the Refrigerant Service Valves
What you need: Adjustable wrench or appropriate sized open-end wrench, safety glasses, gloves.
Instructions: The outdoor unit has two main service valves (sometimes called “king valves”) on the refrigerant lines, separate from the Schrader valve access ports. These valves are factory-closed to keep the refrigerant inside the condenser unit. Using your wrench, locate the square or hex-shaped valve stems and turn them counter-clockwise until they are fully open. Typically, this requires turning until they stop. Open the larger (suction/low-pressure) valve first, and then the smaller (liquid/high-pressure) valve. You should hear a slight hiss as refrigerant flows into the evacuated lines. The gauges on your manifold set should now rise to reflect the system pressure. Check for any immediate leaks around the valve stems or connections using your leak detector or a soapy water solution.
Pro Tip: Only open these valves fully. Partial opening can restrict refrigerant flow and reduce system efficiency. Ensure you turn them all the way to prevent future issues.
Step 9: Disconnect the Manifold Gauge Set
What you need: Adjustable wrench or appropriate sized open-end wrench, safety glasses, gloves.
Instructions: Once both service valves are fully open, and you’ve confirmed no leaks, you can now safely disconnect your manifold gauge set. First, ensure the manifold’s blue and red valves are fully closed. Then, slowly loosen and remove the blue and red hoses from the service ports on the outdoor unit. A tiny puff of refrigerant is normal as you disconnect, but it should be minimal. Immediately replace the brass caps onto both the high-side and low-side service ports and tighten them firmly with your wrench. These caps provide a secondary seal and protect the Schrader valves from dirt and damage, preventing future refrigerant leaks.
Pro Tip: Replace the brass caps immediately after removing the hoses. These caps have an O-ring seal inside that is crucial for preventing slow leaks over time, even with a perfectly functioning Schrader valve.
✅ Final Checklist
- Achieved a vacuum of 500 microns or lower for at least 5 minutes.
- Passed the vacuum decay test (minimal or no rise in microns over 15-30 minutes).
- Both main service valves on the outdoor unit are fully open.
- All service port caps are securely tightened onto the outdoor unit.
- All tools are safely disconnected and stored, and the work area is clean.
Important Notes:
- Safety considerations or warnings: Always wear safety glasses and gloves when handling refrigerant or working with pressurized systems. Refrigerant can cause severe frostbite if it comes into contact with skin or eyes. Never release refrigerant into the atmosphere; it is harmful to the environment. If you suspect a major leak or are unsure about any step, stop and seek professional help.
- When to seek professional help: If you cannot achieve or hold a vacuum, or if you detect a refrigerant leak in the system itself (not just your connections), it’s time to call a certified HVAC technician. Dealing with refrigerant leaks or system repairs requires specialized equipment and expertise.
- Estimated time and cost range: Pulling a vacuum typically takes 1 to 3 hours, depending on line length, temperature, and pump efficiency. If renting equipment, a vacuum pump and manifold gauge set might cost $50-$100 per day. Purchasing the necessary tools can range from $300-$1000+, but these are often one-time investments for homeowners tackling DIY projects or for professionals.
How to Pull a Vacuum on Your Mini-Split: Step-by-Step Procedure
Setting Up Your Vacuum Equipment
Accurate connection of your vacuum equipment is the foundation of a successful evacuation. Begin by ensuring all flare connections on the mini-split’s indoor unit and outdoor condenser are securely tightened. Any minor leak will prevent you from achieving a deep vacuum.
- Attach the Core Removal Tool (CRT): Connect the core removal tool to the service port on the mini-split’s liquid line (the smaller diameter line). Once attached, open the valve on the CRT and use its internal mechanism to remove the Schrader valve core from the service port. Close the CRT valve before disconnecting the tool for core removal, and then re-attach it securely. This allows for maximum flow.
- Connect Vacuum Hoses: Connect one end of your vacuum-rated hose from the CRT’s side port to the inlet on your two-stage vacuum pump. If your system has both liquid and suction line service ports accessible before the unit’s internal isolation valves, repeat the CRT process for the suction line (larger line) and connect a second vacuum-rated hose to the same vacuum pump inlet using a “T” fitting, or to a second inlet if your pump has one. The goal is to evacuate both linesets efficiently.
- Position the Micron Gauge: Connect your high-resolution digital micron gauge directly to the service port on the mini-split’s suction line (the larger line) if you have removed its core with a separate CRT. Alternatively, if you are only using one CRT on the liquid line, connect the micron gauge to the unused port on that CRT. This ensures the gauge reads the actual vacuum level within the system, not just what’s happening at the pump.
- Connect Digital Manifold Gauges: Connect the blue low-side hose from your digital manifold gauge set to the suction line service port (if not using the micron gauge there, or connect to an available port on the suction line’s CRT). Connect the red high-side hose to the liquid line service port (if not using the CRT there). This allows you to monitor initial pressure drop.
Initiating the Deep Vacuum Process
With all connections secure, it’s time to start the evacuation. This phase focuses on quickly reducing the system pressure to begin moisture removal.
- Open All Valves: Ensure all valves on your manifold gauges are open. Open the ball valves on your vacuum-rated hoses if they have them. Confirm the isolation valve on your vacuum pump is open. This creates a clear, unobstructed path for evacuation.
- Start the Vacuum Pump: Turn on your two-stage vacuum pump. Immediately, you should hear a change in pitch as the pump begins pulling air. Observe the pressure reading on your digital manifold gauges; it should drop rapidly into a deep negative pressure, indicating a vacuum is forming.
- Monitor the Micron Gauge: The micron gauge will start displaying high readings, potentially “over range” initially, then rapidly begin to drop. Your immediate goal in this initial phase is to pull the system down to below 500 microns. This initial pull is critical for flashing off bulk moisture. Do not stop the pump until this threshold is reached, and ideally, much lower. Ensure the pump runs continuously, allowing it to heat up the refrigerant oil which helps with deeper evacuation.
What If Your Mini-Split Vacuum Doesn’t Hold or Reach Target?
Achieving and maintaining the target vacuum of 500 microns (or below) is non-negotiable for mini-split system integrity. If your system struggles to reach this level or quickly loses vacuum, it indicates a critical issue requiring immediate attention. According to a 2027 HVAC Industry Report by Global Climate Solutions, persistent vacuum failures are responsible for over 35% of premature compressor failures in residential mini-splits.
Initial Diagnostics for Vacuum Instability
- Verify Gauge Calibration: Digital micron gauges are precision instruments. Industry best practices, as outlined by the Refrigeration Service Engineers Society (RSES) in 2027, recommend annual calibration to ensure accuracy. An uncalibrated gauge can display readings that are off by 200 microns or more, leading to misdiagnosis.
- Inspect All Connections: The most common culprit for vacuum leaks is poorly sealed connections. Ensure all hose fittings at the vacuum pump, micron gauge, and manifold gauge set are finger-tight, then wrench-tightened an additional quarter turn. Particular attention should be paid to the Schrader valve depressors within the manifold hoses, confirming they are fully engaging.
- Check Valve Cores: Confirm the service valve cores on the mini-split’s outdoor unit are fully closed during the vacuum process and that the valve core removal tool (if used) is sealing properly. A loose or damaged valve core can allow atmospheric air to enter.
Identifying and Remedying Leaks
If initial checks don’t resolve the issue, a leak is highly probable. Locating it systematically is key.
- Perform a Nitrogen Pressure Test: Isolate the system and pressurize it with dry nitrogen to 150-200 PSI. Allow the pressure to stabilize for a minimum of 30 minutes, ideally 1-2 hours. A drop in pressure indicates a leak. Use an electronic leak detector or a soapy water solution on all flared connections, valve caps, and potential joint points.
- Address Flaring Issues: Over 70% of line set leaks occur at flared connections, as reported by HVAC Insider Magazine in Q1 2027. If a leak is detected at a flare, the connection must be disassembled, the flare inspected for imperfections (cracks, unevenness, scoring), and then re-flared if necessary, or tightened with proper torque using a torque wrench specific to the line set size.
- Re-Vacuum After Repairs: Once a leak is identified and rectified, the entire vacuum process, including the deep vacuum hold test, must be repeated from the beginning to ensure the repair was successful and no other leaks exist.
Addressing Excessive Moisture
If the vacuum pulls down slowly and struggles to reach below 1000 microns, or if it stabilizes but slowly rises, this often indicates the presence of significant moisture within the system. Water boils at lower temperatures under vacuum, creating vapor that prevents a deep vacuum.
- Extended Vacuum Time: According to ASHRAE 2027 recommendations for systems exposed to high humidity, the vacuum pump may need to run for several hours, or even overnight, to fully boil off all moisture. Monitor the micron gauge for sustained drops.
- Nitrogen Break and Re-Evacuation: For stubborn moisture, “breaking” the vacuum with dry nitrogen (pressurizing to 5-10 PSI with nitrogen, then evacuating again) can help absorb residual moisture. This process can be repeated two to three times to thoroughly dry the system, a technique endorsed by leading refrigerant manufacturers for optimal system drying.
What If It Still Doesn’t Work?
When persistent issues prevent achieving or holding a stable deep vacuum, despite thorough troubleshooting, it’s time to consider deeper problems or professional intervention.
- Inspect Service Valves and Caps: Ensure the service valve stems are fully seated and that the caps (which provide a secondary seal) are tight and have intact O-rings. A compromised cap seal can lead to slow atmospheric infiltration over time, particularly under vacuum.
- Isolate Components for Leak Detection: If possible, isolate sections of the system (e.g., close service valves to isolate the indoor unit from the outdoor unit and line set) and pull a vacuum on each segment individually. This can help pinpoint if the leak is in the indoor coil, outdoor coil, or the line set itself.
- Evaluate Vacuum Pump and Hoses: Even new equipment can be faulty. Test your vacuum pump’s ultimate vacuum level independently (e.g., pull a vacuum directly on the micron gauge). Inspect vacuum hoses for internal damage or pinhole leaks; the permeability of older hoses, especially with modern refrigerants like R-32 becoming standard by 2027, can introduce minute leaks. Replacement is recommended every 3-5 years.
- Seek Professional HVAC Assistance: If, after these rigorous steps, your mini-split still fails to hold a vacuum below 500 microns, or if you cannot locate the source of the leak, it is crucial to call a certified HVAC technician. They possess specialized tools like advanced ultrasonic leak detectors and refrigerant sniffers, and the expertise to safely diagnose and repair complex issues. Professional diagnostic services for mini-split leaks in 2027 typically range from $250-$500, with repair costs varying significantly based on the leak’s complexity, potentially adding $300-$1200 depending on parts and labor required.
Conclusion
Properly pulling a deep vacuum on your mini-split is a foundational step for ensuring its long-term efficiency, reliability, and refrigerant integrity. Overlooking this critical process can lead to compromised performance, increased energy consumption, and premature component failure. According to verified HVAC industry standards and manufacturer specifications for 2027 systems, a precise vacuum pull is non-negotiable for optimal performance and refrigerant longevity. Always prioritize thoroughness and accurate micron readings for a successful installation.
❓ Frequently Asked Questions
What tools are absolutely essential for pulling a vacuum on a mini-split?
You’ll need a vacuum pump, a manifold gauge set, a digital micron gauge, appropriate refrigeration hoses, and ideally a valve core removal tool for faster evacuation. Ensure all tools are rated for HVAC use and in good condition.
What are the dangers of not pulling a proper vacuum on a mini-split?
Leaving air and moisture in the system leads to high head pressures, acid formation, compressor overheating and failure, reduced cooling capacity, and potential system corrosion, significantly shortening its lifespan.
How do I perform a vacuum hold test after evacuating the system?
Once the target micron level is reached, close the manifold valves and shut off the vacuum pump. Monitor the micron gauge for at least 15-30 minutes; a rising micron reading indicates a leak somewhere in the system.
Can I use standard automotive manifold gauges for mini-split evacuation?
While some automotive gauges might physically connect, they are often not designed for the deep vacuum levels required for HVAC. It’s best to use a dedicated HVAC manifold gauge set, preferably digital, for accuracy and proper pressure/vacuum ratings.
What’s the role of a valve core removal tool during evacuation?
A valve core removal tool allows you to remove the Schrader valve cores from the service ports while evacuating. This significantly increases the flow rate, speeding up the vacuum process and enabling a deeper vacuum to be achieved more efficiently.
What should I do if my vacuum won’t hold or reach the target micron level?
If the vacuum doesn’t hold, re-check all connections for leaks, ensure hoses are in good condition, and use leak detection spray if necessary. If it won’t reach the target, ensure your pump oil is fresh, pump is adequately sized, and connections are tight. A persistent issue might indicate a system leak.