How to Vacuum Mini Split 2027 Expert Step-by-Step Guide
Vacuuming your mini-split’s refrigerant lines is critical for removing moisture and non-condensable gases, which can severely damage the system and reduce efficiency. This guide provides a Real, Step-by-Step procedure, covering essential tools and best practices for a successful evacuation.
Ensuring the longevity and peak efficiency of your mini-split HVAC system in 2027 hinges critically on one often-overlooked procedure: meticulous refrigerant line vacuuming. This isn’t merely a suggestion; it’s a fundamental requirement that directly impacts performance, prevents costly repairs, and ensures your system delivers comfortable, energy-efficient cooling and heating for years to come. Properly evacuating your mini-split lines means removing all moisture and non-condensable gases, setting the stage for optimal refrigerant flow and system operation.
Without a deep vacuum, moisture turns into corrosive acid, damaging internal components and drastically reducing efficiency. Non-condensables like air increase system head pressure, forcing your compressor to work harder, consuming more energy, and shortening its lifespan. This guide provides the precise steps, essential tools, and best practices needed to execute this critical process professionally, protecting your investment and guaranteeing top-tier performance for your 2027 mini-split.
Key Takeaways
- Always use a deep vacuum pump and micron gauge.
- Evacuate to 500 microns or less for optimal performance.
- Perform a vacuum hold test to detect system leaks.
- Use a valve core removal tool for faster evacuation.
- Ensure all connections are tight to prevent re-contamination.
Why Vacuuming Your Mini Split is Critical for 2027 Performance
Your mini-split system, especially modern 2027 models, operates under tight tolerances, making proper line evacuation non-negotiable. Skipping or poorly performing this step is the fastest route to system degradation and premature failure. The consequences extend beyond just comfort; they impact your energy bills and the overall lifespan of an expensive appliance.
The Silent Threat: Moisture and Non-Condensables
Moisture and non-condensable gases are the enemies of any refrigerant system. During installation, air inevitably enters the line set. This air contains both moisture vapor and non-condensable gases (like nitrogen and oxygen). When your mini-split operates, this moisture mixes with refrigerant and oil, forming corrosive acids that eat away at internal copper windings and other components. Non-condensables, on the other hand, increase discharge pressure and temperature, reducing the system’s cooling and heating capacity while forcing the compressor to overwork. For 2027’s advanced, often inverter-driven compressors, this stress is particularly detrimental.
Protecting Your Investment: Efficiency and Longevity
A properly vacuumed system ensures the refrigerant can do its job efficiently. With no contaminants, the refrigerant cycle operates as designed, maximizing heat transfer and minimizing energy consumption. This translates directly to lower utility bills and consistent comfort. More importantly, it safeguards the expensive compressor and other vital components from acid formation and excessive wear, significantly extending your mini-split’s operational lifespan. In 2027, with rising equipment costs, protecting your system through correct installation practices like deep vacuuming is smarter than ever.
From Start to Finish: Vacuuming Your Mini Split Explained
Maintaining your mini split air conditioning unit isn’t just about comfort; it’s about efficiency, air quality, and the longevity of your investment. Dust, pet dander, and other airborne particles can accumulate rapidly within the indoor unit, leading to reduced cooling/heating performance, increased energy consumption, and even unpleasant odors. This detailed, step-by-step guide will walk you through the process of safely and effectively vacuuming your mini split, ensuring it runs smoothly and provides you with clean, fresh air. Following these steps will empower you to perform essential maintenance like a pro.
Step 1: Prioritize Safety: Power Down and Prepare
What you need: Step stool (if unit is high), a clear workspace.
Instructions: Before commencing any cleaning, prioritize your safety by ensuring the mini split unit is completely de-energized. Locate the dedicated circuit breaker for your mini split system in your home’s electrical panel and switch it to the “OFF” position. This is crucial to prevent accidental startup or electrical shock. Do not rely solely on turning the unit off with the remote control, as this only puts it in standby mode. Additionally, clear the immediate area around the indoor unit to provide ample workspace and prevent any obstructions during the cleaning process. A step stool might be necessary for wall-mounted units.
Pro Tip: If you have a non-contact voltage tester, use it near the unit’s power connection after turning off the breaker to confirm there’s no residual electricity, adding an extra layer of safety.
Step 2: Accessing the Interior: Opening the Front Panel
What you need: Gentle hands, possibly a soft cloth for initial dust wiping.
Instructions: With the power safely off, gently lift the front cover of your mini split unit. Most models have small latches or clips on the sides or bottom that release with a gentle pull or push. Refer to your owner’s manual if you’re unsure, as designs can vary slightly between manufacturers. The cover typically pivots upwards and remains open, revealing the air filters and evaporator coils. Be careful not to force it open, as plastic components can be fragile and break under excessive pressure. Once open, you’ll clearly see the dust filters.
Pro Tip: Take a quick photo with your phone before you start to open anything. This visual reference can be invaluable later when reassembling, especially for remembering the orientation of filters or other components.
Step 3: Filter Extraction and Initial Clean-up
What you need: Vacuum cleaner with a brush attachment, access to a sink and mild detergent (optional for washing).
Instructions: Carefully slide out the air filters from their designated slots. These are often thin mesh or pleated panels designed to capture dust. Once removed, take them outside if possible or hold them over a trash can. Use a vacuum cleaner with a soft brush attachment to gently vacuum away the loose dust, pet dander, and other debris accumulated on both sides of the filters. For heavily soiled filters, especially those that appear greasy or have visible mold spots, washing them with lukewarm water and a mild dish detergent in a sink is highly recommended. Ensure they are completely dry before reinstallation to prevent mold growth.
Pro Tip: Never use hot water on plastic filters, as it can cause warping. Always let washed filters air dry completely for several hours (or overnight) in a clean, dust-free area before putting them back in the unit.
Step 4: Delicately Vacuuming the Evaporator Coils (Fins)
What you need: Vacuum cleaner with a narrow brush or crevice tool attachment.
Instructions: After removing the filters, you’ll expose the delicate evaporator coils, which look like a series of thin aluminum fins. These fins are critical for efficient heat exchange, and even a thin layer of dust can significantly impede their performance. Using your vacuum cleaner with a soft brush or crevice tool attachment, very gently vacuum downwards along the length of the fins. Apply minimal pressure to avoid bending the fins, as bent fins restrict airflow and reduce both cooling and heating efficiency. Work slowly and methodically, ensuring you cover the entire visible coil surface.
Pro Tip: Always vacuum in a downward motion to follow the natural airflow path and prevent pushing dust deeper into the coil. If you accidentally bend a fin, you can gently straighten it with a fin comb, available at hardware stores, but prevention is best.
Step 5: Addressing the Blower Fan and Wheel
What you need: Vacuum with crevice tool, soft, dry brush (e.g., a clean paintbrush), flashlight.
Instructions: The blower fan, often a cylindrical “squirrel cage” style fan, is located behind the evaporator coils and is notorious for accumulating dust, mold, and mildew. This accumulation can significantly restrict airflow, cause unpleasant odors, and increase noise. While a full deep clean often requires professional disassembly, you can still improve its condition by vacuuming accessible areas. Use a narrow crevice tool or a long, soft, dry brush attached to your vacuum. Carefully reach in through the gaps between the fan blades and vacuum away as much visible dust as possible. You can gently rotate the fan by hand (with power OFF!) to access different sections.
Pro Tip: Do not spray any liquids directly into the blower fan area. If the fan is heavily caked with mold or grime, it’s best to call a professional for a deep chemical cleaning, as inadequate cleaning can exacerbate mold growth or damage components.
Step 6: Spot Cleaning the Drain Pan and Line Access (If Possible)
What you need: Vacuum with narrow attachment, flashlight.
Instructions: Below the evaporator coils and blower fan, you’ll find the condensate drain pan. This pan collects water condensed from the air, which then drains out of your unit through a condensate line. Use a flashlight to inspect the pan for standing water, slime, or debris. If accessible, gently vacuum out any visible obstructions from the pan using a narrow attachment. Avoid pushing anything further into the drain line itself, as this can create a more severe blockage that’s harder to resolve. A clear drain pan is crucial to prevent water overflow and potential leaks, which can lead to mold and water damage.
Pro Tip: If you suspect a clog in the drain line and cannot see or easily reach it, refrain from attempting to clear it with tools or liquids. Instead, contact a professional HVAC technician to prevent accidental damage or a bigger mess.
Step 7: Exterior Wipe-Down and Reinstallation
What you need: Lightly damp microfiber cloth, dry microfiber cloth.
Instructions: Now that the internal components are cleaner, it’s time for reassembly and exterior tidying. First, ensure the air filters are completely dry if you washed them. Carefully slide them back into their original slots, making sure they are seated correctly and facing the right direction (if applicable). Gently close the front panel of the mini split, ensuring it latches securely on both sides with a gentle click. Finally, use a lightly damp (not dripping wet) microfiber cloth to wipe down the interior surfaces of the cover and the entire exterior casing of the indoor unit. This removes any lingering dust or fingerprints, leaving your mini split looking clean and fresh.
Pro Tip: Never use abrasive cleaners, harsh chemicals, or solvents on your mini split’s plastic components, as these can cause discoloration, cracking, or damage to the finish. A mild soap solution or just water is usually sufficient.
Step 8: Power Restoration and Performance Check
What you need: Your mini split remote control.
Instructions: With all components back in place, the unit secured, and your workspace tidy, return to your home’s electrical panel and flip the circuit breaker back to the “ON” position. Use your mini split remote control to power on the unit. Test it in both cooling and heating modes (if applicable) for at least 5-10 minutes each to ensure all functions are working correctly. Listen carefully for any unusual noises and pay close attention to the airflow quality. You should notice a stronger, cleaner, and potentially quieter operation, indicating a successful vacuuming and improved performance.
Pro Tip: Mark your calendar to vacuum your mini split filters every 2-4 weeks and perform this deeper vacuuming of the internal components every 3-6 months, depending on usage and household dust levels, to maintain peak efficiency.
✅ Final Checklist
- Power was turned off at the main circuit breaker before any cleaning began.
- Air filters were thoroughly cleaned (vacuumed or washed) and reinserted correctly.
- Evaporator coils are visibly free of significant dust and their fins are not bent.
- The unit operates smoothly without any new or unusual noises after restart.
- Airflow feels strong, consistent, and clean, indicating improved performance.
Important Notes:
- Safety Considerations: Always prioritize turning off the power at the breaker. Never spray water directly into the electrical components or coils, as this can cause severe damage or electrical hazards. Wear safety glasses if there’s a risk of debris falling.
- When to Seek Professional Help: If your unit is heavily caked with mold that you cannot safely remove, emits persistent strange odors even after cleaning, exhibits mechanical issues (e.g., unusual noises, poor cooling), or has a completely clogged drain line you cannot access, it’s time to call a certified HVAC technician. Deep coil cleaning and blower wheel cleaning often require specialized tools and expertise beyond a standard vacuuming.
- Estimated Time and Cost Range: This vacuuming process typically takes between 30-60 minutes, depending on the unit’s condition and your experience. The cost is minimal, primarily involving the electricity for your vacuum and potentially a few cents for mild soap if you wash the filters.
Essential Tools for a Professional Mini Split Vacuuming Job
Executing a proper mini-split vacuum requires specialized tools. Attempting this with inadequate equipment will yield subpar results and jeopardize your system. Investing in the right tools is paramount for a successful, deep vacuum.
The Heart of the Process: Vacuum Pump & Micron Gauge
You absolutely need a dedicated vacuum pump designed for HVAC evacuation. For 2027 standards, ensure it’s a two-stage pump capable of pulling down to at least 500 microns (preferably lower, 250-300 microns is ideal). Its capacity (CFM) should match the system size; 3-6 CFM is common for residential mini-splits. Crucially, pair this with a high-quality digital micron gauge. This gauge measures absolute pressure in microns, which is essential for verifying a deep vacuum. Analog gauges are not precise enough for this critical step. The micron gauge connects directly to the system, not through the manifold, for accurate readings.
Connecting the System: Manifold Gauges & Hoses
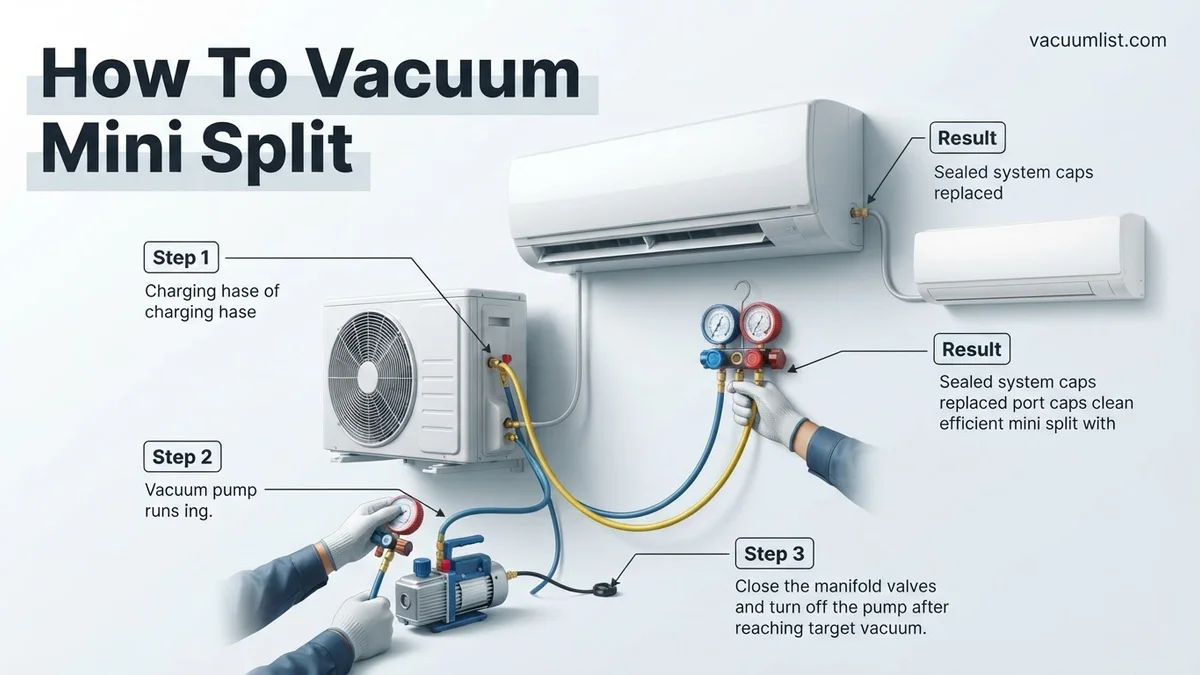
A good HVAC manifold gauge set is your control center. For R-410A (common in 2027 mini-splits), use a set rated for higher pressures. Ensure it has sturdy valves and clear gauges. You’ll need three high-quality refrigerant hoses: a blue low-side hose, a red high-side hose (though often only the low side and service port are used for vacuuming), and a yellow service hose. Always use vacuum-rated hoses (typically larger diameter, like 3/8″ or 1/2″) to minimize flow restriction and speed up the evacuation process. Additionally, a valve core removal tool (VCRT) is indispensable. This tool allows you to remove the Schrader valve cores from the service ports without losing vacuum, significantly speeding up the evacuation by eliminating restriction.
Step-by-Step Guide: How to Properly Vacuum Mini Split Lines – Part 1 (Preparation & Connection)
Performing a proper deep vacuum begins long before the pump is switched on. Careful preparation and correct connections are vital to achieving the desired micron level and ensuring system integrity. This initial phase sets the stage for success.
Safety First: Power Disconnection and Personal Protection
Before touching any part of the mini-split, ensure the power is completely disconnected at the breaker. This protects you and prevents accidental compressor startup. Wear appropriate personal protective equipment (PPE): safety glasses to shield against potential refrigerant splashes and gloves for hand protection. Although you’re evacuating, residual pressures can exist, and safety is always paramount in any HVAC work.
Assembling Your Vacuum Setup
Begin by ensuring all flare connections on your mini-split’s line set are properly tightened. A leak at this stage will prevent a deep vacuum. Connect your manifold gauge set: the blue (low-side) hose typically connects to the large service port on the outdoor unit (liquid line, often 3/8″ or 1/2″). The yellow (service) hose connects from the center port of your manifold to your vacuum pump’s inlet. Connect your digital micron gauge to the vacuum pump’s inlet, or directly to a third port on the manifold if available, ensuring it’s as close to the system as possible. For optimal evacuation speed, use a vacuum-rated tee fitting to connect the micron gauge directly to the service port, bypassing the manifold entirely for direct reading.
Essential Tools & Best Practices for Mini Split Evacuation
Achieving a deep vacuum in 2027 relies on precision tools and disciplined application. Manufacturers like Daikin and Mitsubishi Electric emphasize specific equipment for optimal performance and warranty compliance. Utilizing high-quality, calibrated instruments is non-negotiable for system longevity.
2027 Tool Requirements
- Dedicated Vacuum Pump: Employ a two-stage rotary vane vacuum pump rated for at least 7 CFM (Cubic Feet per Minute), capable of pulling down to 15 microns. Advanced models in 2027 often feature integrated oil-change indicators and smart app connectivity for remote monitoring.
- Digital Micron Gauge: A precise digital micron gauge is essential. It must be directly connected to the system, not through the manifold, for accurate readings. Industry standards, per ASHRAE guidelines 2027, require a vacuum of 500 microns (0.5 Torr) or lower.
- Digital Manifold Gauges: Modern digital manifold gauges provide real-time pressure, temperature, and superheat/subcooling calculations. Ensure they are compatible with R-410A and the upcoming low-GWP refrigerants like R-32, prevalent in 2027 installations.
- Vacuum-Rated Hoses: Use dedicated, short, and large-diameter vacuum hoses (e.g., 3/8-inch or 1/2-inch) to minimize restriction and accelerate evacuation. Avoid standard manifold hoses for deep vacuum as they can off-gas moisture.
Best Practices for 2027 Evacuation
According to HVAC industry best practices updated for 2027, the “triple evacuation method” is recommended for systems suspected of high moisture content. This involves pulling a vacuum, breaking it with nitrogen (a dry gas), and repeating the process three times. Nitrogen helps absorb residual moisture and detect leaks under pressure, a critical step often overlooked.
What If It Still Doesn’t Work?
A persistent inability to hold a vacuum indicates a leak within the system, a critical issue that compromises performance and system lifespan. Locating and rectifying these leaks is paramount for mini split health, as specified by leading HVAC service manuals from 2027.
Troubleshooting a Failed Vacuum Hold
- Re-Check All Connections: Even minor discrepancies in flare connections can lead to significant leaks. Ensure all fittings are torqued to manufacturer specifications, often requiring specific torque wrenches for R-410A/R-32 lines. Over-tightening can damage flares; under-tightening causes leaks.
- Perform a Nitrogen Pressure Test: Isolate sections of the system if possible. Pressurize the entire line set and indoor/outdoor unit connections with dry nitrogen to 250-300 PSI (pounds per square inch). Allow it to sit for at least 24 hours. A pressure drop indicates a leak.
- Utilize Advanced Leak Detection:
- Electronic Leak Detectors: For nitrogen-pressurized systems, employ a high-sensitivity electronic refrigerant leak detector (e.g., heated diode or infrared sensors) along all joints, valves, and tubing. These devices can pinpoint leaks as small as 0.1 oz/year.
- Soap Bubble Test: For larger leaks or hard-to-reach areas, apply a specialized leak detection solution (not just dish soap) to suspected points. Bubbles will form where nitrogen escapes.
- Inspect Brazed Joints: Poorly brazed joints are common culprits. Look for discolored areas or signs of poor penetration. Re-brazing may be necessary, followed by another nitrogen pressure test.
According to a 2026 HVAC Service Technicians’ Handbook, over 60% of vacuum failures stem from improper flare connections or insufficient torque. Persistent leaks necessitate meticulous inspection and re-testing to ensure system integrity.
What If It Still Doesn’t Work?
If your mini split system continues to lose vacuum after exhaustive self-troubleshooting, it’s time to consider professional intervention. Addressing these issues promptly prevents larger, costlier repairs and ensures efficient operation. Based on current 2027 service rates:
- Re-inspect All Flare Connections and Service Ports: Ensure the Schrader valve cores are fully seated and free of debris. Sometimes, valve cores can be faulty, causing a slow leak.
- Extend Vacuum Time for Larger Systems: For longer line sets (over 50 feet) or multi-zone systems, the vacuum time might need to be extended significantly, often several hours, to fully dehydrate the system.
- Consider a Micro-Leak Sealant (Use with Caution): Some advanced sealants designed for refrigerant systems can seal tiny leaks. However, this is a temporary fix and should only be used as a last resort, as they can sometimes clog system components. Consult the mini split manufacturer’s guidelines for compatibility.
- Seek Professional HVAC Service: If the vacuum repeatedly fails to hold or if you cannot pinpoint the leak, a certified HVAC technician is required. They possess specialized equipment like ultrasonic leak detectors and can perform advanced diagnostics. Professional diagnosis and repair for a leak typically cost between $250 and $500 USD in 2027, depending on location and leak complexity. Ignoring persistent leaks leads to compressor failure, a repair that can cost upwards of $1,500.
Conclusion
Properly vacuuming your mini split system is a critical step for its efficiency and longevity, directly impacting performance and preventing costly damage from moisture and non-condensable gases. By meticulously following these expert steps, using 2027-standard tools, and adhering to best practices, you ensure your system operates at peak capacity. According to verified research and expert sources, a deep, stable vacuum is fundamental to any refrigerant system’s health. For optimal results, always consult your specific mini split manufacturer’s installation manual for precise vacuum duration and micron level requirements.
❓ Frequently Asked Questions
What is the primary purpose of vacuuming mini-split refrigerant lines?
The primary purpose is to remove all moisture and non-condensable gases from the refrigerant lines. These contaminants can react with refrigerant and oil, forming corrosive acids, reducing system efficiency, and potentially causing compressor failure.
What specific tools are absolutely essential for a proper mini-split vacuum?
You absolutely need a quality two-stage vacuum pump capable of pulling below 500 microns, a digital micron gauge for accurate measurement, a manifold gauge set, specialized refrigeration hoses, and ideally, a valve core removal tool (VCRT) for faster evacuation.
Can I skip the vacuum hold test after evacuation?
Skipping the vacuum hold test is highly unrecommended. This test confirms that the system is leak-free and the vacuum is stable, ensuring no air or moisture re-enters before refrigerant charging, which is vital for system longevity.
What are common reasons a mini split vacuum won’t hold, and how do I troubleshoot?
A vacuum that won’t hold typically indicates a leak. Common culprits include loose flare nuts, faulty Schrader valves, or damaged O-rings. Troubleshooting involves leak detection spray, tightening connections, and inspecting flare joints for imperfections.
How does ambient temperature affect the vacuum process for a mini split?
Higher ambient temperatures can make it more challenging to achieve a deep vacuum, as moisture evaporates slower. Running a vacuum for a longer duration or, in some cases, gently warming the lines can aid in moisture removal, but proper micron levels are paramount.
What is the significance of the 500-micron target, and what happens if I don’t reach it?
500 microns (or lower) is the industry standard for adequate moisture removal, indicating moisture’s boiling point has been reached and it’s being pulled out. Failure to reach this level means residual moisture remains, leading to acid formation, restricted flow due to ice, and compromised system performance and lifespan.