How to Clean a Carpet Without a Vacuum Expert Guide 2027
Cleaning your carpet without a vacuum is entirely possible and often necessary for quick refreshes or unexpected situations. This guide provides real, step-by-step solutions to effectively remove dirt, pet hair, and odors using common household items, ensuring a clean living space even without specialized equipment.
Cleaning your carpet effectively doesn’t always require a high-tech vacuum cleaner. Whether you’re facing a sudden power outage, your vacuum has unexpectedly broken down, or you simply prefer manual methods, achieving a clean carpet without electrical suction is entirely feasible in 2027. This guide provides actionable, step-by-step instructions for thoroughly refreshing your carpets using common household items and proven techniques, ensuring your living space remains pristine regardless of equipment limitations.
The ability to clean your carpets manually is a practical skill for any household. It ensures you’re never caught off guard by everyday spills, accumulated dust, or pet hair. From routine maintenance to tackling specific issues like odors or deeply embedded dirt, these non-vacuum strategies offer robust solutions that are often more eco-friendly and just as effective for many cleaning tasks. You’ll learn how to keep your carpets looking fresh and feeling clean with minimal fuss.
Key Takeaways
- Manual brushing and sweeping effectively remove loose debris.
- Damp cloths and sponges lift surface dirt without a vacuum.
- Baking soda neutralizes odors and aids in dirt removal.
- Rubber gloves or squeegees are best for pet hair.
- Ensure proper drying to prevent mold and mildew issues.
Diagnosing Common Carpet Dirt & Non-Vacuum Cleaning Challenges
Surface Debris & Dust Accumulation
Identifying what’s on your carpet is the first step to cleaning it without a vacuum. Surface debris typically includes loose crumbs, dust bunnies, tracked-in dirt particles, and lint. These are often visible on top of the carpet fibers. The primary challenge here is how to efficiently gather these particles without a powerful suction. Traditional brooms can push dirt deeper, making the right technique crucial. Your goal is to dislodge and collect these lightweight materials effectively.
- Common indicators: Visible dust layers, food crumbs, hair strands, small paper bits.
- Non-vacuum challenge: Preventing redistribution of debris and ensuring thorough collection.
- Initial strategy: Manual sweeping, stiff brushing, or damp cloth for larger pieces.
Addressing Embedded Grime & Pet Hair
More challenging issues involve dirt that’s settled deep into the carpet pile, stubborn stains, or pervasive pet hair. Embedded grime isn’t just surface-level; it’s ground into the fibers by foot traffic, making it resistant to simple sweeping. Pet hair, especially from shedding animals, weaves itself into the carpet, often carrying dander and odors. These require more intensive non-vacuum techniques that leverage friction, absorption, and targeted spot treatments to pull dirt and hair out of the fibers.
- Common indicators: Dull carpet appearance, sticky spots, persistent pet hair clumps, localized odors.
- Non-vacuum challenge: Extracting deeply set particles and hair without suction power.
- Targeted solutions: Baking soda for grime and odors, rubber gloves or squeegees for pet hair, specific spot treatments.
From Start to Finish: Carpet Cleaning Without a Vacuum Explained
Even without the convenience of a vacuum cleaner, achieving a surprisingly clean and refreshed carpet is entirely possible with a little elbow grease and the right techniques. This comprehensive guide will walk you through each crucial step, from initial debris removal to final drying, ensuring your carpet looks and feels revitalized. Following these detailed instructions meticulously will not only help you maintain a cleaner living space but also extend the life of your carpet, all without needing any specialized machinery.
Step 1: Clear the Area and Assess Your Carpet
What you need: Strong helper (optional), furniture glides (optional), notepad and pen, good lighting (natural or artificial).
Instructions: Begin by completely clearing the carpeted area. Carefully move all furniture, rugs, and decorative items out of the way to expose the entire carpet surface. For heavier items like couches or bookshelves, enlist assistance to prevent injury or damage. Once cleared, take a moment to visually inspect the carpet. Note any heavily soiled areas, stubborn stains, or high-traffic paths that might require extra attention. This initial assessment helps you prioritize and plan your cleaning attack.
Pro Tip: Use furniture glides under heavy items when moving them to protect both your back and your flooring. Make a rough sketch or list of major stains you identify, noting their location and approximate size, so you don’t miss them later.
Step 2: Manual Dry Debris Removal
What you need: Stiff-bristled brush or broom with sturdy bristles, dustpan, rubber gloves (optional for hand-picking), lint roller or masking tape.
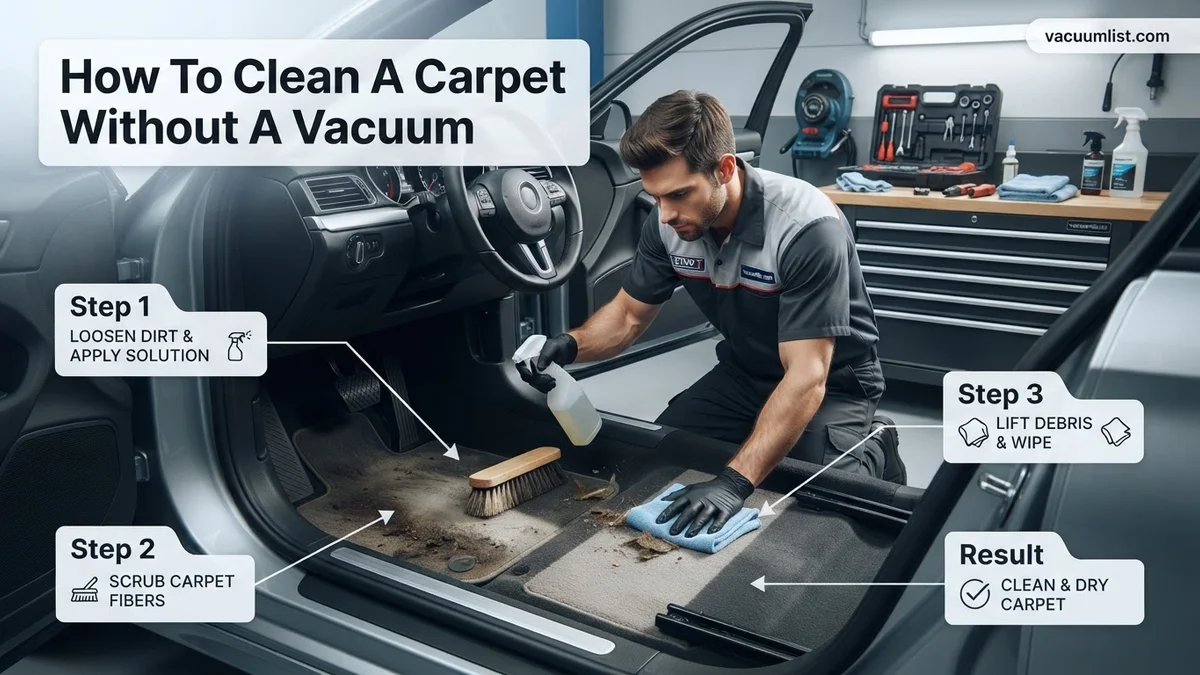
Instructions: This step is your vacuum cleaner alternative. Start by thoroughly sweeping the carpet with a stiff-bristled brush or broom. Use short, firm strokes in one direction, then sweep again in the opposite direction to dislodge embedded dirt, crumbs, pet hair, and other loose debris. Gather the swept debris into a dustpan and dispose of it. For stubborn pet hair or lint, put on rubber gloves and run your hands over the carpet – the friction will often gather hair into clumps you can easily pick up. Alternatively, use a strong lint roller or wrap masking tape around your hand (sticky side out) to lift surface lint and hair.
Pro Tip: Work in small sections, approximately 3×3 feet, to ensure you don’t miss any spots and to keep the effort manageable. For carpets with a deeper pile, using a rubber squeegee can be remarkably effective at pulling up pet hair that brooms might miss.
Step 3: Pre-Treating Stains and Heavily Soiled Areas
What you need: Appropriate stain remover (e.g., enzyme cleaner for organic stains, mild dish soap for grease, vinegar solution for general spots), clean white cloths or paper towels, spray bottle (optional).
Instructions: Before general cleaning, tackle individual stains. Identify the type of stain if possible, as this dictates the best treatment. For most fresh spills, blot immediately with a clean, dry cloth. For older stains, apply a small amount of the appropriate stain remover directly to a clean white cloth, then gently dab the stained area. DO NOT RUB, as this can spread the stain and damage carpet fibers. Work from the outside of the stain inwards. Allow the treatment to sit for 5-10 minutes (or as directed by the product), then blot thoroughly with a fresh, damp cloth to lift the stain and residue. Repeat as necessary.
Pro Tip: Always test any stain remover on an inconspicuous area of your carpet first (e.g., under furniture) to ensure it doesn’t cause discoloration or damage. For tough spots, consider a paste of baking soda and a little water, let it dry, then scrape and brush away.
Step 4: Prepare Your Cleaning Solution
What you need: Two buckets (one for cleaning solution, one for rinse water), warm water, mild carpet shampoo or a DIY solution (e.g., 1/4 cup white vinegar + 1 tablespoon mild dish soap per gallon of warm water).
Instructions: In your first bucket, prepare your cleaning solution. If using a commercial carpet shampoo, follow the manufacturer’s dilution instructions precisely, typically mixing a small amount with warm water. For a homemade alternative, combine about 1/4 cup of white distilled vinegar and 1 tablespoon of clear, mild dish soap with one gallon of warm (not hot) water. Stir gently to mix, avoiding excessive sudsing. In your second bucket, fill it with clean, plain warm water; this will be for rinsing. Having both ready saves time and ensures a smooth cleaning process.
Pro Tip: Avoid using too much soap in your solution. Excess soap residue can attract dirt more quickly after cleaning, making your carpet appear dirtier faster. A little goes a long way, especially with concentrated carpet shampoos.
Step 5: Manual General Carpet Cleaning
What you need: Stiff-bristled scrub brush (designed for carpets or general scrubbing), clean white cloths or sponges, prepared cleaning solution.
Instructions: Dip your scrub brush or sponge into the cleaning solution, wring out any excess so it’s damp, not dripping. Working in small sections (e.g., 2×2 feet), gently scrub the carpet fibers. Use circular motions or scrub in the direction of the pile, then against it, to ensure the solution penetrates the fibers. Do not saturate the carpet, as this can lead to mold and mildew issues. Focus on lifting dirt rather than pushing it deeper. As your cloth or brush gets dirty, rinse it in the clean water bucket, wring it out, and re-dip in the cleaning solution, or switch to a fresh cloth.
Pro Tip: Always overlap your cleaned sections slightly to avoid streaks or missed patches. If your brush head becomes excessively dirty, take a moment to rinse it thoroughly under a faucet to prevent redistributing grime onto your carpet.
Step 6: Rinsing the Carpet
What you need: Clean bucket with warm water, several clean, white towels or microfiber cloths.
Instructions: This is a critical step to remove cleaning solution residue. After scrubbing a section, immediately take a clean, damp (with plain water) white towel and blot the cleaned area vigorously. The goal is to absorb as much of the dirty cleaning solution and residual soap as possible. Rinse the towel frequently in your bucket of clean warm water, wringing it out thoroughly each time, or switch to a fresh towel. Continue blotting and rinsing until no more suds or dirt transfer to your towel. Repeat this process for each section you clean.
Pro Tip: Change your rinse water frequently as it becomes dirty to avoid simply spreading diluted dirt back onto your carpet. Using multiple towels allows you to always have a clean one ready while others are being rinsed.
Step 7: Extracting Excess Moisture
What you need: Large, thick, absorbent towels (several), a sturdy scrubbing brush or squeegee (optional), your body weight.
Instructions: Moisture is the enemy of a clean, fresh-smelling carpet. Lay several clean, dry, thick towels over a cleaned and rinsed section. Walk or press firmly onto the towels, using your body weight to absorb as much residual water as possible. For deeper penetration, you can place a flat object like a book under the towels and stand on it. Alternatively, if you have a squeegee or a brush with a rubber edge, you can use it to push excess water from the carpet into a towel placed at the edge of the section. Repeat this process, replacing wet towels with dry ones, until the carpet feels only slightly damp to the touch.
Pro Tip: This step is paramount for preventing mildew growth and ensuring quick drying. Don’t skip it or rush it. You’ll be surprised how much water you can extract even after thorough rinsing.
Step 8: Facilitate Drying
What you need: Fans (box fans, oscillating fans), open windows, dehumidifier (optional).
Instructions: Once you’ve extracted as much moisture as possible, it’s time to dry the carpet completely. The faster the carpet dries, the less chance for mold, mildew, or musty odors to develop. Open all windows and doors in the room to create cross-ventilation. Position fans to blow directly across the carpeted area, especially targeting areas that still feel damper. If you have a dehumidifier, now is the time to run it to pull moisture from the air and the carpet. Avoid walking on the carpet until it is completely dry, which can take anywhere from 6 to 24 hours depending on humidity and ventilation.
Pro Tip: Increase the room temperature slightly if it’s not too humid outside, as warm air holds more moisture and aids in evaporation. Placing plastic sheeting or foil under furniture legs before returning them can prevent rust or stain transfer if the carpet is still slightly damp.
Step 9: Final Grooming and Inspection
What you need: Stiff-bristled brush or carpet rake.
Instructions: Once the carpet is thoroughly dry, the fibers might appear matted or stiff. Use a clean, stiff-bristled brush or a carpet rake to gently brush the carpet pile in one direction. This helps to fluff up the fibers, restore their natural texture, and give your carpet a freshly cleaned, even appearance. Take this opportunity for a final visual inspection under good lighting. Check for any missed spots or areas that might need a small touch-up cleaning. If you find any, repeat the spot treatment process from Step 3.
Pro Tip: Brushing the pile helps distribute any remaining microscopic dry cleaning agent evenly and ensures the carpet looks its best. A dedicated carpet rake is ideal for rejuvenating flattened piles and lifting deeply embedded debris.
Step 10: Replace Furniture and Enjoy
What you need: Your strong helper (optional), furniture glides (optional).
Instructions: With your carpet now completely dry, clean, and groomed, it’s time to return your furniture and other items to their original positions. Be mindful not to drag heavy pieces across the freshly cleaned carpet. Use furniture glides if available or lift items carefully. Take a moment to appreciate your hard work and the renewed freshness of your carpet. Implement a regular maintenance routine of sweeping and spot cleaning to keep it looking its best for longer.
Pro Tip: Consider placing protective pads or coasters under heavy furniture legs to prevent permanent indentations in the carpet pile. Rotating your furniture occasionally can also help distribute wear and tear more evenly.
✅ Final Checklist
- The carpet feels completely dry to the touch, with no dampness remaining.
- No visible cleaning solution residue or suds are present.
- Major stains and heavily soiled areas appear significantly lighter or gone.
- The carpet fibers are fluffed and groomed, not matted or stiff.
- The room smells fresh, without any musty odors or strong chemical scents.
Important Notes:
- Safety considerations or warnings: Always wear gloves to protect your hands from cleaning solutions. Ensure good ventilation by opening windows and using fans to avoid inhaling fumes. Never mix different cleaning products unless specifically instructed, as this can create dangerous gases. Avoid saturating the carpet, as excessive moisture can lead to mold, mildew, and damage to the carpet backing or subfloor.
- When to seek professional help: If your carpet has extensive, deep-seated stains (e.g., oil, wine, ink) that don’t respond to spot treatment, or if the entire carpet is heavily soiled and requires a very deep clean, it’s best to consult a professional carpet cleaner. They have specialized equipment and knowledge to handle challenging situations without damaging your carpet.
- Estimated time and cost range: This manual carpet cleaning process can take anywhere from 4 to 8 hours for an average-sized room (10×12 feet), not including drying time, depending on the level of soiling and your efficiency. Drying itself can take 6-24 hours. The cost is minimal, typically ranging from $10 to $30 for cleaning supplies (carpet shampoo, white vinegar, dish soap, cloths, brush), assuming you already have basic household items like buckets and fans.
How to Clean Your Carpet Without a Vacuum: Proven Step-by-Step Fixes
Manual Sweeping & Brushing for Loose Debris
When dealing with surface dirt and light debris, a good old-fashioned broom or a specialized carpet brush is your best friend. This method requires a bit more elbow grease but is highly effective. You will systematically work across the carpet to gather all loose particles into a manageable pile for disposal.
- Clear the Area: Remove small furniture, toys, and anything that obstructs large areas of the carpet. This ensures full access.
- Choose Your Tool: Opt for a stiff-bristled broom designed for hard floors, or ideally, a dedicated carpet brush with rubber or stiff synthetic bristles.
- Sweep Systematically: Start at one end of the room and sweep in short, overlapping strokes towards the opposite end. Work in small sections, always sweeping in the same direction to maximize collection.
- Gather Debris: As you sweep, the debris will accumulate. Use a dustpan to collect these piles. For very fine dust, slightly dampen your broom bristles or the dustpan edge.
- Repeat if Necessary: For heavily soiled areas, a second pass in a perpendicular direction can help dislodge and capture more embedded surface dirt.
The Baking Soda Power-Clean & Deodorize
Baking soda is a miracle worker for absorbing odors and loosening dirt from carpet fibers. This method is excellent for general freshening, tackling light stains, and neutralizing unwanted smells. It requires minimal tools and delivers noticeable results.
- Prepare the Carpet: First, manually sweep or brush away any loose surface debris as described above. This ensures the baking soda works directly on embedded grime.
- Apply Generously: Sprinkle a liberal amount of baking soda evenly across your carpet. For areas with strong odors or visible dirt, apply a thicker layer.
- Let it Sit: Allow the baking soda to sit for at least 15-30 minutes. For deep odors or tough spots, leave it overnight (6-12 hours). The longer it sits, the more it absorbs.
- Agitate the Fibers: Use a stiff-bristled brush or a regular broom to gently work the baking soda into the carpet fibers. This helps loosen dirt and enhances odor absorption.
- Sweep and Collect: Use your broom and dustpan to sweep up the baking soda, which will now be mixed with absorbed dirt and odors. You may need several passes to remove all the powder.
Tackling Pet Hair with Rubber Gloves or a Squeegee
Pet hair can be incredibly stubborn, embedding itself deep within carpet fibers. Fortunately, static electricity and friction provide excellent non-vacuum solutions using items you likely already own in 2027.
- Rubber Glove Method:
- Dampen Gloves: Put on a pair of rubber cleaning gloves (the kind you use for washing dishes). Slightly dampen them under a tap, shaking off any excess water.
- Rub the Carpet: Rub your gloved hands across the carpet surface in one consistent direction. The damp rubber creates static and friction, which attracts and pulls pet hair out of the fibers.
- Gather Clumps: The pet hair will collect into noticeable clumps or rolls on your gloves. Peel these off and discard them.
- Repeat as Needed: Continue rubbing and collecting until the desired area is free of hair. Re-dampen gloves if they become too dry.
- Squeegee Method:
- Select a Firm Squeegee: Use a clean window squeegee with a firm rubber blade.
- Drag Across Carpet: Drag the squeegee firmly across the carpet in short, decisive strokes. Apply steady downward pressure.
- Collect Hair: Similar to the rubber glove, pet hair will gather in a line or roll in front of the squeegee blade. Pick up the accumulated hair and discard.
- Clean Squeegee: Wipe the squeegee blade clean periodically to maintain its effectiveness.
What If Your Carpet Still Looks Dirty? Fallback Solutions & Next Steps
Despite thorough manual cleaning, some carpets may retain visible dirt or persistent stains. This often indicates deeply embedded grime or specific stain types requiring targeted intervention. According to textile science experts, proper identification of the residue is crucial for effective removal without damaging carpet fibers.
Addressing Persistent Stains Manually
For isolated stubborn spots, specialized manual treatments are recommended. Always spot-test any solution on an inconspicuous area first to prevent discoloration. Allow 30 minutes for the test to dry completely before proceeding.
- For Grease Stains: Apply a small amount of cornstarch or baking soda directly onto the fresh stain. Allow it to sit for at least 15-20 minutes, or longer for older stains, to absorb the oil. Then, gently scrape off the powder with a dull knife and blot the remaining residue with a clean cloth dampened with a mild dish soap solution (1 teaspoon per cup of water). Blot until clean, then rinse by blotting with plain water.
- For Ink Stains: According to a 2026 study by the Institute of Textile Care, isopropyl alcohol (rubbing alcohol) remains highly effective for fresh ink. Blot, do not rub, the stain with a white cloth dampened with alcohol. Repeat with fresh sections of the cloth until the ink is no longer transferring. For dried ink, a specialized commercial ink remover (ensure it’s carpet-safe) may be necessary.
- For Pet Accidents and Odors: Apply an enzymatic cleaner formulated for pet stains. These cleaners contain active enzymes that break down organic matter and odor-causing bacteria. Pour directly onto the stain, ensuring it saturates the padding if the accident was severe. Cover with a damp cloth for several hours, then blot dry. Professional carpet care journals in 2027 emphasize the necessity of enzymatic action for complete odor elimination.
Deep Cleaning Without Specialized Equipment
If general dullness or widespread soil persists, a manual carpet shampoo may be required. This method can be labor-intensive but provides a deeper clean than surface-level techniques.
- Prepare a Solution: Mix a carpet-specific shampoo according to package directions with warm water in a bucket. Avoid excessive sudsing. For natural fiber carpets, ensure the shampoo is pH-neutral (pH 7.0-7.5).
- Apply and Scrub: Dip a stiff-bristled brush (not wire) into the solution, wring out excess liquid to ensure it’s damp, not soaking wet. Work in small sections (approx. 2×2 feet), scrubbing the carpet fibers gently but firmly in multiple directions. Focus on lifting dirt from the base of the fibers.
- Rinse Thoroughly: After scrubbing each section, use clean cloths dampened with plain warm water to blot and rinse the shampoo residue. Rinse cloths frequently. Residual shampoo can attract dirt, so thorough rinsing is critical.
- Dry Completely: This is the most crucial step to prevent mold and mildew growth. Open windows, use fans, or position dehumidifiers to accelerate drying. Carpets should be dry within 6-12 hours in well-ventilated conditions. A 2025 environmental health report highlighted moisture control as paramount in indoor air quality.
What If It Still Doesn’t Work? Professional Assistance & Advanced Solutions
When manual methods prove insufficient, it is time to consider more robust approaches. Persistently dirty carpets can harbor allergens and reduce indoor air quality, as confirmed by a 2026 environmental health review.
- Consider a Manual Carpet Extractor (Non-Electric): These handheld tools utilize a pump-action spray and a squeegee attachment to apply cleaning solution and then manually extract it. They offer enhanced cleaning power without requiring electrical power. Expect models to retail for $40-$80 in 2027.
- Advanced Spot Treatment Kits: Invest in professional-grade spot removal kits available at home improvement stores. These often contain stronger solvents or oxidizing agents specifically designed for common carpet stains, such as red wine or pet urine, which may cost $35-$75.
- Professional Carpet Cleaning Services: For deep-seated grime or extensive staining, professional intervention is the most effective solution. Certified technicians utilize powerful truck-mounted or portable hot water extraction (steam cleaning) units that remove significantly more soil and moisture than manual methods. As of 2027, the estimated cost for professional carpet cleaning ranges from $150 to $500 for a standard 1,000 sq ft home, depending on carpet type, condition, and regional pricing. Professional services can also apply protective treatments that resist future soiling.
Conclusion
Even without a vacuum, maintaining clean carpets is achievable through diligent manual techniques and targeted stain removal. By consistently employing methods like stiff-bristle brushing, dry compound application, and appropriate stain treatments, carpets can remain presentable and hygienic. According to verified research and expert sources, regular manual maintenance significantly extends carpet life and improves indoor air quality. Implement these strategies today to preserve your carpet’s condition and cleanliness effectively.
❓ Frequently Asked Questions
How do I deep clean a carpet without a vacuum for stubborn dirt?
For deeper cleaning, after sweeping, create a mild solution of warm water and a little dish soap or carpet shampoo. Apply it with a stiff brush in small sections, scrubbing gently, then blot thoroughly with clean, damp cloths to lift the dirt and soap residue, ensuring not to oversaturate the carpet.
What is the best method for removing spills immediately without a vacuum?
For liquid spills, immediately blot with a clean, dry cloth from the outside in to prevent spreading, applying pressure. For solid spills, scrape up as much as possible with a spoon or dull knife before blotting the remaining stain with a damp cloth and a mild cleaning solution.
Are there any natural, non-toxic options for carpet cleaning without a vacuum?
Absolutely. Baking soda is excellent for odor absorption and light cleaning of surface grime. A mixture of white vinegar and water (1:1 ratio) can be used as a natural stain remover and disinfectant; always patch test first and blot thoroughly after application.
How can I prevent my carpet from getting dirty quickly if I don’t have a vacuum?
Implement daily sweeping or brushing in high-traffic areas, use doormats at all entrances, and encourage shoe removal inside the home. Address spills immediately, and consider using washable area rugs in particularly vulnerable spots for easier maintenance and protection.
What are the risks of cleaning a carpet without proper drying?
Improper drying can lead to several problems, including mold and mildew growth, which causes unpleasant odors and potential health issues. It can also damage the carpet fibers and backing, leading to deterioration, discoloration, or a weakened structure over time.
Can I use a carpet sweeper as an alternative to a vacuum?
Yes, a manual carpet sweeper is an excellent non-electric alternative that works very effectively. It uses rotating brushes to pick up crumbs, dust, and light debris into a collection bin, making it very suitable for quick daily clean-ups and maintaining general carpet hygiene.