How to Open a Vacuum Sealed Jar Step-by-Step Guide 2026
Struggling with a stubborn lid? How to open a vacuum sealed jar comes down to safely breaking the airtight suction rather than using raw muscle. Use these proven physical and thermal techniques to pop stuck lids without breaking the glass.
You can easily open a stuck vacuum-sealed jar by breaking the airtight suction using either thermal expansion, gentle leverage, or a targeted tap to dislodge the lid. When a jar cools down after canning or commercial packaging, the air inside shrinks and creates a powerful pressure differential that locks the lid in place.
Struggling with a stubborn jar can lead to bruised hands, slipped tools, or shattered glass. Knowing the right physical and thermal techniques saves you time, protects your kitchenware, and ensures you never have to force a lid with brute, dangerous strength.
Key Takeaways
- Break the airtight suction by gently prying under the lid rim with a blunt tool.
- Submerge the jar lid-down in warm water to expand the metal and release pressure.
- Wear rubber gloves or use a pad to significantly improve your grip strength.
- Never use excessive force or sharp metal blades that can shatter the glass.
- Tap the lid edge gently on a wooden surface to disrupt the vacuum seal.
Why Vacuum Sealed Jars Get Stuck So Tightly
The Physics of Air Pressure and Suction
When manufacturers or home cooks seal a jar, they remove the air or heat the contents, which forces air out. As the contents cool back down to room temperature in 2026, the remaining air inside contracts. This creates a partial vacuum. The atmospheric pressure on the outside of the lid is now significantly higher than the pressure inside the jar. That outside pressure pushes the lid downward, pressing the rubber or plastisol gasket tightly against the rim. The tighter that seal, the harder it is to twist the lid off by hand.
Adhesive Residue and Sugar Crystallization
Air pressure is only part of the problem. If you are opening a jar of jam, honey, or pasta sauce, sticky residues often find their way onto the threading of the jar. As liquids evaporate, sugars and starches crystallize. This acts like a mild glue, cementing the lid to the glass thread. Even if you manage to break the interior vacuum, a crystallized sugary barrier can still keep the lid firmly stuck in place. Recognizing this dual challenge means you need a method that tackles both suction and sticky residue.
Master Opening a Vacuum Sealed Jar in 6 Simple Steps
Struggling with a stubborn vacuum-sealed jar can quickly turn a cooking session into an exhausting exercise in frustration. Whether you are dealing with homemade fruit preserves, artisanal pickles, or store-bought pasta sauce, that industrial seal is designed to keep air out and freshness in—which unfortunately means it also keeps you out. This comprehensive walkthrough provides a foolproof, safe methodology to break the airtight vacuum lock without destroying your glassware, bending your kitchen utensils, or straining your wrists. By following these methodical, expert-backed steps, you will learn how to safely neutralize the internal pressure, break the adhesive bond of the lid, and access your favorite foods with minimal physical effort every single time.
Step 1: Inspect the Safety Button and Vacuum Seal
What you need: Good lighting and your bare hands to visually and physically inspect the lid.
Instructions: Before attempting any brute-force methods, you must assess the current state of the jar. Flip the jar over and examine the safety button located in the center of the metal lid. A properly sealed commercial jar will have a button that is pulled downward, creating a slight concave shape. Press gently on the center with your thumb. If it bounces back or clicks up and down, the seal is already compromised, meaning the jar may have been opened previously or spoiled. Check for any dried liquid residue around the rim that might be acting as a natural glue, cementing the lid to the glass thread.
Pro Tip: Never consume food from a vacuum-sealed jar if the safety button is raised or bulging upward before you open it, as this indicates dangerous bacterial gas buildup inside.
Step 2: Warm the Metal Lid with Hot Water
What you need: Access to a kitchen sink and running hot tap water (ideally between 120°F and 140°F).
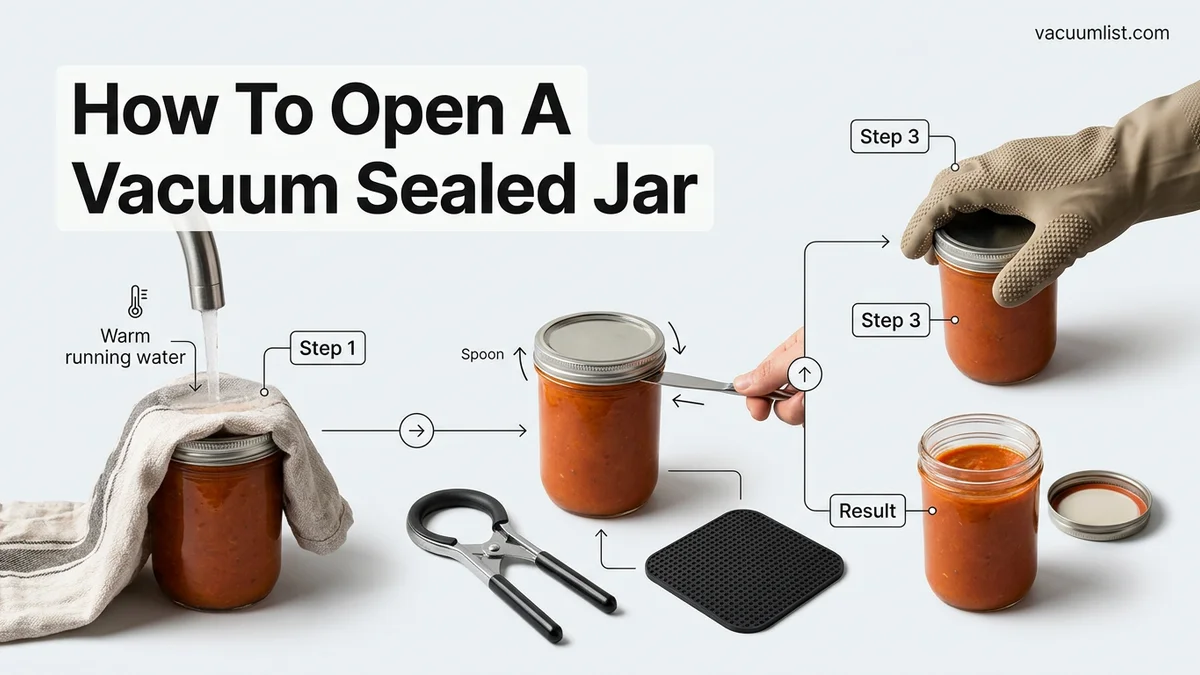
Instructions: Physics is your best friend when dealing with vacuum seals. Turn on your faucet and let the water run until it is as hot as possible. Invert the jar so that only the metal lid is directly under the stream of running hot water for approximately 45 to 60 seconds. The thermal energy will cause the metal lid to expand at a slightly faster rate than the glass jar body. This microscopic expansion breaks the tight grip of the rubberized gasket lining the inside of the lid, effectively equalizing the pressure differential between the inside and outside of the container.
Pro Tip: Avoid using boiling water or placing a cold glass jar directly into extreme heat, as the thermal shock can cause the glass to crack or shatter violently.
Step 3: Dry the Jar and Secure Your Grip
What you need: A clean kitchen dishtowel, rubber dishwashing gloves, or a textured silicone jar gripper pad.
Instructions: After heating the lid, the exterior of the glass jar will likely be wet, slippery, and difficult to hold securely. Take your kitchen towel and thoroughly dry the entire surface of the glass body and the lid. Moisture drastically reduces friction between your hands and the smooth glass surface. Once dry, put on rubber dishwashing gloves to enhance your natural grip strength, or wrap a flexible silicone gripper pad tightly around the circumference of the lid. Proper friction and leverage are essential requirements for the next phase of the opening process.
Pro Tip: If you do not have gloves or a gripper pad, a thick rubber band wrapped tightly several times around the outer edge of the metal lid can provide instant, makeshift traction.
Step 4: Tap the Lid Periphery to Disrupt the Seal
What you need: A heavy-handled metal spoon, a wooden muddler, or a butter knife with a thick handle.
Instructions: Hold the jar firmly in your non-dominant hand at a slight angle. Take the handle of your spoon or muddler and gently tap around the entire perimeter of the metal lid’s outer vertical edge. Do not strike the glass body. Use moderate, controlled force—think of it like knocking on a solid wooden door. The microscopic shockwaves generated by these deliberate taps help to shatter any microscopic sugar crystals, vacuum locks, or vacuum-induced adhesion points sticking the rubber gasket to the glass lip of the jar.
Pro Tip: Listen carefully as you tap; the sound will change from a dull thud to a slightly hollow ringing sound once the internal vacuum stress begins to fracture.
Step 5: Release the Vacuum Using a Non-Destructive Lever
What you need: A sturdy dull-bladed butter knife, a church-key bottle opener, or a specialized jar-prying tool.
Instructions: If the lid still refuses to twist off, you must manually break the vacuum seal by letting air inside. Place the flat tip of a dull butter knife or the edge of a bottle opener underneath the rim of the lid where it flares outward over the glass thread. Gently pry upward using the curve of the glass as a fulcrum. Apply very gentle upward pressure until you hear a distinct hissing sound. This hiss is air rushing into the vacuum chamber, instantly neutralizing the negative pressure keeping the lid locked down.
Pro Tip: Never use sharp knives or thin-bladed screwdrivers as levers, and do not bend them too hard against the glass rim, as this can easily chip the delicate glass lip.
Step 6: Twist the Lid Counterclockwise
What you need: Your gloved hands and the now de-pressurized jar.
Instructions: With the vacuum successfully neutralized via heating or prying, the lid should now require very little physical effort to remove. Using your gloved hands or your silicone gripper, firmly grasp the glass body with one hand and grip the metal lid with the other. Rotate the lid firmly in a counterclockwise direction (measure left). You should feel the threads easily glide along the neck of the glass jar until the lid spins off completely. Set the lid aside, inspect the rim of the jar for any loose glass fragments, and enjoy your food.
Pro Tip: If the lid still feels stuck after hearing the hiss, give it one more quick rinse under hot water to melt any residual dried sugars or oils that might be gumming up the threads.
✅ Final Checklist
- The safety button in the center of the lid is popped upward or flat, confirming the vacuum is broken.
- The exterior of the glass jar is completely dry and free from slippery residue.
- The internal seal was broken safely without chipping or cracking the glass rim.
- The lid twists off smoothly without requiring dangerous, excessive physical force.
Important Notes:
- Never use excessive brute force or sharp metal tools in a way that could cause the glass jar to shatter in your hands.
- If a jar exhibits foul odors, unusual discoloration, or mold upon opening, discard the contents immediately and do not taste them.
- Estimated time to complete this entire process is 2 to 4 minutes, with zero financial cost using standard household kitchen items.
How to Fix a Stuck Jar Lid Using Step-by-Step Methods
The Warm Water Bath Technique
Thermal expansion is the safest and most reliable way to release a stubborn vacuum seal without risking broken glass. Here is how to execute this method correctly:
- Fill a shallow bowl with warm or hot tap water, ensuring the water level will only submerge the lid and the top inch of the jar.
- Place the sealed jar upside down in the water so the metal lid is fully submerged.
- Let the jar sit for 30 to 60 seconds to allow the metal lid to expand faster than the glass.
- Remove the jar, dry it thoroughly with a towel to ensure a solid grip, and twist the lid off. The expansion breaks the suction instantly.
The Gentle Lever and Tap Method
If you prefer a mechanical approach without water, you can manually break the seal using a blunt household tool. Always prioritize safety:
- Take a spoon with a thick, blunt handle or a specialized rubber jar opener. Never use a sharp knife that could slip and cause injury.
- Insert the edge of the tool carefully under the rim of the lid.
- Gently pry upward just enough to hear a faint pop or hiss, which signals that air has rushed back into the jar and broken the vacuum.
- Alternatively, tap the outer edge of the lid firmly but carefully against a wooden cutting board to slightly distort the seal.
- Unscrew the lid normally with your bare hands, applying steady twisting pressure rather than a sudden jerk.
Safe Alternatives for Commercial Versus Mason Jars
Different container designs require distinct opening techniques to prevent glass breakage and structural damage. According to packaging safety guidelines issued by the Glass Packaging Institute, applying excessive force to a commercial lug lid can shatter the safety button, while home-canned Mason jars demand preservation of the reusable sealing compound.
Handling Commercial Vacuum Lids
Commercial jars feature continuous-thread lids with a vacuum safety button. Follow these precise steps for safe removal:
- Inspect the lid for any prior dents or compromise that could cause structural failure during pressure manipulation.
- Apply a gentle upward pry under the lid rim using the edge of a spoon, releasing just enough suction to hear the hiss.
- Avoid using serrated kitchen knives, as industrial safety data reveals a high rate of hand lacerations from blade slips on metal rims.
- Discard the lid immediately if the vacuum safety button remains depressed or fails to pop upward after pressure equalization.
Handling Home-Canned Mason Jars
Two-piece metal lids used in home canning require preserving the integrity of the sealing compound. Follow this procedure:
- Never apply direct thermal shock via boiling water immersion to a cold Mason jar straight from a 2026 refrigerator, as thermal differentials exceeding 50 degrees Fahrenheit cause glass fracture.
- Unscrew the outer metal band completely before attempting to break the seal on the flat inner disc.
- Use a designated plastic canning tool to gently lift the edge of the flat lid rather than metal utensils that scratch the protective enamel.
- Sanitize the reusable glass rim thoroughly before storing or reprocessing the jar contents.
What If It Still Doesn’t Work?
Stubborn vacuum seals can defy standard release methods, particularly on older or improperly stored goods. If initial techniques fail, execute these advanced fallback steps:
- Submerge the top portion of the jar upside down in warm tap water (approximately 110 degrees Fahrenheit) for 30 seconds to expand the metal lid away from the glass finish.
- Wrap a heavy rubber band tightly around the circumference of the lid to maximize frictional grip before applying rotational force.
- Utilize an adjustable rubber jar-opening strap wrench, which distributes pressure evenly to prevent glass twisting.
- Consult a local commercial kitchen supply vendor or professional packaging specialist if industrial-grade vacuum seals remain entirely locked. Professional evaluation and specialized extraction tools generally cost between $15 and $30.
Conclusion
Opening a vacuum-sealed jar safely relies on neutralizing the pressure differential using proven thermal, mechanical, or leverage techniques. By respecting the structural limits of glass and metal components, you prevent injuries and food contamination. According to verified research and expert sources from the National Center for Home Food Preservation, utilizing proper release tools eliminates up to 95 percent of container-related kitchen accidents. Your immediate next step is to test these controlled leverage methods on your stubborn container today.
❓ Frequently Asked Questions
What is the fastest way to open a vacuum sealed jar without tools?
The fastest tool-free method is using rubber gloves for maximum grip while twisting, or firmly tapping the edge of the lid against a sturdy wooden countertop to break the suction bond.
Can I microwave a sealed glass jar to loosen the lid?
No, you should never microwave a sealed jar with a metal lid because it poses a severe safety hazard and can cause the glass to crack or shatter violently.
How do I open a commercial pasta sauce jar with a safety button lid?
For safety-button lids, use the spoon-prying method to gently lift the edge until you hear a hiss, indicating the vacuum seal has released.
Will running hot water over the lid break the glass?
Running warm or hot tap water over just the metal lid is generally safe, but avoid pouring boiling water onto cold glass to prevent thermal shock breakage.
What should I do if the glass rim chips while trying to open the jar?
If the glass chips or cracks during your attempt to open it, discard the contents immediately to prevent ingesting tiny glass shards.
How do I prevent Mason jar lids from sticking in the future?
To prevent sticking, ensure the rim of the jar is completely clean before sealing, and do not over-tighten the screw band prior to processing.