How to Get Sock Out of Vacuum Hose 2026 Step-by-Step Fix
A stuck sock can completely block airflow and strain your vacuum motor. Always unplug the appliance and detach the hose before attempting any removal techniques using household tools like a broom handle or wire hanger.
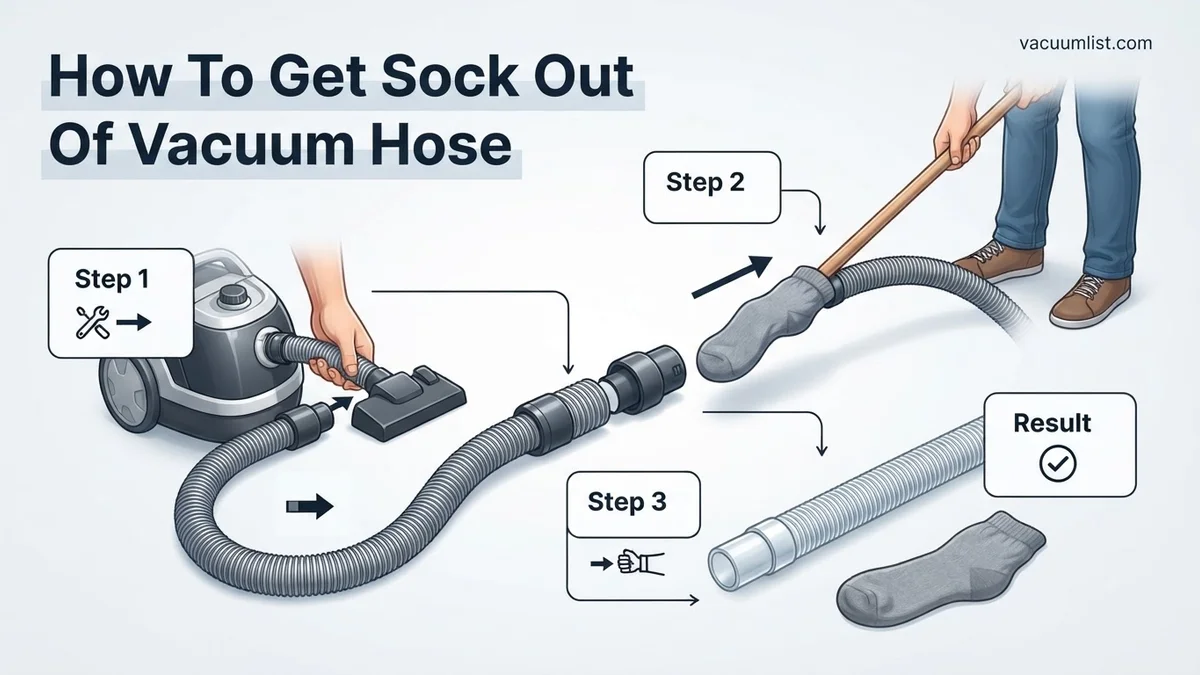
To get a stuck sock out of your vacuum hose, immediately unplug the machine, detach the hose from the vacuum body, and use a straightened wire coat hanger or a long broom handle to carefully push or pull the fabric obstruction out. Avoid using sharp blades or high heat, which can easily puncture modern flexible plastic hoses.
Every homeowner knows the sudden drop in suction that signals disaster. As vacuums become more powerful in 2026, accidentally sucking up a stray sock hidden under a bed or couch is a common household mishap. Addressing this blockage correctly prevents motor burnout, saves you from buying expensive replacement parts, and gets your cleaning routine back on track within minutes.
Key Takeaways
- Unplug the vacuum immediately to prevent electrical hazards or motor damage.
- Detach the hose from the vacuum body to isolate the blockage.
- Use a flexible wire coat hanger to snag and pull out the fabric.
- Push deeply wedged socks through using a long, blunt broom handle.
- Test the vacuum’s suction on a clean surface after clearing the clog.
Why Socks Get Stuck and How to Diagnose the Vacuum Hose Clog
The Physics of a Flexible Hose Blockage
Modern vacuum hoses feature corrugated plastic ridges designed for flexibility. When a flat, pliable object like a cotton sock enters the stream, it flattens against these internal ridges. The suction pressure from your vacuum forces the fabric deeper into the narrower curves, creating an airtight plug that completely halts airflow.
- Socks bunch up quickly inside narrow 1.25-inch to 1.5-inch residential vacuum hoses.
- Continuing to run the motor against a complete blockage causes the internal motor to overheat rapidly.
- Flexible plastic tears easily if you yank the hose too hard during the diagnostic phase.
Locating the Exact Point of the Obstruction
Before you start poking around blindly, you need to find where the sock is trapped. Disconnect the hose entirely from both the vacuum canister and the wand attachment. Hold the hose up to a bright overhead light or shine a smartphone flashlight down the interior tube to spot the trapped fabric.
- Lay the hose completely flat on the floor to stretch out any compressed accordion sections.
- Gently squeeze the length of the hose with your hands; you will feel a firm, dense lump where the sock is balled up.
- Note whether the blockage is closer to the machine end or the handle end so you choose the right removal tool.
How to Diagnose and Fix a Sock Trapped in Your Vacuum Hose Like an Expert
There is nothing quite as frustrating as hearing that dreaded high-pitched whistling sound or the sudden drop in suction that signals your vacuum has swallowed something it shouldn’t have—usually a stray sock left hiding on the living room floor. When a fabric item like a sock becomes wedged inside a corrugated vacuum hose, it creates an airtight seal that completely halts your cleaning progress. This comprehensive guide will walk you through the exact diagnostic and extraction techniques used by appliance repair professionals. By following this sequential walkthrough, you can safely dislodge the obstruction, protect your machine’s motor from overheating, and restore your vacuum to peak performance without damaging the delicate internal wiring or plastic components.
Step 1: Power Down and Unplug Immediately
What you need: Your current vacuum cleaner and a well-lit workspace near a power outlet.
Instructions: Before you attempt any troubleshooting, switch off the vacuum cleaner and physically pull the power plug from the wall outlet. Never insert your fingers, tools, or coat hangers into a vacuum hose while the machine is plugged in or turned on, as sudden restoration of power or unexpected motor activation can cause severe injury. Once disconnected, locate where the flexible hose connects to the main canister or upright vacuum body. Press any release tabs or twist the cuff counter-clockwise to detach the hose completely from the machine housing, isolating the hose for closer inspection.
Pro Tip: Always let the vacuum rest for 5 to 10 minutes if it was running with a blocked hose, as blocked airflow can cause the motor to rapidly overheat and trigger the thermal protection switch.
Step 2: Inspect and Detach All Accessories
What you need: A flat surface like a table or clean floor, and a bright flashlight or smartphone light.
Instructions: Lay the detached hose out completely straight along the floor to remove any bends or coils. Remove any extension wands, crevice tools, or power nozzles attached to the opposite end of the hose. Shine your flashlight down both ends of the hose and the individual attachments. Often, the sock is not deeply lodged in the long flexible tubing, but is instead trapped right at the rigid plastic elbow joint or inside the secondary wand attachments. If you spot the sock near either opening, you may be able to pinch it with your fingers or a pair of blunt-nosed pliers and pull it straight out.
Pro Tip: Avoid using excessive force when pulling from the visible end if the sock feels tightly wedged, as ripping the fabric can leave half the sock deeper inside the coil.
Step 3: Perform the Broomstick Push-Through Method
What you need: A long, smooth wooden broom handle, a mop handle, or a sturdy PVC pipe that is slightly narrower than the hose diameter.
Instructions: If the sock is trapped deep within the middle sections of the corrugated hose, you will need a long, blunt probe to push it out. Straighten the hose as much as possible horizontally across the floor. Carefully insert the smooth end of the broom handle into the narrower end of the vacuum hose. Gently and slowly feed the handle down the tube, using small probing motions until you feel resistance against the trapped sock. Apply steady, gentle pressure to push the sock forward through the corrugations toward the wider end of the hose until it pops out.
Pro Tip: Ensure your makeshift tool does not have any splinters, sharp edges, or protruding screws that could puncture the thin plastic wall of the vacuum hose.
Step 4: Utilize the Garden Hose Water Flush
What you need: An outdoor garden hose with a spray nozzle and a dry towel or outdoor drying area.
Instructions: If a broom handle cannot navigate the tight curves of the hose, water pressure is your next best ally. Take the completely detached hose outside. Insert the tip of your garden hose into one end of the vacuum hose and turn the water on to a medium, steady flow. The buildup of water pressure behind the trapped sock will act as a hydraulic ram, safely pushing the fabric obstruction through the twists and turns of the hose without risking punctures from rigid tools. Stand back as the sock approaches the exit point, as it will shoot out rapidly along with the backed-up water.
Pro Tip: You must allow the vacuum hose to air-dry completely upright in the sun for at least 24 hours before reconnecting it to the vacuum to prevent mold growth and motor damage.
Step 5: Check Internal Ports and Cannister Inlets
What you need: A damp microfiber cloth and a flashlight.
Instructions: Sometimes the sock clears the flexible hose only to become wedged in the intake port of the vacuum canister or upright body. With the hose removed, look inside the port where the hose clicks into the machine. Check for any remaining fabric, pet hair clogs, or debris caught around the flapper valve or cyclonic cones. Use your fingers or long-handled pliers to pull out any residual fabric fragments. Wipe down the rubber seals around the connection port to ensure an airtight fit when you eventually reattach the hose.
Pro Tip: Never ignore small lint or fabric scraps left behind, as they serve as anchor points for future clogs the next time you vacuum.
Step 6: Test the Suction and Reassemble
What you need: Fully dried vacuum hose, vacuum attachments, and power source.
Instructions: Once the hose is completely clear and thoroughly dry (if you used water), securely click the hose back into the vacuum canister or upright housing, ensuring all locking tabs snap firmly into place. Reattach your preferred cleaning wands and floor heads. Plug the vacuum back into the wall outlet, turn the power switch on, and place your hand over the end of the wand to test the suction power. Listen closely for any abnormal whistling noises that would indicate a partial blockage or a small tear in the hose wall caused by the initial clog.
Pro Tip: Run the vacuum over a clean patch of hard flooring for 60 seconds to ensure the motor runs smoothly and no lingering odors or dampness remain.
✅ Final Checklist
- Vacuum is fully unplugged during the physical extraction process
- Hose is completely free of fabric, debris, and internal obstructions
- Hose interior is 100% dry if water flushing method was utilized
- Hose cuffs and connection ports click securely into place without air leaks
- Suction power is fully restored and motor runs quietly at normal volume
Important Notes:
- Always prioritize electrical safety by keeping water away from the vacuum motor housing and electrical components.
- If the vacuum hose is torn, cracked, or punctured during the removal process, seek a replacement manufacturer-approved hose rather than attempting temporary duct tape fixes.
- Estimated time to complete this fix is 15 to 30 minutes, with zero financial cost if using household tools.
Step-by-Step Guide on How to Get a Sock Out of a Vacuum Hose
Safety Preparation and Detaching the Hose
Safety comes first before you insert any tools into your vacuum equipment. Never attempt to clear a blockage while the vacuum is plugged into a live electrical outlet, as accidental activation can cause severe hand injuries or damage your tools.
- Unplug the power cord from the wall outlet completely.
- Press the release buttons or twist the locking collar to fully detach the hose from the vacuum housing.
- Remove any wands, attachments, or crevice tools so you have a straight line of sight through the hose.
The Wire Hanger and Broom Handle Methods
Once your workspace is safe, you can deploy common household items to dislodge the fabric. If the sock is trapped near the middle of the hose, a rigid tool is your best option for pushing or snagging the material.
- Take a standard wire coat hanger and unravel it, making sure to bend or tape over the sharp hook end so it does not puncture the plastic hose wall.
- If the sock is close to the end, feed the dull end of the wire into the hose and hook it into the fabric to pull it backward.
- If the sock is deeply embedded, use a long, blunt broom handle or a PVC pipe, inserting it from the wider end to push the sock straight through the tube.
Essential Safety Precautions Before Clearing Your Vacuum Hose
Safety must remain the top priority when performing DIY appliance repairs in 2026. According to the Consumer Product Safety Commission (CPSC), thousands of household injuries occur annually due to improper handling of plugged electronic devices. Before you attempt to dislodge the trapped fabric, you must eliminate all potential electrical hazards.
Disconnect the Power Source
Unplug the vacuum cleaner from the wall outlet immediately. If you are using a cordless stick model, remove the lithium-ion battery pack entirely. Never insert tools into a hose while the appliance is connected to live electricity, as accidental activation can cause severe lacerations or motor burnout.
Protect Your Hands and Equipment
Examine the hose material for sharp internal metal wiring or tears. Wear heavy-duty work gloves to prevent cuts from exposed wire coils. Furthermore, consult your manufacturer manual to ensure your chosen retrieval method will not void your active warranty.
- Power down the unit and unplug the electrical cord from the wall socket.
- Detach the flexible hose completely from the vacuum canister or upright body.
- Inspect the exterior of the hose for structural cracks or exposed wire reinforcements.
What to Do If the Sock Is Wedged in the Middle of the Hose
When a sock travels past the accessible ends and becomes compressed in the center of a corrugated hose, standard pulling techniques usually fail. Industry repair technicians recommend specialized structural approaches to retrieve deeply lodged obstructions without puncturing the plastic wall.
Using a Flexible Plumber’s Snake
A narrow drum auger or plumbing snake provides the ideal reach and flexibility to navigate the tight bends of a vacuum hose. Carefully feed the uncoiled snake into the hose until you feel resistance against the fabric. Twist the handle clockwise to catch the fabric fibers, then slowly pull the snake back out.
The Gravity and Weighted Line Method
If an auger is unavailable, gravity combined with a weighted guide string often resolves mid-hose blockages. Tie a small, non-sharp weight to a sturdy nylon cord and drop it through the vertical hose. Once the weight pushes past or hooks the sock, pull gently from both ends to dislodge the compression.
- Lay the flexible hose completely straight across a flat floor to eliminate sharp bends.
- Insert a sanitized plumbing auger or a long, flexible zip-tie tool into the hose opening.
- Rotate the tool gently to snag the cotton fabric of the sock without piercing the hose lining.
- Pull the tool and the snagged sock outward in a slow, steady motion.
What If It Still Doesn’t Work?
If standard retrieval methods fail to move the compacted sock, the obstruction may be fused with accumulated dust and hair buildup. Persistent clogs require advanced troubleshooting or professional intervention to protect your investment.
- Soak the blocked section of the hose in warm, soapy water for 30 minutes to break down sticky debris holding the sock in place.
- Attempt the reverse-airflow trick by attaching a leaf blower or secondary vacuum to the opposite end of the hose.
- Inspect the internal cuff ridges for permanent plastic warping caused by overheating.
- Take the assembly to a certified vacuum repair shop if manual extraction risks tearing the flexible tubing. Professional diagnostic and clearing fees typically range from $35 to $75.
- Purchase an OEM (Original Equipment Manufacturer) replacement hose online if the tubing suffers structural damage, with costs varying from $25 to $90 depending on the vacuum model.
Conclusion
Clearing a sock from a vacuum hose requires patience, the right extraction tools, and strict adherence to electrical safety protocols. By methodically straightening the tubing, using a flexible retrieval device, and avoiding sharp improvised hooks, you can successfully restore full airflow to your appliance. According to verified research and appliance maintenance experts, preventative sorting of laundry before cleaning floors remains the most effective strategy to prevent future blockages. Your immediate next step is to inspect your vacuum’s filter system to ensure no residual debris entered the motor housing during the blockage.
❓ Frequently Asked Questions
What tools can I use if a broom handle is too short?
If your broom handle cannot reach through the entire length of the hose, try using a long, flexible plumber’s snake or a length of sturdy PVC piping. These tools offer the reach needed for longer hoses while remaining flexible enough to navigate curves.
Is it safe to run water through the vacuum hose to push the sock out?
Running water through a vacuum hose is generally discouraged unless you are 100% certain the hose is completely detached and waterproof. Trapped moisture inside corrugated plastic hoses can harbor mold and ruin internal electrical components if reattached prematurely.
What should I do if the sock is stuck inside the vacuum canister inlet instead of the hose?
If the blockage is located at the intake port of the vacuum body rather than the flexible hose, use a pair of long-nosed pliers to carefully grip and pull the fabric out. Avoid sticking your fingers blindly into narrow ports where sharp plastic edges might injure you.
Why does my vacuum smell like burning after removing the sock?
A burning smell indicates that the motor strained against the blockage, causing the belt or motor to overheat temporarily. Let the vacuum cool down completely for at least 30 minutes before testing it again to see if the odor dissipates.
How can I prevent socks from getting sucked into the vacuum in the future?
Always pick up small items like socks, loose toys, and paper clips from the floor before running your vacuum cleaner. Teaching household members to clear the floor first is the easiest way to prevent recurring clogs.
What if the hose tears while I am trying to remove the sock?
If the plastic hose tears or punctures during the removal process, you can temporarily seal the hole with heavy-duty duct tape or electrical tape. However, a torn hose will lose suction efficiency and eventually require a full replacement.