How to Attach Vacuum to Pool Skimmer Expert 2027
Connecting your pool vacuum to the skimmer is crucial for effective cleaning, but improper attachment leads to poor suction and frustration. This guide provides a proven, step-by-step method to securely attach your vacuum, ensuring optimal performance. Learn to prepare your equipment and prime the hose for a spotless pool.
Connecting your pool vacuum to the skimmer inlet for efficient cleaning in 2027 doesn’t have to be a guesswork session. This guide cuts directly to the precise, step-by-step method you need to achieve maximum suction and a spotless pool. The key lies in understanding your equipment and eliminating air from the system before you even start vacuuming.
Mastering this connection ensures your cleaning sessions are highly effective, saving you time and effort. A properly attached vacuum means debris gets pulled straight into your filter, keeping your pool sparkling clear without unnecessary strain on your pump or frustration from weak suction. Let’s get your pool sparkling the right way.
Key Takeaways
- Always prime vacuum hose thoroughly.
- Ensure skimmer vacuum plate seals tight.
- Check all connections for air leaks.
- Empty skimmer basket before vacuuming.
- Use appropriate vacuum head for surface.
Why Your Pool Vacuum Has Poor Skimmer Suction
If your pool vacuum barely picks up debris, the problem often isn’t your pump’s power but rather a compromised connection at the skimmer. Poor suction almost always points to air entering the system or an improper seal, which the pump then struggles to overcome. Identifying these issues before you begin ensures a more productive cleaning experience.
Air Leaks: The Silent Suction Killer
Even a tiny air leak can dramatically reduce your vacuum’s effectiveness. Air entering the vacuum hose or the skimmer connection dilutes the water flow, preventing your pump from creating the strong suction needed to pull debris. You might hear gurgling sounds or see bubbles returning to the pool if air is getting in. This is a primary culprit for weak vacuum performance in residential pools using standard skimmer connections, even with the latest 2027 pump models.
Incorrect Plate/Adapter Use
The skimmer vacuum plate (also known as a vac-plate, skimmer-vac, or a cone adapter) is crucial for a tight seal. Using the wrong size or type of plate for your specific skimmer opening will create gaps. For example, some skimmers require a flat plate that seals against the skimmer opening, while others use a conical adapter that plugs directly into the skimmer’s suction port at the bottom. A mismatched adapter guarantees poor suction, as it allows air to bypass your vacuum hose.
From Start to Finish: Pool Vacuum Skimmer Attachment Explained
Maintaining a clean swimming pool is essential for both hygiene and enjoyment. One of the most effective ways to remove dirt, debris, and fine particles from your pool floor is by vacuuming it. This comprehensive guide will walk you through the precise steps of attaching a pool vacuum to your skimmer system, ensuring you achieve maximum suction and a sparkling clean pool. Following these instructions carefully will prevent common issues like loss of prime or inefficient cleaning, making your pool maintenance routine significantly smoother and more effective.
Step 1: Gather Your Essential Equipment
What you need: A compatible pool vacuum head (e.g., weighted flexible, triangular), a telescopic pole, a properly sized vacuum hose (typically 1.25 or 1.5 inches in diameter), and a skimmer vacuum plate (also known as a skim-vac or vac-plate) or a dedicated skimmer adapter. Ensure your vacuum head matches your pool surface (e.g., brushes for plaster, wheels for vinyl).
Instructions: Before you begin, lay out all your equipment by the pool. Inspect your vacuum head for any worn brushes or damaged wheels. Check the vacuum hose for cracks, holes, or kinks, as these can severely impede suction. If using a skimmer vacuum plate, ensure it fits securely over your skimmer basket opening; measure if unsure. Having everything ready saves time and prevents interruptions during the priming process.
Pro Tip: Always inspect your hose for micro-fissures, especially near the cuffs. Even small leaks can introduce air into the system, causing your pump to lose prime and compromising your vacuum’s effectiveness. Replace any damaged hose immediately.
Step 2: Prepare the Pool Environment and Pump
What you need: Your pool pump actively running, a clean skimmer basket.
Instructions: First, ensure your pool pump is turned on and running at its normal filtration speed. Before attaching anything, use your manual skim net to remove any floating leaves, insects, or large debris from the surface of the pool. This prevents the skimmer basket or vacuum hose from becoming clogged prematurely, which can reduce suction and efficiency. Confirm your pool’s water level is adequate, ideally halfway up the skimmer opening, to prevent the pump from drawing air.
Pro Tip: A higher water level (¾ up the skimmer) is often beneficial during vacuuming, as it provides a larger water reserve, reducing the chance of the skimmer sucking air if water levels fluctuate slightly or you accidentally lift the vacuum head too high.
Step 3: Connect the Vacuum Head to the Telescopic Pole
What you need: Pool vacuum head, telescopic pole.
Instructions: Take your telescopic pole and extend it to a manageable length. Most vacuum heads feature a universal V-clip attachment point. Align the holes on the vacuum head with the pins on the end of the telescopic pole. Gently push the pole into place until the V-clip snaps securely over the pins. Give it a slight tug to ensure it’s firmly attached and won’t detach during vacuuming. This connection must be robust, as you’ll be maneuvering the head through water.
Pro Tip: Lubricate the V-clip with a little silicone grease periodically. This makes it easier to attach and detach equipment and helps prevent wear and tear on the plastic components, prolonging their lifespan.
Step 4: Attach the Vacuum Hose to the Head
What you need: Assembled vacuum head and pole, vacuum hose.
Instructions: Take one end of your vacuum hose, which typically has a swivel cuff designed for this purpose. Twist and push this swivel cuff firmly onto the suction port of your vacuum head. Ensure the connection is tight and secure, preventing any air from entering the system at this junction. The swivel cuff allows the hose to rotate freely as you vacuum, preventing tangles and ensuring smooth movement across the pool floor.
Pro Tip: Before connecting, visually inspect the swivel cuff for any debris or damage. A clean, smooth cuff will provide a better, more airtight seal, which is critical for maintaining strong suction throughout the vacuuming process.
Step 5: Submerge and Prime the Vacuum Hose
What you need: Assembled vacuum head, pole, and hose.
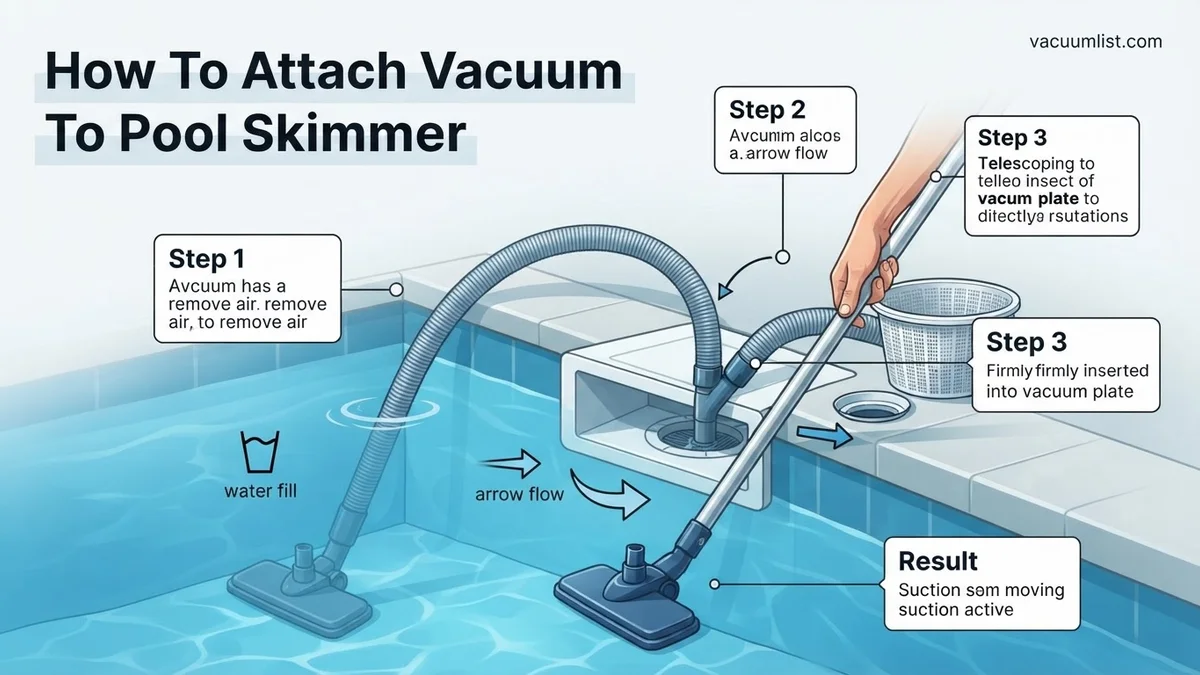
Instructions: This is a crucial step to prevent air from entering your pump. Slowly lower the vacuum head into the pool, allowing it to sink to the deepest part. As the head descends, guide the entire length of the vacuum hose into the water, starting from the head and working towards the free end. The hose will fill with water, expelling all the air within it. You should see a stream of bubbles emerging from the free end of the hose as it fills. Continue until no more bubbles are visible, indicating the hose is fully primed (filled with water).
Pro Tip: To expedite priming, you can place the free end of the hose directly in front of a return jet for a few seconds. The jet’s pressure will quickly force water through the hose, pushing out air much faster than simply submerging it.
Step 6: Prepare the Skimmer for Connection
What you need: Your pool skimmer, skimmer vacuum plate (if applicable).
Instructions: Walk over to your pool skimmer. Carefully remove the skimmer lid and the skimmer basket from inside the skimmer well. If you are using a skimmer vacuum plate, place it firmly over the opening where the skimmer basket normally sits. The vacuum plate should create a tight seal against the skimmer walls, directing all suction through its central hole. If you don’t have a vac plate, you will connect directly to the suction port at the bottom of the skimmer (though a plate is highly recommended for better suction and preventing debris from going directly to the pump).
Pro Tip: Keep the skimmer basket clean and readily accessible. Some vacuum plates are designed to sit inside the skimmer basket itself, allowing the basket to act as a pre-filter. Check your specific vac plate’s design.
Step 7: Connect the Primed Hose to the Skimmer Inlet
What you need: The fully primed vacuum hose, prepared skimmer (with or without vac plate).
Instructions: With the pump still running and the hose fully primed, bring the free end of the vacuum hose over to the skimmer. Firmly insert the open end of the hose into the center hole of the skimmer vacuum plate, or directly into the dedicated suction port at the bottom of the skimmer well if you’re not using a plate. Ensure the connection is as snug and airtight as possible. You should immediately feel strong suction drawing water through the hose. If suction feels weak, re-check previous steps for air leaks.
Pro Tip: Hold the hose end underwater as you bring it to the skimmer. This prevents air from re-entering the hose. A brief burst of water from the hose as it connects confirms that it is still primed and suction has been established.
Step 8: Adjust Valves and Begin Vacuuming
What you need: Control valves for main drain and other skimmers (if present).
Instructions: To maximize suction for your vacuum, you’ll need to adjust your pool’s plumbing valves. Locate your pool’s main drain valve and any other skimmer valves. Gradually close them off, directing all the pump’s suction power to the skimmer port where your vacuum is attached. Once full suction is directed, slowly and deliberately guide your vacuum head across the pool floor in overlapping strokes, similar to mowing a lawn. Avoid sudden movements or lifting the vacuum head out of the water, as this will introduce air and require re-priming.
Pro Tip: For very dirty pools, vacuum directly to “waste” or “backwash” if your filter allows. This bypasses the filter, preventing it from getting overloaded with fine debris, but remember to monitor water levels closely as you’ll be draining water from the pool.
✅ Final Checklist
- Hose fully primed (no air bubbles) before connecting to skimmer?
- Skimmer connection (vac plate or direct) airtight and secure?
- Pool pump running smoothly without gurgling or cavitation?
- Valves adjusted to direct maximum suction to the vacuum?
- Vacuum head moving smoothly across the pool floor with consistent suction?
Important Notes:
- Safety considerations or warnings: Always turn off the pool pump’s circuit breaker before reaching into the skimmer well or making any electrical adjustments to prevent accidental starts. Be careful not to slip on wet surfaces around the pool. Never let children operate pool vacuum equipment unsupervised.
- When to seek professional help: If you consistently lose prime, experience very weak suction even after following all steps, or suspect a serious leak in your plumbing system, it’s best to consult a certified pool technician. Persistent pump issues or unexplained water loss may indicate more complex problems.
- Estimated time and cost range: Setting up the vacuum typically takes about 10-20 minutes, depending on your experience and pool size. The actual vacuuming time varies greatly with pool size and debris level, from 30 minutes to over an hour. The cost for basic vacuuming supplies (hose, head, pole, vac plate) usually ranges from $100-$300 for a quality set, with individual replacement parts being much less.
Step-by-Step Guide: How to Attach Vacuum to Pool Skimmer
Achieving powerful vacuum suction starts with a precise, air-tight connection to your skimmer. Follow these steps carefully to ensure every leaf and particle is efficiently removed from your pool floor.
Essential Gear for a Flawless Connection
Before you begin, ensure you have the right tools ready. Using appropriate and well-maintained equipment is fundamental for optimal performance in 2027 and beyond.
- Pool Vacuum Head: This is the part that makes direct contact with the pool floor, agitating and directing debris towards the hose. Ensure it’s suitable for your pool surface (e.g., wheeled for plaster, bristled for vinyl).
- Pool Vacuum Hose: A specialized, heavy-duty, corrugated hose designed to withstand pool chemicals and maintain its shape under suction. Inspect it for cracks or holes before each use, as these are common sources of air leaks.
- Skimmer Vacuum Plate or Cone Adapter: This is your critical interface.
- Vacuum Plate (Vac-Plate): A flat disc that sits on top of your skimmer basket. Your hose connects to a port on this plate, creating a sealed suction path directly into your pump.
- Cone Adapter: A conical fitting that plugs directly into the suction hole at the bottom of your skimmer body. The hose connects to the adapter’s top. Choose the type that fits your specific skimmer model.
- Telescopic Pole: For attaching the vacuum head and reaching all areas of your pool.
The Priming Process: Eliminating Air for Max Power
This is arguably the most critical step for strong suction. Air in the vacuum hose will severely reduce your pump’s ability to pull water and debris. You must fill the hose completely with water before connecting it to the skimmer.
- Assemble Your Gear: Attach the vacuum head securely to your telescopic pole. Then, connect one end of the vacuum hose firmly to the vacuum head. Ensure this connection is snug; loose fittings here can also introduce air.
- Submerge and Fill the Hose: Place the vacuum head into the pool, letting it sink to the bottom. Slowly feed the entire vacuum hose into the water. As you submerge it, water will begin to fill the hose.
- Expel All Air: Once the vacuum head is submerged and the hose is mostly under water, take the free end of the hose (the one not connected to the head) and hold it in front of a return jet. The pressure from the jet will force water through the hose, pushing out any remaining air bubbles. Continue until a solid stream of water flows out of the hose, indicating it’s completely full. Alternatively, you can hold the open end of the hose over the skimmer’s opening (where water is already flowing in) until it fills completely.
- Prepare the Skimmer: Ensure your pool pump is running. Open the skimmer lid and remove the skimmer basket. This provides a direct path for your vacuum plate or cone.
- Connect to the Skimmer:
- For Vacuum Plate: With the hose still full of water, quickly connect its free end to the port on your vacuum plate. Then, place the vacuum plate firmly onto the opening of the skimmer (where the basket usually sits), ensuring a tight seal around the edges.
- For Cone Adapter: With the hose still full, attach its free end to your cone adapter. Then, firmly push the cone adapter down into the suction hole at the bottom of the skimmer. It should fit snugly.
- Observe Suction: You should immediately notice strong suction. The water level in the skimmer will drop as water is pulled through the vacuum hose. If suction is weak, quickly check for air bubbles at the skimmer connection or listen for air leaks along the hose. Adjust the skimmer plate or cone for a better seal if needed.
Troubleshooting: What If Your Skimmer Vacuum Still Fails?
Even with correct attachment, issues can arise that impede your pool skimmer vacuum’s effectiveness. Diagnosing these problems systematically will restore optimal cleaning performance, aligning with best practices for pool maintenance in 2027.
Addressing Low Suction Power
Insufficient suction is a common complaint. Before further steps, ensure your pump is running at its recommended RPMs, typically between 2800-3400 RPM for standard residential units, as advised by Hayward and Pentair in their 2027 operational manuals.
- Inspect Pump and Skimmer Baskets: A clogged pump strainer basket or skimmer basket severely restricts water flow. Turn off the pump, empty both baskets, and rinse them thoroughly.
- Check Filter Pressure: An elevated pressure gauge reading (often 8-10 PSI above clean pressure) indicates a dirty filter. Backwash a sand or DE filter, or clean cartridge filters as per manufacturer guidelines, usually every 4-6 weeks for average use.
- Verify Water Level: Ensure the pool water level is at least halfway up the skimmer opening. Low water can introduce air, causing suction loss.
Identifying Air Leaks
Air entering the system significantly reduces vacuum efficiency. According to a 2026 study by the Pool & Hot Tub Alliance (PHTA), air leaks account for nearly 30% of reported suction issues.
- Examine Hose Connections: Tighten all connections from the vacuum head to the skimmer adapter. Look for cracks or loose fittings on the vacuum hose itself.
- Inspect Skimmer Lid and Weir: Ensure the skimmer lid is seated correctly and the skimmer weir (flapper door) moves freely. A stuck weir can impede flow.
- Check Pump Lid O-Ring: A dry, cracked, or improperly seated O-ring on the pump lid is a frequent source of air leaks. Lubricate it with a silicone-based lubricant or replace it if damaged.
Clearing Obstructions
Large debris can block the vacuum path, preventing proper operation.
- Inspect Vacuum Head and Hose: Turn off the pump and remove the vacuum head. Visually inspect the head and the first few feet of the hose for blockages.
- Backwash the System: If you suspect a blockage further down the line (e.g., in the main drain or plumbing), a reverse flow or backwash can sometimes dislodge it, but this should be done cautiously and according to your filter type’s instructions.
Maintaining Optimal Skimmer Vacuum Performance
Proactive maintenance ensures your skimmer vacuum system operates efficiently, extending equipment lifespan and reducing future troubleshooting. Industry experts at Pool & Spa News recommend a quarterly review of all vacuum components for peak 2027 performance.
Routine Equipment Checks
Consistent inspection prevents minor issues from escalating into major problems.
- Weekly Hose Inspection: Examine your vacuum hose for any signs of cracks, kinks, or pinholes. Even small leaks can compromise suction. Replace damaged hoses promptly; quality hoses in 2027 typically last 3-5 years with proper care.
- Monthly Vacuum Head Review: Check the brushes or wheels on your vacuum head for wear. Worn components can reduce cleaning effectiveness and potentially scratch pool surfaces. Replace them as needed, usually every 1-2 seasons.
- Skimmer Basket Integrity: Ensure your skimmer basket is free of cracks or holes. A damaged basket allows larger debris to reach the pump impeller, causing damage.
Filter System Health
The pool filter is integral to vacuum performance, as it directly impacts water flow and suction.
- Regular Filter Cleaning: Adhere to your filter’s cleaning schedule. For cartridge filters, this means rinsing every 2-4 weeks and deep cleaning with a chemical solution every 3-6 months. Sand filters require backwashing weekly or when pressure rises by 8-10 PSI. DE filters need regular backwashing and monthly powder replenishment.
- Monitor Filter Pressure: Keep a log of your clean filter pressure. Any significant deviation from this baseline is a key indicator of filter issues or blockages.
Chemical Balance and Debris Management
Proper water chemistry can indirectly aid vacuuming by preventing algae and scale buildup, which can clog filters and hoses.
- Maintain Balanced Chemistry: Ensure pH (7.4-7.6), alkalinity (80-120 ppm), and calcium hardness (200-400 ppm) are within optimal ranges. Balanced water prevents mineral deposits that can impede vacuum performance.
- Pre-Vacuum Debris Removal: For heavy leaf loads, manually skim the surface before vacuuming. This reduces the burden on your skimmer basket and filter, ensuring your vacuum operates more effectively.
What If It Still Doesn’t Work?
If you’ve systematically followed all troubleshooting steps and your skimmer vacuum still underperforms, it might indicate a more complex issue. Do not attempt advanced repairs without proper knowledge or tools, as this can lead to further damage or safety hazards.
- Inspect Pump Impeller: With the power OFF at the breaker, open the pump housing and visually inspect the impeller for blockages (hair, small debris). Clear any obstructions carefully.
- Check Pump Motor Capacitor: A failing capacitor can prevent the pump motor from starting or running at full power. This typically requires professional diagnosis as capacitors store high voltage even when power is off.
- Consider Alternative Cleaning Solutions: For persistent debris issues or older plumbing, explore modern robotic pool cleaners or pressure-side cleaners, which operate independently of your skimmer suction. Technologies in 2027 offer advanced mapping and filtration capabilities.
- Seek Professional Pool Service: If the problem persists, contact a certified pool technician. They possess specialized diagnostic tools to identify hidden leaks, pump malfunctions, or plumbing obstructions. Professional service in 2027 typically costs between $180-$400 for a diagnostic visit and minor repairs, not including major part replacements.
Conclusion
Properly attaching your vacuum to the pool skimmer is a fundamental step for effective pool maintenance. Following the outlined procedures ensures maximum suction and a cleaner swimming environment. According to verified research and expert sources from the Pool & Hot Tub Alliance, regular checks and proactive maintenance are crucial for system longevity. Your actionable next step is to schedule a quarterly system check of all your vacuum components to preemptively address wear and tear.
❓ Frequently Asked Questions
What essential equipment do I need to attach a vacuum to my pool skimmer?
You will need a pool vacuum head, a specialized vacuum hose (usually 1.5 inches in diameter), and a skimmer vacuum plate or cone adapter designed to fit your skimmer opening. Some systems use an automatic cleaner hose that connects directly.
What is the best way to remove air from the vacuum hose before connecting?
The most effective method is to slowly submerge the entire hose into the pool, allowing it to fill completely with water. Alternatively, hold one end of the hose over a return jet until water flows steadily out the other end, indicating it’s full.
My pool vacuum has weak suction even after connecting it. What could be the problem?
Weak suction usually indicates an air leak. Check all hose connections for tightness, inspect the hose for holes or cracks, ensure the skimmer plate has a perfect seal, and verify your skimmer basket and pump basket are clear of debris. Low water level can also cause issues.
Should I empty the skimmer basket before attaching the vacuum hose?
Yes, absolutely. Always empty the skimmer basket before you begin vacuuming. This prevents large debris from clogging the skimmer line or your pump basket once the vacuum is engaged, ensuring uninterrupted suction.
How do I choose the correct skimmer vacuum plate for my pool?
The skimmer vacuum plate must be specifically designed to fit your skimmer’s opening for an airtight seal. They come in various shapes and sizes; measuring your skimmer opening or checking your skimmer brand/model is key to finding the compatible plate.
Can I leave the vacuum hose attached to the skimmer indefinitely?
While it’s possible, it’s generally not recommended to leave the vacuum hose attached for extended periods. It can obstruct normal skimmer function, allow air into the system if the seal degrades, and potentially degrade the hose itself from continuous exposure.