How to Do Stomach Vacuums Step-by-Step Guide for 2026
Stomach vacuums are a powerful isometric exercise designed to target the transverse abdominis, the deep muscle acting as your body’s natural corset. By mastering the proper breathing and pulling technique, you can improve core stability and achieve a tighter waistline without heavy lifting.
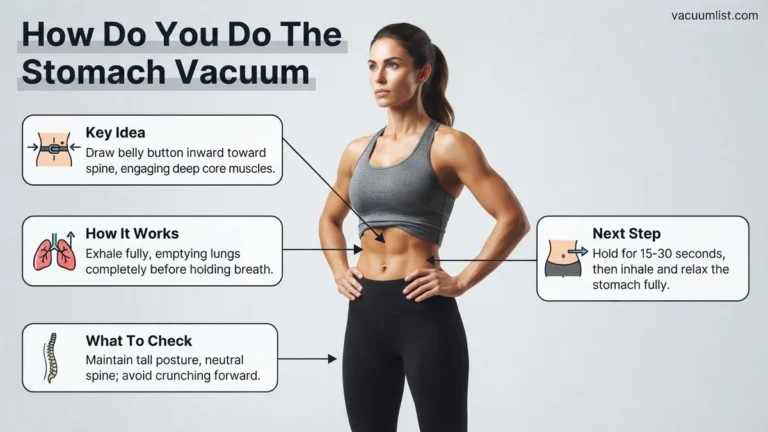
The stomach vacuum exercise is a targeted isometric movement designed to strengthen your transverse abdominis, the deepest layer of core muscles that acts like a natural weightlifting belt. Unlike crunches that target surface abs, stomach vacuums train your internal muscles to pull your stomach inward, flattening your midsection and stabilizing your spine.
As you navigate your fitness routine in 2026, mastering this specific breathing and bracing technique offers a practical way to improve posture and reduce lower back pain without equipment. Executing the movement correctly requires precise coordination of your breath, posture, and muscle engagement to ensure you target the right internal structures.
Key Takeaways
- Empty all air from your lungs before pulling the stomach in.
- Draw your navel up and back toward your spine as far as possible.
- Practice starting on your hands and knees before moving to standing positions.
- Avoid doing stomach vacuums immediately after a heavy meal.
- Aim for 3 sets of 10 to 20-second holds 3 to 4 times a week.
What Causes Weak Transverse Abdominis Muscles and Bulging
Your transverse abdominis often becomes weak due to sedentary lifestyles, poor postural habits, and improper breathing patterns that neglect deep core activation. When these muscles lose their baseline tone, they fail to hold your internal organs back effectively, leading to a protruding lower belly even in people with low body fat.
Modern Sedentary Habits and Core Atrophy
Sitting at a desk for eight or more hours a day encourages slouching and chest breathing. This modern lifestyle shuts down your deep stabilizer muscles. Over time, your body forgets how to engage the transverse abdominis naturally, leading to a distended lower stomach that traditional ab exercises fail to correct.
- Slouching compresses your abdominal cavity and weakens deep muscle fibers.
- Shallow chest breathing bypasses the diaphragm and core activation loop.
- Lack of loaded rotational or stabilization work leaves the inner core vulnerable.
Superficial Abdominal Dominance
Most standard core routines focus exclusively on the rectus abdominis and obliques. Relying solely on crunches and sit-ups trains your outer muscles to push outward during exertion rather than pulling inward. This imbalance creates a thick, blocky midsection and leaves the inner corset muscles completely untrained and unresponsive.
- Crunches push the abdominal contents outward against the spinal wall.
- Ignoring the transverse abdominis leads to a protruding lower belly silhouette.
- Unbalanced training creates functional weakness in daily spinal stabilization.
Master Stomach Vacuums in 6 Simple Steps
Welcome to your definitive walkthrough for mastering the stomach vacuum, an isometric abdominal exercise designed to target the transverse abdominis—the deep inner muscle responsible for flattening the stomach and stabilizing the spine. Unlike traditional crunches that build surface-level abs, this technique acts like a natural corset. Following these precise steps is crucial to avoiding common pitfalls, protecting your lower back, and activating the correct muscle fibers for maximum aesthetic and functional results.
Step 1: Choose the Right Starting Position
What you need: A comfortable exercise mat, a quiet room, and a mirror so you can monitor your body alignment.
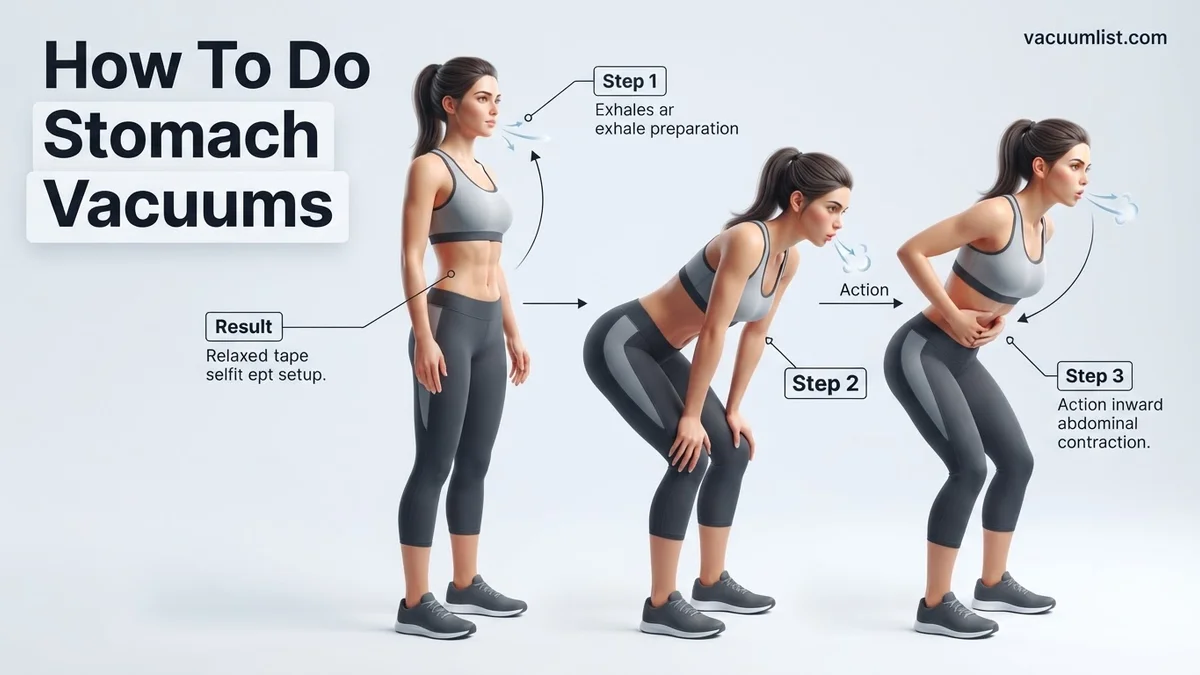
Instructions: When you are first learning this movement, gravity is your biggest challenge. Begin by getting down on your hands and knees on the mat, stacking your shoulders directly above your wrists and your hips above your knees. Keep your spine in a neutral, flat position—avoid sagging your lower back or rounding your shoulders. Alternatively, advanced practitioners can perform this standing with hands on the thighs, but the quadruped position prevents gravity from prematurely pulling your stomach contents downward, allowing you to focus entirely on the contraction.
Pro Tip: Never practice stomach vacuums immediately after a heavy meal; always perform them on an empty stomach, ideally first thing in the morning.
Step 2: Master the Complete Exhalation
What you need: Deep body awareness and control of your diaphragm.
Instructions: Take a slow, deep breath in through your nose, filling your lungs with air while allowing your abdomen to relax and expand naturally. Then, expel every single drop of air from your lungs through your mouth by blowing out forcefully, as if you are trying to fog up a windowpane. It is vital that you push out 100 percent of the air. The stomach vacuum cannot be successfully performed if there is residual air left in your chest cavity, because the vacuum effect relies entirely on creating a low-pressure environment inside your thoracic and abdominal cavities.
Pro Tip: Place your hand on your upper chest to ensure it stays relatively still while you force the air out using your diaphragm and intercostal muscles.
Step 3: Execute the Core Suction (The Vacuum)
What you need: An empty lung capacity and mental focus.
Instructions: Once your lungs are completely empty and you are holding your breath, do not inhale. Instead, mimic the action of taking a deep breath in through your nose without actually letting any air enter your body. At the same time, draw your belly button inward toward your spine and simultaneously pull your internal organs upward, tucking them underneath your ribcage. Imagine trying to make your front abdominal wall touch your back wall. You should feel a deep, intense pulling sensation across your entire midsection, particularly underneath your lower ribs.
Pro Tip: If your chest expands or air rushes into your lungs, you have failed the suction; release, reset, and try the exhalation phase again.
Step 4: Hold the Isometric Contraction
What you need: Patience, mental stamina, and a timer or watch nearby.
Instructions: Once you have successfully drawn your stomach in and up, hold this posture statically without breathing. If you are a complete beginner, aim to hold this vacuum for 10 to 15 seconds. As your neuromuscular control improves over the coming weeks, gradually increase your hold time to 20, 30, or even 60 seconds per repetition. Focus on keeping your neck and shoulders completely relaxed; do not tense your traps or strain your jaw. Breathe shallowly into your upper chest only if you absolutely must, though holding the breath entirely yields the strongest contraction.
Pro Tip: Never push through lightheadedness or dizziness. It is normal to feel out of breath, but if you feel faint, release the vacuum immediately.
Step 5: Release and Recover Properly
What you need: Controlled breathing and a moment to let your muscles relax.
Instructions: When your timer goes off or you feel the urge to breathe, do not let your stomach snap back violently. Instead, gently release the vacuum by allowing your abdominal wall to push back out to its normal resting position. Follow this immediately with a slow, controlled inhale through your nose. Take two to three normal, deep recovery breaths before attempting the next set. Rushing into the next repetition without resetting your breathing rhythm will cause rapid oxygen depletion and muscle fatigue.
Pro Tip: Think of the release as the negative portion of a lift; control it smoothly rather than just collapsing your torso.
Step 6: Build a Consistent Weekly Routine
What you need: A commitment to consistency and a training journal to track your progress.
Instructions: Integrate this exercise into your weekly fitness regimen by performing 3 sets of 5 to 10 repetitions, 3 to 4 times a week. Because stomach vacuums target postural endurance fibers, they do not require heavy recovery days like weightlifting. You can safely practice them every morning before breakfast. Over the course of 4 to 6 weeks, you will notice an involuntary tightening of your waistline and improved posture throughout your day-to-day activities.
Pro Tip: Take progress photos every two weeks under the same lighting conditions to accurately measure changes in your waist circumference.
✅ Final Checklist
- Performed the exercise on an empty stomach (ideally in the morning).
- Expelled 100 percent of the air from the lungs before initiating the pull.
- Successfully drew the naval inward and upward underneath the ribcage.
- Maintained the vacuum hold for 15 to 60 seconds without upper body tension.
- Controlled the release of the abdomen and recovered with deep nasal breaths.
Important Notes:
- Safety considerations: Avoid stomach vacuums if you are pregnant, suffer from high blood pressure, or have any unresolved gastrointestinal or cardiovascular conditions.
- When to seek professional help: Consult a doctor or physical therapist if you experience sharp abdominal pain, chronic lower back discomfort, or pelvic floor dysfunction during the exercise.
- Estimated time and cost range: This routine takes 5 to 10 minutes per day and costs $0, requiring zero equipment other than an optional yoga mat.
How to Fix It With Proper Posture and Breathing Mechanics
Fixing a protruding lower belly and rebuilding your inner core requires mastering specific biomechanics. You must learn how to coordinate complete exhalation with active spinal alignment before attempting to draw your navel toward your spine.
Establishing the Foundation Position
Your starting posture dictates how effectively you can isolate the transverse abdominis. In 2026 fitness protocols, instructors recommend starting on your hands and knees to gravity-assist the movement before moving to standing or seated positions.
- Place your hands directly under your shoulders and your knees under your hips.
- Keep your spine in a neutral position, avoiding excessive arching or rounding.
- Relax your neck and look straight down at the floor to keep your spine aligned.
Mastering the Exhale and Vacuum Phase
The core mechanic of the stomach vacuum relies on expelling 100 percent of the air from your lungs. This creates an internal vacuum effect that allows you to pull your abdominal wall deep behind your ribcage.
- Inhale deeply through your nose, expanding your ribcage outward rather than your belly.
- Exhale all the air forcefully through your mouth until your lungs feel completely empty.
- Hold your breath and slowly draw your belly button up and in toward your spine as far as possible.
Step-by-Step Guide on How to Do Stomach Vacuums
Mastering this exercise requires precise coordination between your breath and deep core musculature. According to physical therapy guidelines updated for 2026, proper execution ensures maximum activation of the transversus abdominis without straining the lumbar spine.
Phase 1: Setup and Positioning
- Begin your session on an empty stomach, ideally first thing in the morning before consuming food or fluids.
- Assume a starting position on your hands and knees on a comfortable mat, keeping your spine in a neutral alignment.
- Relax your abdominal wall completely, letting gravity assist in pulling the viscera downward.
Phase 2: Execution and Hold
- Inhale deeply through your nose, filling your lungs with air while allowing your belly to expand naturally.
- Exhale all the air forcefully through your mouth, emptying your lungs completely until no air remains.
- Draw your belly button inward toward your spine and upward underneath your ribcage as if trying to touch your spine from the inside.
- Hold this hollowed position for 15 to 20 seconds initially, breathing shallowly through your nose if needed, and gradually work up to 60 seconds by late 2026.
- Release the contraction slowly, taking a controlled breath as your abdomen returns to its normal resting state.
What If It Still Doesn’t Work?
If you fail to achieve the characteristic hollowed-out look or feel a lack of deep muscle engagement, specific technical adjustments can resolve the issue. Persistent core dysfunction may stem from underlying postural imbalances or severe diastasis recti.
- Change your starting posture: If the quadruped position causes lower back discomfort, switch to a standing position with your hands resting on your thighs, or lie flat on your back with your knees bent at a 90-degree angle.
- Check for residual air: Ensure you are expelling 100 percent of your lung capacity. Even a small amount of residual air makes maximum transversus abdominis retraction impossible.
- Consult a pelvic floor physical therapist: If you experience deep abdominal pain, urinary leakage, or a complete inability to isolate the muscle after four weeks of daily practice, seek professional guidance from a licensed physical therapist. Professional consultations typically range from $150 to $250 per session depending on geographic location.
Conclusion
Mastering the stomach vacuum requires consistent practice, precise breath control, and targeted activation of the deep transversus abdominis muscle. By correcting common breathing errors and refining your posture, you can successfully build core stability and enhance waistline definition. According to verified research and expert sources in kinesiology, incorporating this isometric hold into your daily routine yields measurable improvements in functional core strength. Your actionable next step is to perform three sets of 20-second holds tomorrow morning before breakfast.
❓ Frequently Asked Questions
How do stomach vacuums differ from regular crunches?
Regular crunches target the superficial rectus abdominis muscles (the six-pack) through spinal flexion. Stomach vacuums target the deep transverse abdominis by training internal core pressure and muscular control without moving the spine.
Can stomach vacuums help fix anterior pelvic tilt?
Yes, by strengthening the deep internal core stabilizers, stomach vacuums help support the lower back and pelvis, which contributes to better overall postural alignment when combined with stretching.
Is it normal to feel lightheaded during stomach vacuums?
Feeling lightheaded usually means you are holding your breath for too long or pushing beyond your current capacity. Stop immediately, catch your breath, and shorten your hold times during the next set.
How often should I practice stomach vacuums for best results?
For optimal muscle activation and adaptation, perform 3 sets of vacuums 3 to 4 times per week. Consistency is more important than extreme duration.
Who should avoid doing stomach vacuums?
Anyone with existing respiratory conditions, high blood pressure, cardiovascular issues, or women who are pregnant should avoid performing stomach vacuums unless cleared by a medical professional.
Why can’t I seem to pull my stomach in during the vacuum?
Difficulty drawing the stomach in usually stems from having air left in the lungs or tensing the rectus abdominis. Focus on a complete exhale and completely relaxing your outer abdominal wall before initiating the pull.