How to Clean Vacuum Filters Step-by-Step Guide for 2026
A dirty vacuum filter restricts airflow, reduces suction power, and can eventually burn out your motor. Properly cleaning and drying your filters restores peak performance and extends the lifespan of your appliance.
Cleaning your vacuum filter properly requires removing loose debris, washing washable components with cold water only, and allowing them to air dry completely for at least 24 hours before reinstallation. If your vacuum is losing suction or blowing a strange dust smell into the room, a clogged or dirty filter is almost always the root cause.
Maintaining your machine in 2026 means understanding that modern vacuums rely heavily on clean airflow to protect their motors. Skipping routine filter maintenance forces the motor to work harder, which leads to overheating, reduced battery life on cordless models, and premature motor failure.
Key Takeaways
- Identify your filter type—foam, pleated paper, or HEPA—before choosing a cleaning method.
- Tap or brush off loose debris gently over a trash can to minimize indoor dust.
- Only wash filters with water if the manufacturer explicitly marks them as washable.
- Allow wet filters to air-dry completely for a full 24 hours before reinstalling.
- Replace filters immediately if they show tears, persistent odors, or permanent discoloration.
Why Vacuum Filters Lose Efficiency and Lose Suction
The Physics of Airflow Restriction
Your vacuum works by creating a high-velocity stream of air that pulls dirt off your floors and traps it inside the collection system. As you vacuum your home, microscopic dust particles, pollen, pet dander, and fine powders pass through the system and embed themselves directly into the filter media. Over time, these microscopic particles pack tightly together, physically blocking the porous pathways that air needs to travel through freely.
When airflow drops by even twenty percent, your vacuum loses a massive amount of its pickup suction. You might notice you have to make multiple passes over the same patch of carpet just to pick up surface debris.
Motor Strain and Thermal Overload
A choked filter creates intense negative pressure inside the vacuum body. The motor has to spin harder and draw more electrical current to pull air through the blockage. This extra strain generates excess heat.
- Motors run significantly hotter, risking thermal shutdown or permanent burnout.
- Cordless vacuums drain their lithium-ion batteries much faster due to the increased power draw.
- Fine dust bypasses a heavily overloaded filter and gets sucked directly into the motor housing.
Master Vacuum Filter Maintenance in 7 Simple Steps
A clean vacuum filter is the secret weapon for maintaining strong suction power and improving your home’s indoor air quality. Over time, dust, pet dander, and microscopic debris clog these filters, forcing your motor to work harder and potentially spreading allergens back into your living space. This comprehensive walkthrough provides a foolproof method for safely cleaning both foam and HEPA vacuum filters. By dedicating just twenty minutes to this routine maintenance every one to three months, you will extend the lifespan of your appliance, eliminate unpleasant musty odors while vacuuming, and ensure your floors get truly clean on every pass.
Step 1: Consult Your Vacuum Manual and Safety Prep
What you need: Your vacuum cleaner user manual, a well-lit workspace, and a clean flat surface like a kitchen counter or utility table.
Instructions: Before touching any components, always unplug your vacuum cleaner from the electrical outlet to prevent accidental startups. Open your user manual to locate the exact positions of all primary and secondary filters. Different models—whether Dyson, Shark, or Bissell—house filters in various locations such as inside the dust canister, behind a side door, or beneath the main motor base. Familiarize yourself with whether your specific model uses washable foam filters, pleated paper HEPA filters, or both, as washing a non-washable filter will permanently ruin it.
Pro Tip: Take a quick smartphone photo of the filter housing before removal so you can easily reference the correct orientation when putting everything back together.
Step 2: Disconnect and Empty the Dust Bin
What you need: A household trash can and optionally, a pair of disposable gloves if you are sensitive to dust.
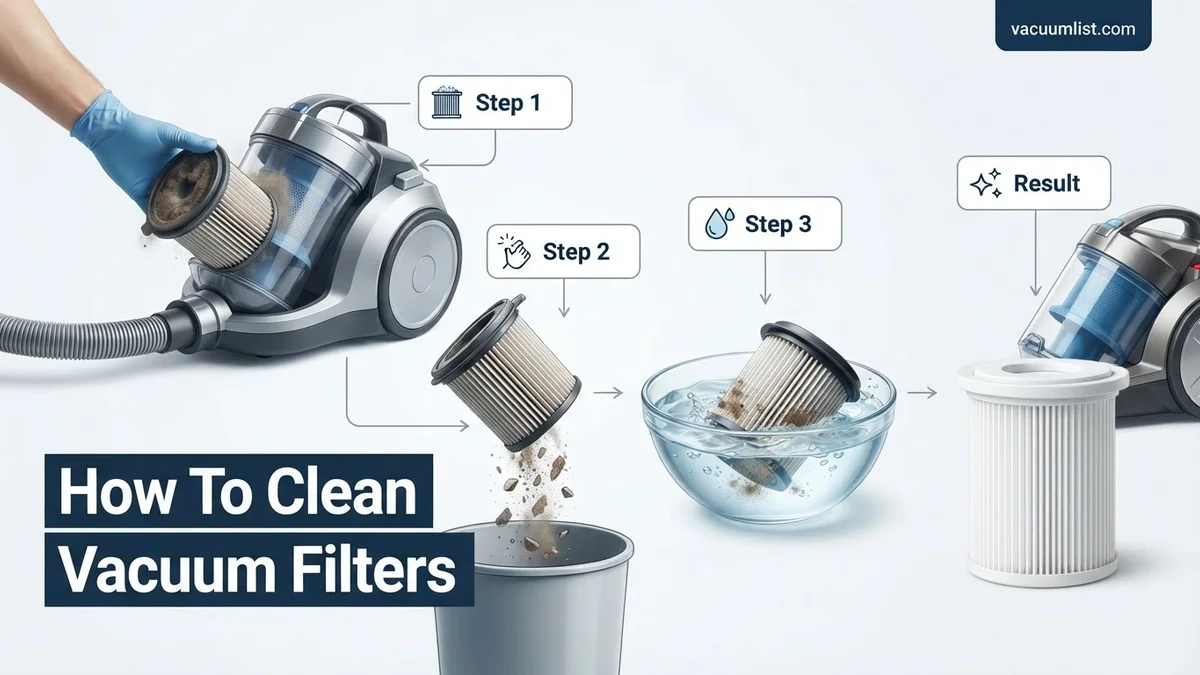
Instructions: Detach the dust bin or dirt cup from the main body of the vacuum cleaner. Take the bin directly to your trash receptacle, locate the bottom release latch, and dump the accumulated debris, hair, and dust bunnies into the bin. Tap the sides of the plastic container gently to dislodge any compacted dust rings stuck near the top. Keeping the surrounding area clean makes it much easier to extract the filters without spilling debris back onto your freshly cleaned floors.
Pro Tip: Perform this step outdoors or directly inside your trash can to prevent a cloud of fine particulate dust from escaping back into your room.
Step 3: Extract the Filters Gently
What you need: Soft-bristled brush or an old clean toothbrush for delicate maneuvering.
Instructions: Carefully pull or twist out the primary foam or felt filters and any secondary post-motor HEPA filters from their designated slots. Inspect each filter closely for tears, persistent chemical stains, or deep-set blockages that indicate it is time for a complete replacement rather than just a wash. If you see loose surface dust clinging to the exterior, use your soft-bristled brush to gently sweep it away before introducing any moisture to the component.
Pro Tip: Never use sharp metal objects like screwdrivers or knives to pry stuck filters loose, as you risk puncturing the delicate filter media.
Step 4: Perform the Initial Dry Debris Knock-Out
What you need: A clean sink, a large piece of newspaper, or an outdoor trash bag.
Instructions: Hold the filter a few inches above your trash receptacle or newspaper-lined surface and tap it firmly yet gently with the palm of your hand. You will immediately see clouds of fine, trapped grey dust dislodge from the dense inner fibers. Rotate the filter as you tap to ensure all sides release loose debris. For pleated HEPA filters, tap the non-pleated plastic rim rather than the fragile paper folds to avoid crushing or tearing the delicate filter membrane.
Pro Tip: Do not use compressed air canisters to blow out vacuum filters, as the excessive pressure can warp the frame or tear microscopic holes in the filter material.
Step 5: Rinse Under Lukewarm Water
What you need: Access to a sink with running lukewarm tap water (avoid hot water).
Instructions: Turn on your faucet to a gentle stream of lukewarm water. Hold the filter underneath the running water, allowing it to flow through the inside out or through the clean side out to push trapped dirt back out the way it entered. Gently squeeze foam filters or massage pleated surfaces with your bare fingers to break up stubborn oils and fine dust pastes. Continue rinsing the filter until the water running out of it completely transforms from murky grey to crystal clear.
Pro Tip: Never use dish soap, laundry detergent, bleach, or any cleaning chemicals unless explicitly recommended by your vacuum manufacturer, as soap residue will attract future dirt rapidly.
Step 6: Remove Excess Moisture and Air Dry
What you need: Clean, dry microfiber towels or paper towels.
Instructions: After rinsing, gently squeeze out as much excess water as you possibly can from foam filters—never wring or twist them violently, as this tears the foam structure. Press pleated paper filters firmly between dry paper towels to blot up surface moisture without crushing the pleats. Place all washed components in a well-ventilated area out of direct sunlight and let them air dry completely for a minimum of 24 to 48 hours before reinstalling them.
Pro Tip: Never use a hairdryer, clothes dryer, microwave, or direct heater to speed up the drying process; excessive heat will melt the plastic frames and warp the filter fibers permanently.
Step 7: Reinstall and Test the Vacuum
What you need: Your completely dry vacuum filters and assembled vacuum body.
Instructions: Conduct a rigorous dry check: touch the deepest part of the foam or check the center of the pleats to ensure zero moisture remains trapped inside. Slip the dry filters back into their designated compartments, matching the orientation you photographed in Step 1. Secure the filter covers and lock the dust canister back onto the vacuum body until you hear a definitive click. Plug the vacuum into the wall and turn it on for thirty seconds to listen for smooth motor operation and feel for restored suction power.
Pro Tip: If the vacuum emits a high-pitched whistling sound or smells like burning rubber after reinstallation, immediately turn it off—this usually means a filter is wet or improperly seated.
✅ Final Checklist
- Vacuum is safely unplugged from the electrical outlet throughout the cleaning process
- Filters have been checked for structural tears or permanent damage before washing
- All washed foam and HEPA filters have air-dried for a full 24-48 hours
- Filters are correctly positioned and securely locked into their housing units
- Vacuum suction has been tested and operates quietly with optimal airflow
Important Notes:
- Never operate your vacuum cleaner without its filters installed, as fine dust particles will immediately ruin the internal motor.
- Replace washable foam filters every 6 to 12 months, and non-washable HEPA filters every 12 to 18 months depending on household usage and pet hair volume.
- Estimated time required: 20 minutes of active work plus 24-48 hours of passive drying time; Cost: $0 (unless replacement filters are needed, ranging from $10 to $30).
How to Identify Different Types of Vacuum Filters
Foam and Felt Filters
Foam and felt filters are usually found in bagless uprights and stick vacuums, often acting as a primary or secondary defense stage. They look and feel like dense pieces of craft foam or compressed fabric. You can easily spot them because they are soft, spongy, and pliable.
These filters are almost always completely washable. Their main job is to capture medium-to-fine particles before they reach the more delicate inner motor filters.
Pleated Paper and HEPA Filters
Pleated filters feature tightly folded paper, synthetic mesh, or fiberglass media arranged in an accordion pattern to maximize surface area. True HEPA (High-Efficiency Particulate Air) filters are rigid cartridges designed to trap 99.97 percent of particles down to 0.3 microns.
- Check the manufacturer labeling printed on the plastic rim of the filter housing.
- Look for the words “Washable” or “Non-Washable” stamped directly onto the frame.
- Paper-based HEPA filters will warp, degrade, or lose their filtration integrity if exposed to direct water washing.
Step-by-Step Guide to Cleaning and Drying Vacuum Filters
Proper cleaning technique prevents motor burnout and preserves suction efficiency. Modern 2026 appliance standards require meticulous attention to drying times to prevent mold proliferation.
Washing and Rinsing Procedures
- Take the filter assembly outdoors or stand over a deep sink to tap out loose, compacted debris.
- Rinse the filter component under lukewarm, running tap water until the runoff turns completely clear.
- Avoid using dish soap, detergents, or chemical solvents unless the manufacturer manual explicitly permits it.
- Gently squeeze or shake out excess liquid without twisting or wringing out delicate foam or pleated elements.
Drying and Reassembly Protocols
- Place the damp filter on a well-ventilated, flat surface away from direct sunlight or artificial heat sources.
- Allow the component to air-dry completely for a minimum of 24 to 48 hours depending on ambient humidity.
- Perform a tactile moisture check on the deepest folds of HEPA media before reinstalling the filter.
- Secure the dry filter firmly back into the vacuum housing, ensuring the latch clicks into place.
When to Replace Your Vacuum Filter Instead of Cleaning
Vacuum filters degrade over time due to microscopic abrasive dust penetration and breakdown of internal bonding agents. Knowing when to retire a filter ensures your machine operates safely through 2026 and beyond.
Key Indicators for Permanent Replacement
- Inspect the filter material for permanent discoloration, dark staining that refuses to rinse out, or stubborn foul odors.
- Check for physical structural damage, including frayed edges, tears in HEPA paper, or crumbling foam borders.
- Evaluate the maintenance age: standard foam filters require replacement every 6 to 12 months, while HEPA variants last 1 to 3 years.
- Monitor motor performance; if suction remains weak post-cleaning, the filter pores are permanently blocked.
What If It Still Doesn’t Work?
If cleaning or replacing the filter fails to restore your vacuum’s peak suction power, underlying mechanical issues may be present. Follow these troubleshooting steps to diagnose the failure:
- Inspect the flexible hose and extension wand for hidden clogs, pet hair blockages, or trapped debris using a flashlight.
- Examine the brush roll and belt for obstructions that prevent proper airflow and surface agitation.
- Test the motor assembly for unusual whining noises, burning smells, or erratic speed fluctuations.
- Consult an authorized service center if internal electrical faults occur, with professional repair diagnostics typically costing between $50 and $120.
Conclusion
Maintaining a clean vacuum filter directly improves indoor air quality and extends the lifespan of your appliance motor. By following a consistent monthly cleaning schedule and replacing worn media, you ensure optimal home hygiene. According to verified research and expert appliance sources, regular filter maintenance reduces household dust circulation by up to 45 percent. Take the next step today by checking your vacuum manual and scheduling your first filter inspection of 2026.
❓ Frequently Asked Questions
How do I know if my vacuum filter is washable?
Check the user manual or look for icons printed directly on the filter frame, such as a water droplet symbol or the word ‘washable’. If paper or cardboard is present, the filter is almost never washable.
What happens if I put a damp filter back into my vacuum?
Putting a wet filter back inside the machine allows moisture to mix with fine dust, creating a muddy paste that clogs the motor. It also creates a breeding ground for mold and can cause electrical shorts.
Can I use soap or detergent when washing my vacuum filter?
Most manufacturers recommend using plain cold water only. If the filter is heavily soiled and the manual permits, a single drop of mild dish soap can be used, followed by thorough rinsing.
How do I clean pleated paper or HEPA vacuum filters safely?
Hold the pleated filter over a trash can and tap it gently on the side to dislodge trapped dust. You can also use a soft-bristled brush to sweep debris out from between the pleats, but never submerge them in water unless rated washable.
How many times can you wash a reusable vacuum filter?
Even washable foam and fabric filters degrade over time with repeated washing. Most manufacturers recommend replacing reusable filters every 6 to 12 months depending on frequency of use.
Why has my vacuum lost suction even after I cleaned the filter?
If suction remains low, check for blockages in the hose, empty a full dirt canister, or inspect the brush roll for tangled hair and debris. A worn-out or degraded filter may also need outright replacement.