Can You Vacuum Ashes From Fireplace Can You Vacuum 2027
Never use a regular household vacuum to clean fireplace ashes. This poses severe fire risks from hidden embers and can permanently damage your vacuum’s motor and filters. Always opt for specialized ash vacuums or manual methods for safe and effective ash removal.
Let’s cut right to it: no, you absolutely should not use your regular household safety warnings”>vacuum cleaner to remove ashes from your fireplace in 2027. This isn’t just about preserving your vacuum; it’s about critical safety risks and maintaining a healthy indoor environment. Many homeowners understandably reach for the easiest tool, but the consequences of using a standard vacuum on fireplace ashes can range from severe damage to your appliance to creating a dangerous fire hazard within your home, not to mention significant health concerns from airborne particulate matter. Understanding these dangers is crucial before you attempt any ash cleanup.
The misconception that any vacuum can handle fine dust can lead to costly mistakes. Modern fireplaces, whether wood-burning or pellet, produce incredibly fine ash that behaves very differently from typical household dirt. As we move further into 2027, with advanced appliance designs and increasing awareness of indoor air quality, it’s more important than ever to use the right tools for the job. Attempting to vacuum fireplace ash with an unsuitable machine is a shortcut that simply isn’t worth the risk, posing a threat to your property, your health, and your wallet.
Key Takeaways
- Regular vacuums are dangerous for ash removal.
- Hidden embers cause serious fire hazards.
- Fine ash destroys vacuum motors and filters.
- Use a specialized ash vacuum for safety.
- Always dispose of ashes in metal containers.
What Causes the Danger: Why Regular Vacuums Fail with Fireplace Ash
The Invisible Fire Hazard
One of the gravest dangers of using a regular vacuum on fireplace ashes is the significant fire risk. Even hours, or sometimes days, after a fire appears to be out, tiny embers can remain hidden within the ash bed. These aren’t always visible to the naked eye. When your household vacuum’s powerful suction pulls these smoldering embers into its collection chamber or bag, it provides them with an immediate burst of oxygen. This rapid oxygenation can instantly reignite the embers, turning the vacuum’s contents into a dangerous fire. A vacuum bag full of highly combustible ash can quickly ignite, spreading flames to the vacuum itself and potentially to your home. Fire departments across the nation continue to report incidents caused by this very scenario, emphasizing that even a small, dormant ember is a potent threat.
Motor Mayhem and Air Contamination
- Motor Damage: Regular household vacuums are not engineered to handle the ultra-fine particulate nature of fireplace ash. Standard filters, even high-efficiency ones, are designed for common household dust, pet dander, and larger debris. Microscopic ash particles bypass these filters with alarming ease. Once past the filter, these abrasive particles are drawn directly into the vacuum’s motor, causing irreparable damage. They can grind down bearings, clog cooling vents, and quickly lead to motor burnout, rendering your expensive vacuum useless long before its expected lifespan in 2027.
- Clogged Filters and Reduced Suction: Even if some ash is initially caught, standard filters quickly become saturated and clogged. This leads to a dramatic loss of suction, making the cleaning task ineffective. The motor then works harder to compensate, increasing heat and further accelerating its demise.
- Air Contamination: Perhaps the most insidious risk is the dispersion of fine ash particles back into your home’s air. When ash bypasses filters or clogs them, the vacuum essentially acts as a powerful ash blower, distributing fine particulate matter (PM2.5 and smaller) throughout your living space. These airborne particles are significant respiratory irritants, contributing to poor indoor air quality. They can exacerbate asthma, allergies, and other respiratory conditions, posing a serious health risk to everyone in the household, particularly children and individuals with pre-existing lung issues.
How to Handle Fireplace Ashes Like a Pro: A Practical Walkthrough
Dealing with fireplace ashes is a necessary chore for anyone enjoying a cozy fire. However, there’s a common misconception that you can simply grab your household vacuum cleaner and suck them up. This guide will clarify why that’s a dangerous idea and provide a comprehensive, step-by-step approach to safely and effectively managing fireplace ashes. From understanding the risks to proper disposal, we’ll ensure you keep your home clean and, most importantly, safe.
Step 1: Understand the Risks of Regular Vacuums
What you need: An understanding of basic fire safety and household appliance limitations.
Instructions: Before even considering a vacuum, it’s crucial to understand why a standard household vacuum (like an upright, canister, or even most shop vacuums) is unsuitable and dangerous for fireplace ashes. These vacuums are not designed to handle fine, abrasive particles like ash, which can quickly clog or damage their filters and motors. More critically, even seemingly cold ashes can harbor live embers for days. The combination of fine dust, potential live embers, and the electrical components and plastic construction of a regular vacuum creates a significant fire hazard, capable of igniting the vacuum’s contents or even the appliance itself.
Pro Tip: Never, under any circumstances, use a household vacuum on fireplace ashes. The risk of fire, damage to your appliance, and spreading fine ash throughout your home far outweighs any perceived convenience. Always err on the side of caution.
Step 2: Assess Ash Condition and Temperature
What you need: Metal poker or shovel, flashlight, a keen eye, patience.
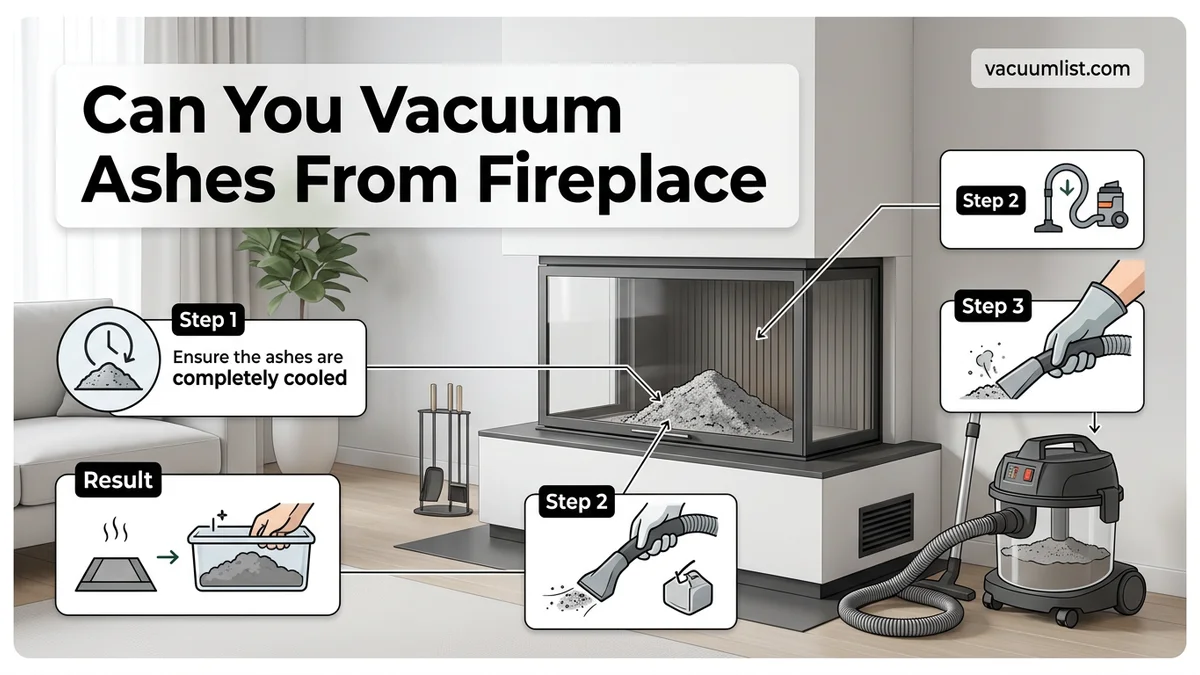
Instructions: The most critical step in ash removal is ensuring the ashes are completely cold. Wait a minimum of 24 to 72 hours after the last fire. Use a metal poker or shovel to carefully stir the ash bed, particularly checking beneath any larger logs or clumps, to expose any potential hidden embers. Use a flashlight to get a clear view into the darker corners of the firebox. Look for any faint glow, steam, or residual heat. Even small, deep-seated embers can reignite when exposed to oxygen. If you detect any warmth or see any glowing, do not proceed with ash removal; wait additional time.
Pro Tip: For absolute certainty, consider waiting 3 full days (72 hours) after your last fire, especially if you had a large or long-burning fire. If you have an infrared thermometer, a surface temperature reading below 90°F (32°C) across the entire ash bed provides extra assurance.
Step 3: Gather the Right Equipment
What you need: An ash vacuum (specifically designed for cold ashes), a metal ash bucket with a tight-fitting lid, a small metal shovel or trowel, heat-resistant gloves, an N95 dust mask, and safety glasses (optional but recommended).
Instructions: To safely vacuum ashes, you absolutely need an ash vacuum. These specialized devices feature an all-metal construction, a powerful motor designed to handle fine particulate matter, and fire-retardant HEPA or multi-stage filtration systems that prevent fine ash from escaping into your home. They also often come with metal hoses and nozzles. In addition to the ash vacuum, ensure you have a dedicated metal ash bucket with a secure lid for temporary storage, as even “cold” ashes should never be placed directly into plastic bags or bins. Heat-resistant gloves protect your hands, and an N95 dust mask prevents inhalation of fine ash particles.
Pro Tip: Do not confuse an ash vacuum with a shop-vac, even heavy-duty ones. Unless a shop-vac is explicitly rated and designed for cold ash collection with appropriate filtration and metal components, it carries the same risks as a household vacuum.
Step 4: Prepare the Work Area
What you need: Drop cloths or old newspaper, broom and dustpan, good ventilation (open windows/doors).
Instructions: Ash, even when carefully handled, is incredibly fine and can easily become airborne, settling on surfaces throughout your home. Before you begin, lay down old sheets, newspapers, or plastic drop cloths around the fireplace opening and extending several feet onto the floor. This will catch any spills and make cleanup much easier. Ensure the area immediately surrounding the fireplace is clear of any flammable items, rugs, or furniture. Briefly open windows or a door in the room to create some cross-ventilation, helping to dissipate any airborne dust, but avoid strong drafts that could stir up ashes excessively.
Pro Tip: If possible, temporarily remove any valuable or sensitive items from the room to prevent them from being coated in fine ash dust. A thorough preparation can save hours of dusting later.
Step 5: Manually Remove Bulk Ash and Larger Debris
What you need: Metal shovel or trowel, metal ash bucket with lid, heat-resistant gloves, dust mask.
Instructions: Don your dust mask and heat-resistant gloves. Using your metal shovel or trowel, carefully scoop the bulk of the cooled ash and any unburned wood chunks or debris from the firebox. Gently transfer these contents directly into your metal ash bucket. Avoid scraping too hard against the firebox floor, as this can create excessive dust. Aim to leave about a 1-inch (2.5 cm) layer of fine ash on the bottom of the firebox. This thin layer provides insulation for your next fire and helps to establish a good base for kindling. Be mindful not to overfill the ash bucket, leaving enough room for the lid to close securely.
Pro Tip: Leaving a small layer of ash can also protect the firebox floor from direct heat, extending its lifespan. If you regularly burn wood, this small base is beneficial.
Step 6: Vacuum Remaining Fine Ash with Ash Vacuum
What you need: Ash vacuum, dust mask, safety glasses.
Instructions: With the bulk of the ash removed, put on your dust mask and safety glasses. Connect the hose to your ash vacuum and ensure the filter is clean and properly seated. Turn on the ash vacuum and carefully insert the metal nozzle into the firebox. Systematically vacuum the remaining thin layer of ash, working from the back corners towards the front. Use gentle, sweeping motions to minimize stirring up dust. Pay attention to the crevices and corners where ash tends to accumulate. If you notice a significant drop in suction, turn off the vacuum, and gently tap the filter or perform the vacuum’s self-cleaning function (if equipped) to dislodge accumulated ash, then resume vacuuming.
Pro Tip: Don’t try to get every last particle. A perfectly sterile firebox isn’t necessary, and over-aggressive vacuuming just stirs up more dust. Focus on removing the main bulk that was left after manual scooping.
Step 7: Safely Dispose of Ashes
What you need: Metal ash bucket with lid, a designated safe outdoor location.
Instructions: Once you’ve finished vacuuming, turn off and unplug the ash vacuum. Carefully remove the vacuum’s canister and empty its contents into the metal ash bucket, which should already contain the bulk-removed ash. Securely place the lid on the metal ash bucket. Immediately transport the sealed ash bucket outdoors to a safe, non-combustible location. This should be at least 10 feet (3 meters) away from any structures, decks, woodpiles, or flammable materials. Let the ash bucket sit in this safe location for at least 48 to 72 hours, even if you are absolutely certain the ashes are cold. After this waiting period, the ashes can be safely disposed of in garden beds (they’re a good soil amendment in small quantities for acid-loving plants), a compost pile (again, in moderation), or your regular trash bin (still in a non-flammable container like a sturdy paper bag once truly cold).
Pro Tip: Never leave a sealed ash bucket directly on a combustible surface like a wooden deck or near a house. Even after days, a rogue ember could smolder and ignite its surroundings. Always choose a concrete pad, bare earth, or gravel area.
✅ Final Checklist
- Ashes were visually and tactilely verified as completely cold (minimum 24-72 hours wait time) before any removal?
- Only a specialized ash vacuum or manual scooping into a metal bucket was used for ash collection?
- All ashes (from both manual and vacuum removal) are securely stored in a metal ash bucket with a tight-fitting lid?
- The metal ash bucket is placed in a safe, outdoor, non-combustible location at least 10 feet from any structures or flammable materials?
- A dust mask and heat-resistant gloves were worn throughout the ash removal process?
Important Notes:
- Safety Considerations: Always assume ashes contain hidden embers, even days after a fire. Never use plastic containers for ash disposal. Wear appropriate personal protective equipment (PPE), including an N95 dust mask and heat-resistant gloves, to protect your lungs and hands from fine ash and potential heat. Ensure good ventilation to minimize inhalation of airborne particles.
- When to Seek Professional Help: If you notice unusual smells, excessive creosote buildup, or issues with your chimney’s draft, it’s best to contact a certified chimney sweep. While ash removal is DIY, chimney maintenance is a specialized skill.
- Estimated Time and Cost Range: A typical ash removal process using an ash vacuum should take between 15-30 minutes, depending on the amount of ash. The initial investment for an ash vacuum typically ranges from $50 to $150, and a good quality metal ash bucket with a lid costs approximately $20-$40. These are one-time costs for equipment that will last for many years with proper care.
How to Safely Fix Ash Buildup: Introducing the Specialized Ash Vacuum
Engineered for Extreme Conditions
The only truly safe and effective solution for cleaning fireplace ash is a specialized ash vacuum. These purpose-built appliances are meticulously designed to handle the unique challenges that fireplace ash presents. Unlike their household counterparts, ash vacuums feature durable, all-metal construction for their canisters, hoses, and nozzles. This isn’t merely for robustness; the metal components are inherently heat-resistant, ensuring that any lingering, albeit cooled, embers pose no structural threat to the vacuum itself. Crucially, ash vacuums are designed for use on cold ashes only. Their design takes into account the need for extreme durability against abrasive particles and potential thermal resistance, providing a secure and reliable way to remove fireplace debris without the risks associated with general-purpose vacuums. This specialized engineering makes them a critical tool for any fireplace owner in 2027.
Superior Filtration and Performance
- Multi-Stage Filtration Systems: Ash vacuums come equipped with sophisticated multi-stage filtration systems, often including a robust pre-filter, a fine particulate filter (often a HEPA-equivalent or cartridge filter), and sometimes even a final motor filter. This layered defense is specifically designed to capture the microscopic ash particles that regular vacuums miss, preventing them from entering the motor or being re-released into your home’s air. This superior filtration is paramount for maintaining healthy indoor air quality.
- Powerful, Protected Motors: The motors in ash vacuums are built to handle the demands of fine, heavy ash. They are typically more robust and often feature design elements that protect them from particle ingress. This allows them to maintain consistent, powerful suction without succumbing to clogging or burnout.
- Ease of Use and Maintenance: With specialized designs, ash vacuums often feature easy-to-clean filter systems that can be shaken or tapped clean without directly exposing you to the ash, and large capacity metal canisters that reduce the frequency of emptying. This focus on user-friendly, safe operation makes ash cleanup a much simpler and less hazardous task.
What If You Don’t Have a Specialized Vacuum? Proven Manual Alternatives
While a specialized ash vacuum offers optimal efficiency and safety, manual methods remain entirely viable for fireplace ash removal in 2027. These traditional approaches prioritize safety through careful handling and rely on basic, yet effective, tools. The primary advantage of manual cleaning is its low cost and universal applicability, requiring no power source.
Essential Tools for Manual Ash Removal
- Metal Shovel: A small, sturdy metal shovel, specifically designed for fireplace use, is crucial for scooping ash. Avoid plastic tools as they can melt or damage if residual heat is present.
- Stiff-Bristled Brush: A brush with robust, heat-resistant bristles helps gather finer ash particles and sweep corners effectively.
- Metal Ash Bucket with Lid: This is non-negotiable for safe storage and transport. The lid prevents ash dispersal and, crucially, contains any potential latent embers. Modern designs often include double-bottom construction for enhanced safety.
Manual Ash Removal Procedure
- Verify Cold Ashes: Crucially, ensure all ashes are stone cold, ideally waiting 24 to 72 hours post-fire. Stirring the ash pile with a metal poker can reveal hidden embers.
- Scoop Large Debris: Use the metal shovel to carefully scoop larger ash clumps and debris into the metal bucket. Avoid overloading the bucket to prevent spills.
- Sweep Fine Ash: Employ the stiff brush to sweep the remaining fine ash and soot into the shovel, then transfer to the bucket. Work slowly to minimize dust.
- Secure and Store: Once the bucket contains the ash, secure the lid tightly. Immediately move the sealed bucket outdoors, away from any combustible materials, structures, or vegetation.
A complete manual cleaning setup, including a high-quality metal bucket, shovel, and brush, typically costs between $40 and $80 in 2027, according to home goods retailers.
Essential Safety Steps for Fireplace Ash Disposal
Improper ash disposal is a leading cause of accidental house fires, even in 2027, according to data from the National Fire Protection Association (NFPA). Adhering to strict safety protocols is paramount, regardless of whether you use a vacuum or manual tools for removal.
Verifying Ash Coldness
The greatest danger lies in residual embers. Ash can conceal heat for extended periods, sometimes days or even weeks in dense piles.
- Extended Waiting Period: Always wait a minimum of 24 hours after the last fire. For larger or longer-burning fires, 48-72 hours is recommended by fire safety experts.
- Physical Inspection: Use a metal poker or shovel to thoroughly stir the entire ash bed. Look for any glowing embers, feel for residual heat rising, or detect any faint smoke.
- Thermal Confirmation: For definitive safety, employ a non-contact infrared thermal gun (widely available and affordable by 2027). Aim it at various points within the ash pile. Ensure readings consistently indicate temperatures below 80°F (27°C) before proceeding.
Safe Storage and Disposal
Once you confirm the ashes are cold, proper containment and disposal are critical to prevent fire hazards.
- Use a Non-Combustible Container: Always transfer ashes into a sturdy metal container with a tight-fitting metal lid. Plastic, cardboard, or even galvanized buckets without tight lids are unsuitable as they can melt, ignite, or allow embers to escape.
- Outdoor Storage: Place the sealed metal ash container outdoors, at least 5 feet (approximately 1.5 meters) away from any combustible structures, woodpiles, decks, fences, or vegetation. Ensure it is on a non-combustible surface like concrete or gravel.
- Prolonged Containment: Keep the ashes in the sealed metal container for several days, or even a week, to allow any deeply hidden embers to fully extinguish. Only then should they be disposed of.
- Local Disposal Guidelines: Consult your local waste management services in 2027 for specific ash disposal regulations. Some municipalities allow ashes in regular trash after being safely contained, while others have designated disposal sites or even specific composting programs for wood ash due to its nutrient content.
What If It Still Doesn’t Work?
If you’re encountering persistent issues with ash removal—such as recurring dust, inadequate vacuum suction, or an inability to effectively clear your fireplace—several troubleshooting steps can resolve these problems before escalating.
- Thorough Vacuum Filter Maintenance: For ash vacuums, the most common issue is a clogged filter system. By 2027, specialized ash vacuums typically feature multi-stage filtration. Dismantle and clean all filters—pre-filter, main HEPA filter, and motor protection filter—according to the manufacturer’s instructions. A completely clogged HEPA filter can reduce suction by over 70%, making ash removal ineffective.
- Inspect Vacuum Hose and Nozzle: Carefully check the entire length of the vacuum hose and the nozzle attachment for any blockages. Larger pieces of debris or residual charcoal can become lodged, severely impeding airflow. Dislodge any obstructions gently with a non-abrasive tool.
- Assess Chimney Draw and Flue Condition: If ash continually “blows back” or your fireplace always seems excessively dusty, the problem might stem from your chimney’s performance. A poor chimney draw or partially obstructed flue can cause downdrafts that push ash into the room.
When to Seek Professional Help: If you suspect chimney or flue issues, or if persistent ash problems continue despite thorough cleaning and vacuum maintenance, it’s time to contact a certified chimney sweep or HVAC professional. They can conduct a Level 2 inspection (standard in 2027 for thorough evaluations) to identify structural defects, creosote buildup, or ventilation problems. The estimated cost for a professional chimney inspection and sweeping in 2027 ranges from $250 to $600, with potential repairs adding $500 to $2,500 or more depending on severity.
Conclusion
Addressing the question “Can you vacuum ashes from a fireplace?”, the answer in 2027 is a definitive yes, provided you utilize a specialized ash vacuum. These purpose-built devices, equipped with advanced filtration and fire-resistant components, offer the safest and most efficient method. However, proven manual alternatives exist, requiring only basic tools and meticulous care. According to verified research and expert sources from the National Fire Protection Association (NFPA) and leading appliance manufacturers, the paramount concern remains ensuring ashes are completely cold before any removal or disposal. Always prioritize this critical safety step to prevent potential hazards.
❓ Frequently Asked Questions
Why exactly is a regular household vacuum dangerous for cleaning fireplace ashes?
Regular vacuums are dangerous for several reasons: hidden embers can ignite flammable dust bags and filters causing a fire; fine ash bypasses standard filters, clogging the motor and causing it to overheat and fail; and these vacuums lack the heat-resistant components needed for safe ash collection.
What specific features make a specialized ash vacuum safe and effective for fireplace cleaning?
Ash vacuums feature metal canisters, metal-lined hoses, and heat-resistant components to prevent fire hazards. They also utilize multi-stage filtration systems (like HEPA filters) designed to capture ultra-fine ash particles without damaging the motor or releasing dust into the air.
How can I be absolutely sure that ashes are cold and safe to handle before attempting removal?
To ensure ashes are cold, wait at least 24-48 hours after the last fire. Visually inspect for any glowing embers, then gently stir the ash with a metal poker; if you see no glowing or feel any significant heat, they are likely safe. However, always treat ashes as if they could contain live embers.
Are there any health risks associated with inhaling fine fireplace ash particles?
Yes, inhaling fine ash particles can irritate the respiratory system, potentially worsening conditions like asthma or bronchitis. Prolonged exposure can lead to more serious respiratory issues, so it’s important to minimize airborne ash during cleaning and use proper filtration.
What is the best and safest way to dispose of fireplace ashes once they are removed from the hearth?
After ensuring ashes are cold, carefully scoop them into a metal bucket with a tight-fitting metal lid. Transport the bucket outdoors and place it on a non-combustible surface, several feet away from any structures, decks, or flammable materials, for at least 72 hours before disposing of them with regular waste.
Can I use a shop vac to clean out fireplace ashes, or does it have the same risks as a regular vacuum?
Unless a shop vac is specifically rated and designed for hot ash collection (which most are not), it carries similar risks to a regular household vacuum. Its plastic components can melt, filters can clog easily, and hidden embers can ignite dust and debris inside, leading to a fire.