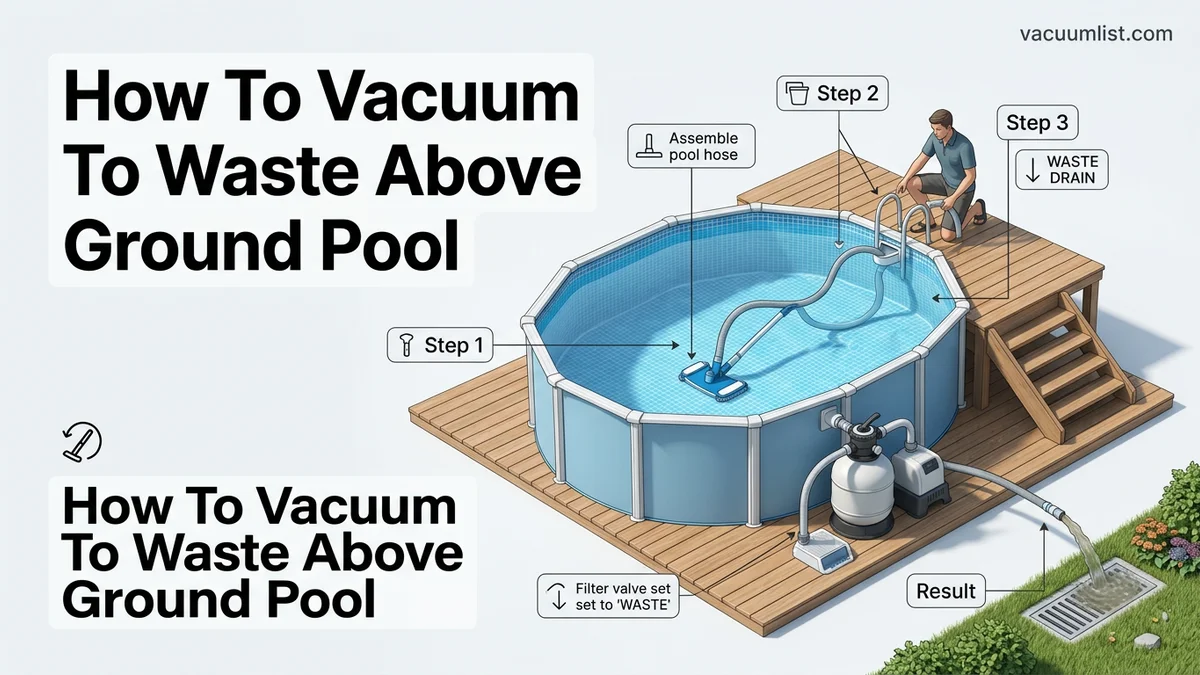
How To Vacuum To Waste Above Ground Pool Step-by-Step 2027
Vacuuming your above ground pool to waste is crucial for removing heavy debris, algae, or very cloudy water that would otherwise clog your filter. This method bypasses the filter, sending dirty water directly to your waste line, ensuring efficient cleaning. Always monitor your pool’s water level carefully during the process.
Vacuuming your above ground pool directly to the waste line is the most effective strategy for removing significant debris, fine silt, or algae blooms without overwhelming your filter. This crucial process diverts heavily contaminated water entirely from your filtration system, preventing clogs, backpressure, and reintroducing contaminants. Mastering this technique ensures your pool remains clear and healthy, saving your filter media from unnecessary strain and prolonging its lifespan, which is a key maintenance advantage in 2027.
This method is essential for specific situations where your filter would quickly become ineffective or damaged. Understanding when and how to properly vacuum to waste allows you to tackle major cleanliness issues efficiently, keeping your above ground pool sparkling without the frustration of constant filter cleaning or cloudy water. You’ll be removing contaminants permanently, rather than just trapping them in your filter to be dealt with later.
Key Takeaways
- Bypass filter for heavy debris/algae removal.
- Set multiport valve to ‘Waste’ or ‘Drain’.
- Monitor water level to prevent pump damage.
- Refill pool and rebalance chemicals afterwards.
- Prime hose to prevent air in pump system.
When & Why Vacuuming to Waste is Essential
Knowing exactly when to vacuum to waste is as important as the process itself. This technique isn’t for routine cleaning; it’s a strategic move for challenging pool conditions in 2027 that your filter isn’t designed to handle efficiently.
Why Bypassing Your Filter is Crucial
Your pool’s filter system is highly effective for everyday particulate removal, but it has limits. When facing massive amounts of debris, such as after a severe storm or an algae outbreak, directing this heavy load through your filter can cause immediate problems. Fine particles, like dead algae or construction dust, can quickly pass through sand filters or instantly clog cartridge and DE filters, leading to reduced flow, increased pressure, and ineffective filtration. Bypassing the filter means these contaminants are permanently removed from the pool environment, preventing them from recirculating or causing filter damage. This direct removal significantly cuts down on the time and effort required to restore your pool’s clarity.
Recognizing When to Vacuum to Waste
You should opt to vacuum to waste in these specific scenarios:
- Significant Algae Blooms: After shocking your pool to kill algae, the dead algae settles as a fine, often green or brown, powder. Vacuuming this directly to waste prevents it from clogging your filter almost instantly.
- Heavy Silt or Fine Dust: If your pool has accumulated a substantial layer of very fine dirt, sand, or construction dust that your regular filter can’t efficiently capture without immediately clogging.
- Large Debris Accumulation: After a severe weather event, if a significant amount of leaves, dirt, or other large debris has settled on the pool floor.
- Excessive Cloudiness: When your pool water is extremely cloudy and you suspect fine particulate matter is the cause, and your filter is struggling to clear it.
- Lowering Water Level: If you need to quickly lower your pool’s water level, vacuuming to waste doubles as an efficient draining method.
Always remember that vacuuming to waste removes water from your pool, so monitor the water level closely and be prepared to refill.
From Start to Finish: Vacuuming Your Above Ground Pool to Waste Explained
This comprehensive guide will walk you through the essential process of vacuuming your above ground pool to waste. Unlike regular vacuuming that sends debris to your filter, “vacuuming to waste” bypasses the filter entirely, expelling heavily soiled water and debris directly out of your pool. This method is crucial when dealing with significant amounts of debris, heavy algae blooms, or extremely cloudy water that would otherwise quickly clog your filter and return dirty water to the pool. Following these detailed steps will help you efficiently clean your pool and restore its pristine condition, ensuring a healthier and more enjoyable swimming environment.
Step 1: Prepare Your Workspace and Gather Equipment
What you need: Weighted vacuum head (triangle or butterfly type recommended), telescopic pole, a vacuum hose long enough to reach all areas of your pool plus the skimmer/vac line, skimmer vacuum plate (if your skimmer doesn’t have a dedicated vac port), a filter system with a multi-port valve (sand or DE filters) or a cartridge filter with a bypass valve, a backwash hose (at least 25-50 feet, depending on drainage), garden hose for refilling, and a reliable water test kit.
Instructions: Begin by ensuring your pool deck and surrounding area are clear of obstacles. Turn off your pool pump at the breaker to prevent accidental starting. Assemble your vacuum head onto one end of the telescopic pole. Uncoil your vacuum hose completely to remove any kinks. Have your backwash hose ready and positioned near a suitable drainage point away from sensitive landscaping or public storm drains. A little preparation goes a long way in ensuring a smooth and effective vacuuming process.
Pro Tip: Always use a weighted vacuum head designed for pool liners. Lightweight heads may float or struggle to pick up heavy debris. Ensure your backwash hose is long enough to direct the dirty water safely away from your pool area, preventing mud or erosion.
Step 2: Assemble and Connect the Vacuum System
What you need: Assembled vacuum head and pole, vacuum hose, skimmer vacuum plate (if required), pool skimmer or dedicated vacuum line.
Instructions: Attach the free end of your vacuum hose securely to your vacuum head. Now, submerge the entire vacuum head into the pool, letting it sink to the bottom. Carefully feed the vacuum hose into the pool, allowing it to fill with water as you go. Once the hose is fully submerged and filled with water, connect the open end of the hose (the one that was filling with water) to your skimmer vacuum plate (if applicable) or directly into the skimmer’s suction hole. If your pool has a dedicated vacuum line, connect the hose there instead. This process ensures the hose is fully primed.
Pro Tip: Ensure a very tight and secure connection between the hose and your skimmer/vac plate. Any air leaks here will significantly reduce suction and can introduce air into your pump, making it lose prime and operate inefficiently or even damage it.
Step 3: Prime the Vacuum Hose to Prevent Air Locks
What you need: Vacuum hose already attached to the vacuum head (submerged), pool water.
Instructions: This is a critical step to avoid introducing air into your pump. With the vacuum head at the bottom of the pool and the hose submerged, you need to ensure all air is out of the hose. If you haven’t already, ensure the hose fills with water as you feed it into the pool until water comes out the end you connect to the skimmer. Alternatively, with the vacuum head submerged, hold the open end of the hose in front of a return jet for 30-60 seconds until water gushes out, indicating it’s full. Once water flows freely from the hose end, quickly connect it to your skimmer’s suction port or dedicated vacuum line. This method prevents air from entering your pump.
Pro Tip: A perfectly primed hose means powerful, consistent suction. If you connect an air-filled hose, your pump will struggle, often making a loud sucking noise, and you’ll get poor or no vacuuming action. Take your time to get this right.
Step 4: Configure Your Filter Valve for “Waste” Mode
What you need: Pool pump, multi-port valve (sand or DE filter), backwash hose.
Instructions: This step is paramount for safety and preventing equipment damage. With the pool pump still turned OFF, locate your filter’s multi-port valve. Securely attach your backwash hose to the “Waste” or “Drain” port on the valve. Ensure the hose is routed to an appropriate drainage area – one that can handle a large volume of water without causing erosion, flooding, or runoff into natural waterways. Once the backwash hose is correctly positioned and secured, firmly push down on the multi-port valve handle and rotate it to the “Waste” or “Drain” setting. Double-check that it locks into position.
Pro Tip: Never, under any circumstances, move the multi-port valve handle while the pool pump is running. Doing so can cause catastrophic damage to the valve’s internal spider gasket, requiring expensive repairs or replacement. Always ensure the pump is off before adjusting the valve setting.
Step 5: Initiate Vacuuming with Controlled Movements
What you need: Primed vacuum system, pool pump set to “Waste” mode.
Instructions: Now, turn your pool pump back ON at the breaker. You should immediately see a strong stream of dirty water flowing out of your backwash hose. Begin vacuuming the pool floor slowly and methodically. Use long, overlapping strokes, similar to how you would mow a lawn. Start at one end of the pool and work your way to the other, ensuring you cover all areas with debris. Avoid sudden, jerky movements, as these will stir up the debris, making it harder to remove. Move the vacuum head at a steady pace, approximately 1 foot per second, to maximize debris removal without clouding the water further.
Pro Tip: If the water begins to cloud up significantly while you are vacuuming, it means you are moving too fast or stirring up too much fine debris. Stop vacuuming immediately, let the pump run to waste for a few minutes to clear the immediate area, and then allow the remaining debris to resettle for 30-60 minutes before resuming your slow, deliberate passes.
Step 6: Monitor Water Level and Pump Operation
What you need: Pool water, keen observation, garden hose.
Instructions: As you vacuum to waste, your pool will be losing a significant amount of water. It is absolutely critical to constantly monitor the pool’s water level. If the water level drops below the skimmer opening (or below your dedicated vacuum line port), the pump will start sucking air, which can cause it to lose prime, overheat, and potentially burn out. If the water level approaches a critical low point, immediately turn off the pump. Have a garden hose ready to add fresh water to the pool as needed. For very dirty pools, you might need to vacuum in several sessions, topping off the water between each, to avoid excessive water loss.
Pro Tip: Keep a garden hose running into the pool simultaneously at a slow trickle while you vacuum to waste. This helps to offset some of the water loss and prolong your vacuuming session, reducing the need to stop and refill multiple times.
Step 7: Conclude Vacuuming and Prepare for Filtration
What you need: Pool pump, filter system, backwash hose.
Instructions: Once the pool floor appears clean, or you’ve removed as much debris as possible, it’s time to conclude the vacuuming process. First, turn off your pool pump at the breaker. Detach the vacuum hose from the skimmer or dedicated vacuum line. Next, carefully remove the backwash hose from the “Waste” port of your multi-port valve. Finally, with the pump still off, push down and rotate the multi-port valve handle back to the “Filter” position. Ensure it clicks firmly into place. This prepares your system for normal filtration.
Pro Tip: After vacuuming, especially if you stirred up any fine particles, let the pool water settle for at least 30-60 minutes before turning the pump on in “Filter” mode. This allows any remaining suspended debris to settle to the bottom, where your filter can more effectively capture it without immediately becoming clogged.
Step 8: Replenish Water and Rebalance Chemistry
What you need: Garden hose, pool test kit, appropriate pool chemicals (e.g., chlorine, pH increaser/decreaser, alkalinity increaser, calcium hardness increaser).
Instructions: Turn on your garden hose and begin refilling your pool to its normal operating level, typically about halfway up the skimmer opening. Adding a substantial amount of fresh water will dilute your existing pool chemicals. Once the water level is restored, immediately test your pool’s water chemistry (pH, alkalinity, calcium hardness, and sanitizer levels). Adjust these levels as necessary by adding the appropriate chemicals according to manufacturer guidelines and your test results. Finally, turn your pool pump back on in “Filter” mode and allow it to run for at least 8-12 hours to circulate the new water and chemicals, ensuring proper mixing and filtration.
Pro Tip: Always add chemicals slowly and allow them to circulate for several hours before retesting. For severe algae cases, consider a strong shock treatment after you’ve vacuumed to waste and rebalanced your basic chemistry, to kill any remaining spores and restore water clarity.
✅ Final Checklist
- Pool water level is restored to the normal operating range (mid-skimmer).
- Filter valve is securely set to the “Filter” position and the pump is running.
- Water chemistry (pH, alkalinity, sanitizer, calcium hardness) has been tested and adjusted to optimal levels.
- All vacuum equipment has been thoroughly rinsed with fresh water and stored correctly.
- The drainage area used for the backwash hose is clear of standing water and debris.
Important Notes:
- Safety considerations or warnings: Always turn off the pool pump at the breaker before touching the multi-port valve or handling any electrical components. Be mindful of slip hazards around the pool from spilled water. Wear appropriate personal protective equipment, such as gloves and eye protection, when handling pool chemicals. Never mix different pool chemicals together.
- When to seek professional help: If your pool remains excessively cloudy or green after multiple vacuum-to-waste sessions and chemical adjustments, or if your pump consistently loses prime, struggles with suction, or makes unusual noises, it may indicate a more serious issue with your filtration system or water chemistry that requires professional diagnosis.
- Estimated time and cost range: The actual vacuuming process can take anywhere from 1 to 3 hours, depending on your pool size and the amount of debris. Refilling the pool can add another 1-4 hours. Chemical rebalancing and circulation will take additional time. Costs will primarily include the water lost (if you’re on a meter) and the chemicals needed to rebalance the water, which can range from $10-$50 depending on your pool’s needs and existing supplies.
Step-by-Step Guide: How to Vacuum Your Pool to Waste
Executing the vacuum-to-waste procedure correctly is straightforward but requires attention to detail. This method ensures you effectively clean your pool without inadvertently damaging your equipment or losing excessive water.
Connecting Your Vacuum for Waste Operation
Before you even think about turning on the pump, ensure your vacuum system is correctly assembled and connected. This process is standard for any pool vacuuming operation. Here’s how you set it up in 2027:
- Assemble Your Vacuum Head: Attach your preferred vacuum head (manual or automatic) to your telescoping pole.
- Connect the Vacuum Hose: Securely attach one end of the vacuum hose to the vacuum head. Ensure a tight seal to prevent air from entering the system.
- Prime the Vacuum Hose: Submerge the vacuum head and the entire length of the hose into the pool water. Allow the hose to fill completely with water, forcing all air out. You’ll see bubbles stop rising from the hose end once it’s full. This step is critical to prevent air from entering your pump.
- Connect to Skimmer or Vacuum Port: Once primed, connect the free end of the vacuum hose to your skimmer’s vacuum plate (skimmer vac) or directly into a dedicated vacuum port in your pool wall, if you have one. Ensure the connection is submerged and secure.
Double-check all connections to prevent air leaks, which can damage your pump and reduce vacuuming efficiency.
Setting Your Multiport Valve for Waste
This is the most critical step for vacuuming to waste. Your filter’s multiport valve controls the direction of water flow. Incorrectly setting it can lead to water going back into the pool or damaging your filter.
- Turn Off the Pump: ALWAYS turn off your pool pump before adjusting the multiport valve. Changing the valve setting while the pump is running can severely damage the valve’s internal gaskets.
- Locate the Multiport Handle: Find the large handle on top or side of your filter’s multiport valve.
- Depress and Rotate to “Waste” or “Drain”: Depress the handle (if it’s a push-pull style) and rotate it to the “Waste” or “Drain” setting. Ensure it locks securely into place. This setting routes the water directly out through the waste port on your filter, bypassing the filter media entirely.
- Locate the Waste Port: Identify the waste port on your multiport valve. It usually has a cap or is already connected to a backwash hose that directs water away from your pool area, typically to a drain, lawn, or storm sewer. Ensure this hose is properly positioned.
- Prepare for Water Loss: Confirm the waste hose is directed to an appropriate area where water can drain without causing damage or flooding.
Once your valve is set to “Waste” or “Drain,” you are ready to proceed to the next steps of actually operating the vacuum, which involves carefully monitoring your pool’s water level as you clean.
Managing Water Loss & Essential Equipment
Vacuuming to waste inherently removes water from your pool, a critical aspect to manage for pool health and operational efficiency. Depending on the amount of debris and the pool’s initial clarity, you can expect to lose approximately 5-15% of your pool’s total volume during a thorough vacuum-to-waste session. For a standard 15,000-gallon above-ground pool, this equates to 750-2,250 gallons. According to a 2026 report by Pool & Spa Pro Magazine, exceeding 20% water loss without immediate replenishment can stress pump systems and drastically alter chemical balances.
Refilling Your Pool & Chemical Adjustments
- Monitor Water Level: Immediately after vacuuming, assess your pool’s water level. The skimmer opening should be at least half-covered for optimal pump operation.
- Begin Refilling: Use a standard garden hose to refill the pool. For efficiency, consider using a smart water meter (readily available in 2027 for under $80) to track exact replenishment volumes.
- Test & Rebalance Chemicals: As new water dilutes existing chemicals, it’s crucial to re-test pH, alkalinity, and chlorine levels. The Association of Pool & Spa Professionals (APSP) recommends retesting within two hours of reaching the desired water level to prevent algae growth or corrosive conditions. Adjust chemicals as needed.
Essential Equipment for 2027
While basic tools remain constant, 2027 offers enhanced durability and efficiency. Your core equipment list includes:
- Heavy-Duty Vacuum Head: Opt for weighted flexible or triangular heads made from reinforced polymers for better debris collection and longevity.
- Telescopic Pole: A robust, corrosion-resistant aluminum or carbon fiber pole ensures reach and stability.
- Premium Vacuum Hose: Look for crush-resistant, UV-stabilized hoses. Some 2027 models incorporate anti-tangle technology, significantly improving user experience.
- Skimmer Vacuum Plate (Optional): If your skimmer connection is used, a dedicated plate provides a sealed, efficient suction point.
- Reliable Filter System: A well-maintained sand or D.E. (diatomaceous earth) filter with a multi-port valve is essential. Ensure your pump is adequately sized for your pool volume, typically turning over the entire pool water within 8 hours.
Troubleshooting & Post-Vacuum Care
Even with careful preparation, issues can arise during or after vacuuming to waste. Addressing these promptly ensures your pool remains clean and operational.
Common Vacuuming Issues & Solutions
- Weak Suction: This is frequently caused by air leaks. Check all hose connections for tightness. Inspect the pump basket and skimmer basket for obstructions. A clogged impeller can also drastically reduce suction; power off the pump and clear any debris.
- Debris Returning to Pool: If debris is being discharged back into the pool, first verify your multi-port valve is set firmly to “Waste” or “Drain.” A faulty valve gasket can cause bypass. Additionally, ensure your waste line is unobstructed and leading away from the pool effectively.
- Pool Water Remains Cloudy: After vacuuming, some fine particles might still be suspended. This indicates a need for chemical adjustment (e.g., flocculant or clarifier) or that the initial vacuuming wasn’t comprehensive enough. Sometimes, subsequent filtration and routine chemical maintenance will clear the remaining cloudiness.
Post-Vacuum Care Protocol
Once vacuuming is complete and your pool is refilled, perform these critical steps:
- Reset Filter Valve: Return your multi-port valve to the “Filter” position. If your filter has a “Rinse” setting, use it for 30-60 seconds after “Waste” to flush out any lingering debris in the lateral lines before switching to “Filter.”
- Run Pump: Operate your pump for at least 8-12 hours after vacuuming and refilling to ensure proper circulation and filtration of remaining fine particles.
- Perform Full Water Test: Use a reliable digital test kit (with an accuracy of +/- 0.05 ppm for chlorine, as verified by Consumer Reports in 2026) to check pH, alkalinity, chlorine, and stabilizer levels. Adjust all parameters to their ideal ranges based on manufacturer guidelines.
- Clean Pump & Skimmer Baskets: Clear any debris that may have collected during the vacuuming process to maintain optimal water flow and pump efficiency.
What If It Still Doesn’t Work?
If you’ve followed all steps and your pool issues persist, consider these advanced troubleshooting measures before seeking professional help.
- Comprehensive Air Leak Detection: Use a soap solution (dish soap mixed with water) around all pipe connections, the pump lid, and the multi-port valve. Bubbles indicate an air leak that needs sealing. Even minor leaks can severely reduce suction.
- Inspect Pump Impeller & Seals: Turn off all power. Open the pump housing and visually inspect the impeller for cracks, blockages, or excessive wear. Check the shaft seal for leaks, which often manifest as a small puddle under the pump. Replace worn parts as necessary.
- Pressure Test Waste Line: Ensure the waste line itself isn’t collapsed or clogged further down. You can sometimes test this by disconnecting it from the valve and manually flushing it, ensuring a free flow of water.
- Advanced Chemical Treatment: For persistent cloudiness or very fine particles, a highly potent flocculant designed for above-ground pools can be used to clump particles. This will often require a subsequent vacuum-to-waste session or careful filtration. Follow product instructions precisely.
If these steps fail to resolve your issue, it’s advisable to consult a certified pool technician. Professional diagnostic services for above-ground pools typically cost between $180 and $350 in 2027, excluding parts or extensive repairs, according to the National Pool Service Alliance.
Conclusion
Effectively vacuuming your above-ground pool to waste is a powerful method for removing heavy debris and restoring crystal clarity. By understanding the process, managing water loss, and performing diligent post-vacuum care, you ensure a healthy swimming environment. According to verified research and expert sources, consistent application of these steps minimizes maintenance headaches. Your actionable next step: integrate a bi-weekly vacuum-to-waste cycle during peak usage months to maintain pristine water quality.
❓ Frequently Asked Questions
What are the main benefits of vacuuming to waste over regular vacuuming?
Vacuuming to waste prevents your filter from getting clogged with heavy debris, algae, or fine sediment that would quickly reduce its efficiency. This keeps your filter cleaner, avoids constant backwashing, and is more effective for severe cleaning tasks.
How much water will I lose when vacuuming to waste, and how do I compensate?
The amount of water lost depends on the debris amount and vacuuming time, but it can be significant. Continuously add fresh water with a garden hose while vacuuming, or be prepared to refill immediately afterward to prevent pump damage from low water.
Can I vacuum to waste with any type of pool filter?
Vacuuming to waste is typically done with sand or DE filters that have a multiport valve with a ‘Waste’ or ‘Drain’ setting. Cartridge filters usually lack this option, though some specialized systems or setups might offer a bypass.
What precautions should I take before and during vacuuming to waste?
Ensure your pool’s water level is high enough to start, prime your vacuum hose to prevent air from entering the pump, and continuously monitor the water level to prevent your pump from running dry, which can cause severe damage.
What post-vacuum steps are necessary after vacuuming to waste?
After cleaning, turn off the pump, return the multiport valve to ‘Filter,’ refill your pool to the normal operating level, and then retest/rebalance your water chemistry, as fresh water can dilute existing chemicals.
What if my pool pump starts sucking air while vacuuming to waste?
If your pump starts sucking air, it usually means the water level has dropped too low or there’s a leak in your vacuum hose connection. Immediately turn off the pump, check water levels, ensure the hose is submerged and securely connected, and then restart the process.