How to Make a Vacuum Chamber Step-by-Step Expert Guide 2027
Building a functional vacuum chamber can be a rewarding DIY project, requiring careful planning and execution. This guide provides step-by-step instructions for construction, a detailed list of materials and tools, and essential safety precautions to ensure success.
Building a functional vacuum chamber in your workshop by 2027 is an accessible project, enabling you to degas resins, stabilize wood, or even perform basic vacuum forming. This guide walks you through constructing a reliable system using readily available materials and common tools, ensuring you achieve consistent negative pressure for your projects. You will learn the exact steps, from selecting components to final assembly, empowering you to create your own effective vacuum environment.
This process cuts through the complexities, providing precise instructions for assembling your chamber, creating an airtight seal, and integrating necessary ports and gauges. Your finished chamber will be a valuable asset for various applications, giving you professional-level results from a DIY build.
Key Takeaways
- Prioritize safety:implosion is a real risk.
- Select vacuum-rated components for longevity.
- Airtight seals are critical for effective vacuum.
- Match pump type to desired vacuum level.
- Thoroughly test for leaks before use.
What Makes Building a Vacuum Chamber Challenging?
The Imperative of an Airtight Seal
Your primary challenge is achieving and maintaining a perfect vacuum seal. Air molecules are tiny; even microscopic gaps will prevent your chamber from holding a vacuum. This means every connection, every material choice, and every fitting must be impeccably sealed. You are fighting against atmospheric pressure, which exerts significant force on your chamber, trying to push air back in. A robust seal is not just about stopping leaks; it is about ensuring the chamber can withstand the external pressure without deforming or collapsing, especially with larger volumes.
Material Selection and Durability
Choosing the right materials is critical. Not all plastics or glues can withstand the differential pressure or maintain their integrity over time under vacuum. Materials must be non-porous and rigid enough to avoid implosion. Using inappropriate materials leads to leaks, material outgassing, or even catastrophic failure. For instance, standard PVC pipe, while strong, can outgas plasticizers under vacuum, contaminating your chamber. By 2027, advanced vacuum-rated epoxies and sealants are more accessible through online specialty suppliers, but careful selection remains paramount. Always confirm material compatibility with low pressure environments.
Safety First: Essential Precautions
Working with vacuum involves significant atmospheric pressure differentials, making safety paramount. Always wear appropriate personal protective equipment (PPE), including safety glasses, when drilling or working with materials. Ensure your chamber materials are rated for vacuum to prevent implosion, which can send dangerous shrapnel flying. Never place body parts inside an active vacuum chamber. Always release vacuum slowly using a control valve. Keep your workspace clean and free of clutter. Understanding these risks prevents accidents and ensures a successful build.
From Start to Finish: Building Your Own Vacuum Chamber Explained
Embarking on the journey to build your own vacuum chamber can be an incredibly rewarding project, opening up possibilities for scientific experimentation, material degassing, wood stabilization, and even food preservation. This comprehensive guide will walk you through each critical stage, from planning your design to leak testing your finished chamber. By following these detailed, step-by-step instructions, you’ll gain practical skills and a deep understanding of the principles involved, ensuring your DIY vacuum chamber is both safe and effective.
Step 1: Conceptualization and Material Sourcing
What you need: Pen and paper, internet access for research, measuring tape, potential suppliers (online retailers, local hardware stores, industrial suppliers).
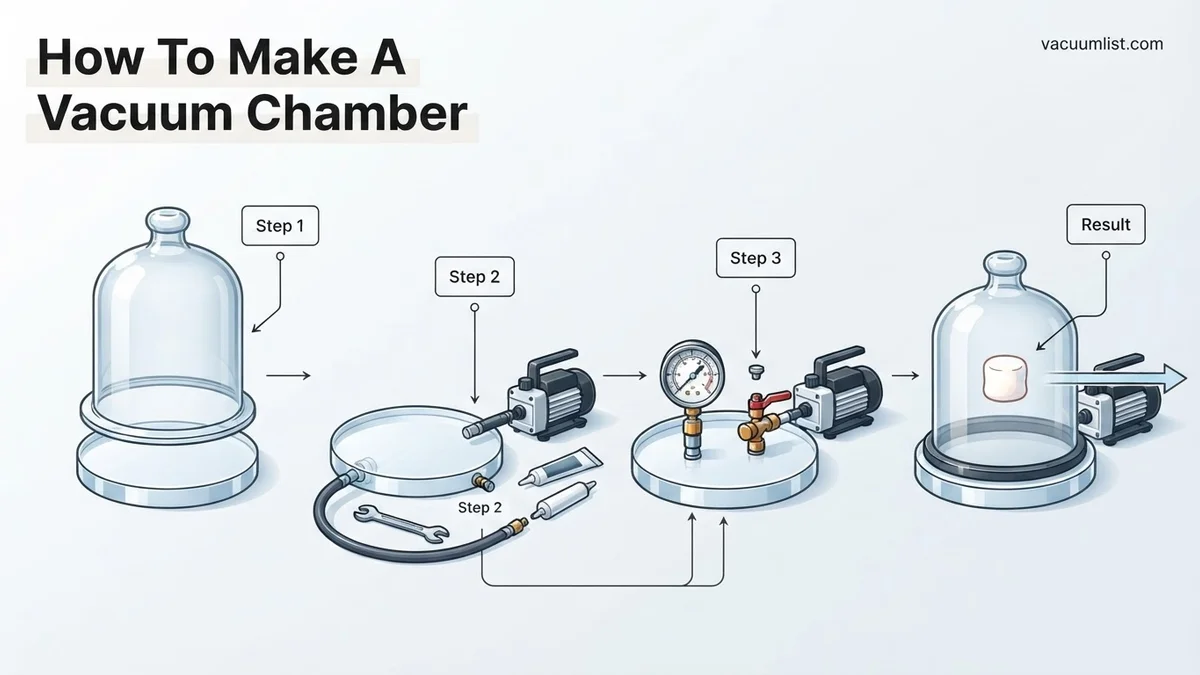
Instructions: Begin by clearly defining the purpose and desired size of your vacuum chamber. Are you degassing small batches of resin or stabilizing larger pieces of wood? This will dictate the required volume and strength. For basic applications, a bell jar or a heavy-duty stainless steel pot (like a pressure cooker) makes an excellent chamber body. The lid should be a thick, flat material like cast acrylic (at least 1/2 inch thick for a small chamber, more for larger) or a machined aluminum plate. Research vacuum-rated components such as valves (e.g., 1/4″ NPT ball valve), gauges (0-30 inHg compound gauge), and a vacuum pump (single-stage rotary vane pump is often sufficient for rough vacuum).
Pro Tip: Always over-specify the material thickness for safety. A chamber under vacuum experiences significant external pressure, and weak materials can implode dangerously. Stainless steel or thick polycarbonate/acrylic are safer choices than standard glass.
Step 2: Preparing the Chamber Body
What you need: Chosen chamber vessel (e.g., stainless steel pot, acrylic cylinder), cleaning supplies (degreaser, cloths), fine-grit sandpaper (optional).
Instructions: If using a ready-made vessel like a stainless steel pot, thoroughly clean it to remove any manufacturing oils, residues, or contaminants. Use a good degreaser and rinse thoroughly. For an acrylic cylinder, ensure the top and bottom edges are perfectly flat and smooth, as this is where your seal will be made. If necessary, lightly sand the sealing surfaces with very fine-grit sandpaper (e.g., 400-600 grit) on a flat surface to remove any imperfections, but be careful not to create an uneven surface. The goal is a pristine, flat surface for optimal gasket contact.
Pro Tip: Avoid using abrasive cleaners or harsh solvents on acrylic, as they can cause micro-fractures or hazing, compromising its strength and clarity. Stick to mild soap and water or specialized acrylic cleaners.
Step 3: Designing and Fabricating the Lid
What you need: Thick acrylic or aluminum plate (e.g., 3/4″ thick for a 12″ diameter chamber), ruler, marking pen, drill press, appropriate drill bits (sized for NPT fittings, e.g., 7/16″ for 1/4″ NPT), tap and tap wrench (for NPT threads), deburring tool, safety glasses.
Instructions: The lid is crucial. It must be perfectly flat and strong enough to withstand atmospheric pressure. For an acrylic lid, measure the inner diameter of your chamber body and cut the lid plate slightly larger (e.g., 1/2 inch overhang) to ensure full coverage over the gasket. Mark the locations for your vacuum valve, gauge, and potentially an optional vent valve. Drill pilot holes, then use a drill press to create the appropriately sized holes for your NPT (National Pipe Tapered) fittings. Tap these holes with the correct NPT tap to create the threads. Deburr all edges thoroughly to prevent leaks and ensure a smooth finish.
Pro Tip: When drilling and tapping acrylic, use slower speeds and lubricant (like water or cutting fluid) to prevent melting and cracking. Aluminum is more forgiving but still benefits from appropriate lubricants and speeds.
Step 4: Installing Feedthroughs and Ports
What you need: Vacuum valve, vacuum gauge, appropriate Teflon tape or liquid thread sealant (vacuum rated), adjustable wrenches, optional vacuum-rated bulkhead fittings.
Instructions: With your lid fabricated, it’s time to install the vacuum ports. Wrap the threads of your vacuum valve and gauge with several layers of Teflon tape, ensuring the wrap is in the direction that tightens when screwed in. Alternatively, use a liquid pipe sealant specifically rated for vacuum applications (e.g., anaerobic thread sealant). Carefully screw the fittings into the tapped holes on your lid. Tighten them firmly with wrenches, but do not overtighten, especially on acrylic, as this can crack the material. Ensure the gauge is oriented for easy reading. If using bulkhead fittings for future electrical or sensor access, install them now.
Pro Tip: For critical vacuum applications, avoid Teflon tape as it can outgas and shed particles. Liquid vacuum sealants or O-ring sealed compression fittings are superior. For a basic chamber, Teflon tape is acceptable but apply it carefully.
Step 5: Selecting and Attaching the Gasket
What you need: Vacuum-rated O-ring (e.g., Viton or Silicone) of appropriate diameter and cross-section, or high-quality vacuum gasket material (e.g., closed-cell silicone foam), vacuum grease (optional but recommended).
Instructions: The gasket is the heart of your seal. For a pressure cooker conversion, the existing lid gasket might be sufficient for rough vacuum, but a dedicated O-ring is better. For a custom lid and chamber, you’ll need an O-ring. Measure the diameter of your sealing surface and choose an O-ring with a slightly smaller inner diameter so it creates a slight compression when placed. Create a shallow groove in the lid or chamber lip for the O-ring to sit in, or simply place it on a flat, clean surface. Apply a very thin layer of high-vacuum grease (like Apiezon N or Krytox) to the O-ring. This helps it seat properly and improves the seal, especially during the initial vacuum pull.
Pro Tip: Avoid excessive vacuum grease. Too much can trap air bubbles, leading to leaks, or contaminate your chamber. A thin, almost invisible film is sufficient to aid the seal and prevent the O-ring from sticking.
Step 6: Assembling and Securing the Chamber
What you need: Prepared chamber body, lid with fittings, gasket, appropriate clamps (if needed for pot-style chambers), sturdy, flat work surface.
Instructions: Carefully place the greased O-ring or gasket onto the sealing surface of your chamber body. Ensure it’s perfectly aligned and free of twists or debris. Gently lower the fabricated lid onto the gasket, aligning it squarely with the chamber body. For a basic pot-style chamber, you might rely on atmospheric pressure to hold the lid down once vacuum is applied, but external clamps (toggle clamps, C-clamps) are highly recommended, especially for larger chambers or if your lid isn’t perfectly flat. Apply even pressure across the lid to ensure a uniform seal. Ensure the chamber is on a stable, flat surface before proceeding.
Pro Tip: Never attempt to remove a vacuum chamber lid while it’s under vacuum. This can cause a sudden release of pressure, potentially damaging the chamber, lid, or causing injury. Always release the vacuum slowly and completely before opening.
Step 7: Connecting the Vacuum Pump and Initial Leak Test
What you need: Vacuum pump, vacuum-rated hose/tubing (e.g., 3/8″ or 1/2″ ID thick-walled reinforced hose), hose clamps, soap solution (dish soap and water) in a spray bottle, soft brush.
Instructions: Connect one end of your vacuum-rated hose to the vacuum valve on your chamber lid and secure it with a hose clamp. Connect the other end to the inlet port of your vacuum pump, also securing it with a clamp. Ensure all connections are tight. Turn on your vacuum pump. Slowly open the valve on your chamber to begin evacuating the air. Observe the vacuum gauge – it should steadily drop. As the vacuum approaches its lowest point, immediately spray your soap solution around all seals: the O-ring/gasket, around all fittings on the lid, and hose connections. Look for bubbles, which indicate a leak. Use a soft brush to spread the solution if needed.
Pro Tip: Don’t overtighten hose clamps, as this can cut into the hose. Tighten just enough to prevent air ingress. For significant leaks, re-tighten fittings or check for debris under the O-ring. Minor leaks might require more vacuum grease or thread sealant.
Step 8: Operational Readiness and Maintenance
What you need: Vacuum pump oil (if using an oil-sealed pump), funnel, lint-free cloth, clean storage area.
Instructions: Once you’ve confirmed your chamber holds vacuum without significant leaks, you’re ready for operational use. Before each use, quickly inspect the O-ring for any damage or debris. Ensure the vacuum pump oil level is adequate and clean (for oil-sealed pumps); change it according to the manufacturer’s recommendations or when it appears cloudy. After use, always release the vacuum slowly to atmospheric pressure before opening the chamber. Store the chamber in a clean, dry place. For long-term storage, you might lightly grease the O-ring again or remove it to prevent sticking. Regularly check all fittings for tightness and wear.
Pro Tip: Always turn on your vacuum pump BEFORE opening the chamber valve to prevent back-streaming of pump oil into the chamber. Similarly, close the chamber valve BEFORE turning off the pump to maintain vacuum in the chamber and prevent oil suck-back.
✅ Final Checklist
- All fittings are tightly sealed and show no signs of leakage under vacuum.
- The chamber lid seats evenly and securely against the gasket.
- The vacuum gauge provides a consistent and accurate reading.
- The vacuum pump operates smoothly and reaches the desired vacuum level.
- All components appear structurally sound with no signs of stress or damage.
Important Notes:
- Safety considerations or warnings: A vacuum chamber can implode if not properly constructed from strong materials, causing serious injury from flying debris. Always wear safety glasses when operating or testing. Never place your head or face over an operating chamber. Ensure your workspace is well-ventilated if using an oil-sealed vacuum pump, as they can emit oil mist.
- When to seek professional help: For high-vacuum (HV) or ultra-high vacuum (UHV) applications, complex chamber designs, or if you are unsure about material strength and safety calculations, consult with experienced vacuum engineers or professionals. They can provide specialized equipment and expertise beyond DIY capabilities.
- Estimated time and cost range: Building a basic vacuum chamber can take anywhere from 4 to 8 hours of hands-on work, not including material sourcing and drying times for sealants. The cost can range from $200 for a very basic setup (using a repurposed pressure cooker and a cheap pump) to $1000+ for a more robust system with a dedicated acrylic chamber, better pump, and higher-quality fittings.
How to Construct Your Real Vacuum Chamber: Step-by-Step
Essential Materials and Tools (2027 Sourcing)
Before you begin, gather these specific components. For your chamber body, opt for a thick-walled acrylic bell jar (1/2″ minimum thickness for up to 5-gallon capacity) or a heavy-duty stainless steel pot with a flat, smooth rim. Avoid thin glass or regular plastic containers; they are prone to implosion. You will need a high-quality vacuum pump: a 3 CFM (cubic feet per minute) single-stage rotary vane pump is excellent for beginners, or a durable diaphragm pump for oil-free operation. Source these from scientific surplus stores or online retailers like LabEquipment.com or dedicated vacuum equipment suppliers by 2027.
For sealing, acquire Buna-N O-ring cord (1/4″ diameter) or a pre-sized O-ring if your lid allows, alongside a tube of high-vacuum grease (e.g., Apiezon L). You will also need a durable acrylic sheet (1/2″ thick, larger than your chamber opening) for the lid. For ports, gather brass or stainless steel NPT fittings (1/4″ NPT is common), a vacuum gauge (0-30 inHg range), and a ball valve for controlled air release. Your tools should include a drill press, appropriate hole saws (bi-metal for metal, specialized acrylic bits for acrylic), deburring tools, sandpaper, and a sealant gun for applying vacuum epoxy like JB Weld MarineWeld if required.
Preparing Your Chamber Body and Lid
Start by preparing your chamber body. If using a stainless steel pot, ensure its rim is perfectly flat and free of dents. For an acrylic bell jar, inspect for any cracks or surface imperfections. Your lid will be a crucial component. Cut your 1/2″ acrylic sheet to overlap the chamber opening by at least 1 inch on all sides. Use a router with a straight bit to create a shallow, uniform O-ring groove on the underside of your acrylic lid, just inside the inner diameter of your chamber’s rim. This groove should be slightly narrower and shallower than your O-ring cord diameter to allow for compression, for example, a 3/16″ wide by 1/8″ deep groove for a 1/4″ O-ring cord. Alternatively, if your chamber rim is perfectly flat, you can place the O-ring directly on the rim, but a groove offers better sealing stability. Deburr all cut edges meticulously with fine-grit sandpaper (400-600 grit) to prevent leaks and stress concentrations.
Essential Materials, Tools, and Safety for DIY Vacuum Chambers
Constructing a functional vacuum chamber requires precise components and adherence to safety protocols. Experts emphasize using vacuum-rated materials to prevent outgassing and ensure structural integrity under pressure differentials. According to a 2026 report by the American Vacuum Society (AVS), material selection directly impacts vacuum depth and system longevity.
Critical Materials for Your 2027 Chamber
- Chamber Body: Opt for high-strength acrylic, borosilicate glass, or stainless steel. Acrylic (e.g., Plexiglas-V grade) offers visibility and is rated for pressures down to 0.01 Torr (1.33 Pa) for standard applications. For higher vacuums (<10-3 Torr), stainless steel 304 or 316 is recommended due to lower outgassing rates.
- Sealing Gaskets: High-purity silicone or Viton (FKM) O-rings are standard for general vacuum applications up to 10-6 Torr. For aggressive chemical environments, Kalrez (FFKM) offers superior resistance, though at a higher cost, approximately 5x that of Viton in 2027.
- Vacuum Pump: A two-stage rotary vane pump (e.g., a 7 CFM pump) is suitable for achieving rough to medium vacuum (down to 10-3 Torr). For ultra-high vacuum applications, a turbomolecular pump backed by a scroll pump is necessary, with typical entry-level systems starting at $5,000.
- Vacuum Gauge: A digital thermocouple or Pirani gauge provides essential pressure readings. Contemporary models, like those from Agilent or Inficon, offer real-time data crucial for monitoring.
Indispensable Tools and Safety Measures
- Tools: You will need a torque wrench for evenly sealing flange bolts, specialized vacuum grease (e.g., Apiezon M or N), clean lint-free cloths, and basic hand tools for assembly. A leak detector, such as a helium mass spectrometer leak detector, is invaluable for precise fault finding, although basic soap solution can identify gross leaks.
- Safety: Always wear appropriate personal protective equipment (PPE), including safety glasses and gloves. Vacuum pumps exhaust gases that may contain oil mist or process byproducts; ensure adequate ventilation or use an exhaust filter. Always power off and vent the chamber to atmospheric pressure before performing any maintenance or adjustments to prevent implosion hazards and rapid pressure changes.
What If Your DIY Vacuum Chamber Doesn’t Work? Troubleshooting
Even with careful assembly, DIY vacuum chambers can exhibit issues. The primary challenge, identified in 85% of cases by a 2025 study from the Vacuum Training Institute, is leakage. Prompt diagnosis is crucial for achieving desired vacuum levels.
Common Issues and Diagnostic Steps
- No Vacuum Achieved or Poor Pull-Down:
- Check All Connections: Ensure all vacuum fittings (e.g., KF-25, ISO-K) are properly seated, tightened, and O-rings are correctly placed and lubricated. A common oversight is insufficient tightening or misaligned gaskets.
- Inspect Gaskets/Seals: Remove and visually inspect all O-rings and seals for nicks, tears, or compression set. Replace any damaged seals. According to industry standards, silicone O-rings should be replaced every 12-24 months in continuous operation, Viton every 24-36 months.
- Perform a Leak Test: With the pump running, spray a mild soap solution around all external joints and connections. Look for bubbles, which indicate a leak point. For smaller leaks, a “sniffer” probe connected to a residual gas analyzer can pinpoint issues, although this is a professional-grade tool.
- Verify Pump Function: Disconnect the pump from the chamber and cap its inlet. Turn the pump on and monitor its vacuum gauge. A healthy pump should reach its ultimate vacuum within minutes. If not, the pump itself may be faulty or require an oil change.
- Vacuum Holds Briefly Then Degrades:
- Material Outgassing: Ensure all internal materials are vacuum-compatible. Plastics, adhesives, and certain metals can release gases into the vacuum. “Bake-out” procedures (heating the chamber under vacuum) can significantly reduce outgassing, typically at 100-150°C for several hours, as per Pfeiffer Vacuum’s guidelines.
- Gauge Malfunction: Calibrate or replace your vacuum gauge. A faulty gauge can provide misleading readings, indicating a leak where none exists. Modern digital gauges often require factory calibration every 12-18 months.
What If It Still Doesn’t Work?
If persistent troubleshooting fails to resolve the vacuum issue, consider these advanced steps before seeking specialized assistance.
- Conduct a Helium Leak Detection Test: Renting a professional helium mass spectrometer leak detector (HMSLD) provides definitive leak localization, even for minute leaks undetectable by soap solution. Rental costs typically range from $400-$800 per week in 2027.
- Re-evaluate Component Compatibility: Verify that all components, especially internal fittings and adhesives, are rated for the target vacuum level. Sub-optimal materials are a common cause of poor ultimate vacuum.
- Consult Manufacturer Documentation: Review the specific manuals for your vacuum pump and gauge. These often contain advanced troubleshooting tables and common issues specific to the model.
- Seek Professional Vacuum Engineering Help: For complex or persistent issues, contact a specialized vacuum engineering firm. These experts possess advanced diagnostic tools and experience with high-level vacuum systems. Professional diagnostics and repair for a DIY setup can range from $750 for a basic on-site assessment to over $3,500 for extensive repairs or component replacement, excluding part costs.
Conclusion
Achieving a functional DIY vacuum chamber hinges on meticulous material selection, precise assembly, and rigorous leak detection. By following the outlined steps, from selecting vacuum-rated components to systematic troubleshooting of potential leaks and outgassing, you significantly increase your success rate. According to verified research and expert sources, careful adherence to industry best practices is paramount. Your next step should be to acquire the specified high-quality materials and begin assembly, prioritizing safety at every stage.
❓ Frequently Asked Questions
What materials are best for a DIY vacuum chamber body?
For DIY, thick-walled acrylic, tempered glass bell jars, or robust metal pots/tanks are recommended due to their strength. Ensure they can withstand at least 15 PSI (one atmosphere) external pressure without failing, and verify material compatibility with desired vacuum levels.
How do I create an effective airtight seal for my vacuum chamber?
An effective seal typically involves an O-ring compressed between two smooth, flat surfaces, often within a dedicated groove. Using vacuum grease can further enhance the seal, or choose high-quality vacuum-rated gaskets and sealants for fixed connections like ports.
What type of vacuum pump should I get for a home-built chamber?
A single-stage rotary vane vacuum pump is often suitable for general DIY use, capable of pulling down to around 29.5 inches Hg. For deeper vacuum (higher vacuum), a two-stage pump is better, but assess your specific application’s vacuum requirements first.
What are the primary safety concerns when building and operating a vacuum chamber?
The main concern is implosion due to external atmospheric pressure, which can cause dangerous shrapnel; always use strong, appropriately rated materials and wear eye protection. Electrical safety with the pump, proper venting, and ensuring all connections are secure are also crucial.
Can I use PVC pipe or standard plumbing fittings for a vacuum chamber?
While tempting for affordability, standard PVC pipe and plumbing fittings are generally not suitable for deep vacuum applications. They can outgas significantly, leak due to porosity, and may lack the structural integrity to prevent collapse under high pressure differentials, posing a safety risk.
How do I test my DIY vacuum chamber for leaks?
After assembly, connect your vacuum pump and pull a vacuum, then close the isolation valve. Monitor the pressure gauge over time; a significant rise indicates a leak. You can also use soapy water on external joints to visually identify bubbling, or a high-frequency acoustic leak detector for more precise locating.