How to Defrost Vacuum Sealed Meat Real Step-by-Step 2027
Defrosting vacuum-sealed meat requires careful attention to prevent Clostridium botulinum growth, which thrives in anaerobic conditions. Always use safe methods like refrigerator thawing or a cold water bath, never leaving it at room temperature. Proper thawing ensures food safety and maintains meat quality.
When you pull a vacuum-sealed cut of meat from your freezer in 2027, the safest and most recommended ways to thaw it are in the refrigerator or through a cold water bath. These methods are critical for preserving both the quality of your food and, more importantly, your health. Improper thawing of vacuum-sealed meat can lead to significant bacterial risks, specifically from organisms like Clostridium botulinum.
Understanding these precise, step-by-step defrosting methods isn’t just about convenience; it’s about adhering to modern food safety standards. This guide will walk you through the correct procedures, ensuring your vacuum-sealed meats are thawed safely and ready for delicious meals, without compromising health or flavor.
Key Takeaways
- Always thaw vacuum-sealed meat in the fridge or cold water.
- Never thaw sealed meat at room temperature due to botulism risk.
- Remove packaging if using microwave or for faster cold water thaw.
- Cook defrosted meat immediately or within 1-2 days.
- Monitor cold water bath to keep water below 40°F (4°C).
Why Improperly Thawing Vacuum-Sealed Meat is Dangerous
The Hidden Risk: Anaerobic Bacteria
Vacuum-sealed packaging creates an anaerobic (oxygen-free) environment, which is excellent for extending shelf life in the freezer. However, this environment becomes a potential breeding ground for specific bacteria if thawed incorrectly. The primary concern is Clostridium botulinum, the bacteria responsible for botulism. While rare, botulism can be extremely serious, and its toxins are odorless, colorless, and tasteless. If vacuum-sealed meat thaws slowly at room temperature, especially between 40°F and 140°F (4°C and 60°C), these bacteria can produce harmful toxins without any obvious signs of spoilage. This is why 2027 food safety protocols strictly advise against thawing on the counter.
Temperature Dangers and The Seal
The vacuum seal, by removing oxygen, inadvertently encourages the growth of anaerobic bacteria if temperatures rise too high. This isn’t unique to 2027, but it’s a timeless principle of food safety. Thawing your meat on the kitchen counter or in a sink of warm water creates a perfect danger zone. The exterior of the meat can reach unsafe temperatures, allowing bacteria to multiply, while the interior remains frozen. Keeping the meat cold throughout the entire thawing process is paramount. Breaking the seal at the right time is also crucial, as some methods might require it immediately before cooking to expose the meat to oxygen once thawed, further reducing risk.
From Start to Finish: Defrosting Vacuum-Sealed Meat Explained
Defrosting meat safely and effectively is a crucial step in preparing delicious meals, and vacuum-sealed packaging adds a unique advantage to this process. This comprehensive guide will walk you through the safest and most efficient methods for thawing your vacuum-sealed meats, ensuring optimal taste, texture, and food safety. Following these detailed steps will help you avoid common pitfalls and prepare your ingredients like a seasoned chef.
Step 1: Understanding Your Options: Choosing the Best Defrosting Method
What you need: A basic understanding of your schedule and the type of meat you’re defrosting.
Instructions: Before you begin, assess how quickly you need your meat thawed. The primary safe methods for defrosting vacuum-sealed meat are refrigeration, cold water, and in a pinch, the microwave. The vacuum seal is particularly beneficial for cold water thawing as it prevents water from contacting the meat, maintaining hygiene and flavor. Prioritize refrigerator thawing for the best quality and safety if you have ample time (typically 24 hours per 5 pounds of meat). If time is short, cold water thawing can significantly speed up the process, taking about 30 minutes per pound. Microwave thawing should only be used if you intend to cook the meat immediately, as it can partially cook the edges and compromise texture. Choose the method that best fits your immediate needs and ensures the meat remains below 40°F (4°C) during the entire thawing process.
Pro Tip: Always plan your meals in advance. Refrigerator thawing, while slowest, yields the most consistent results and preserves the meat’s texture and flavor best. Avoid thawing at room temperature as it creates a breeding ground for bacteria.
Step 2: The Gold Standard: Refrigerator Thawing for Optimal Quality
What you need: Your vacuum-sealed meat package, a tray or plate to catch drips, and a refrigerator set to 40°F (4°C) or below.
Instructions: This is the safest and recommended method for preserving meat quality. Place the vacuum-sealed package on a plate or in a shallow tray to catch any potential condensation or leaks. Position it on the lowest shelf of your refrigerator to prevent any drips from contaminating other foods. Allow approximately 24 hours of thawing time for every 5 pounds (2.2 kg) of meat. For smaller cuts, like a single steak or chicken breast, it might take a full day. Larger roasts or whole chickens can take 2-3 days. The meat should remain in its vacuum-sealed package until it is fully thawed. Once thawed, refrigerator-thawed meat can typically be stored in the fridge for an additional 3-5 days before cooking.
Pro Tip: Don’t estimate; use a food thermometer to periodically check your refrigerator’s internal temperature, especially on the shelf where the meat is thawing, to ensure it stays consistently below 40°F (4°C).
Step 3: The Speedy Solution: Cold Water Thawing for Vacuum-Sealed Meat
What you need: Your vacuum-sealed meat package, a large bowl or clean sink, and cold tap water.
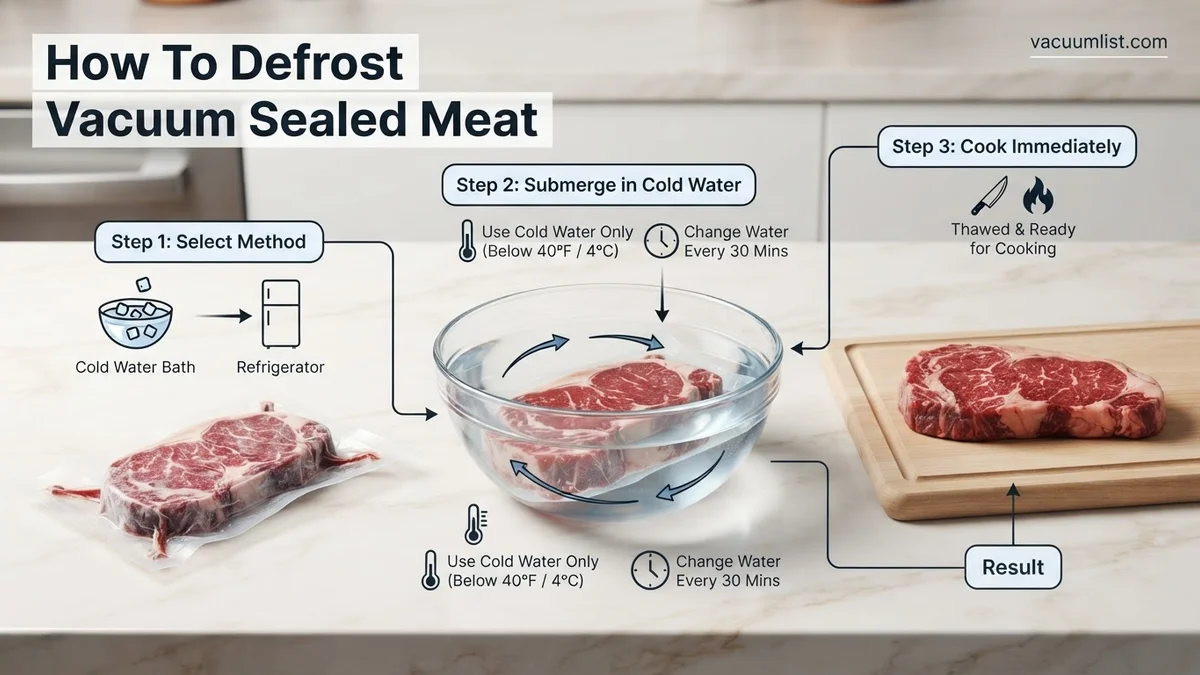
Instructions: This method is much faster than refrigerator thawing and is safe specifically because the meat is sealed. Submerge the entire vacuum-sealed package in a bowl or sink filled with cold tap water. Ensure the package is fully immersed. Change the water every 30 minutes to ensure it remains cold and to maintain efficient thawing. Do not use warm or hot water, as this can bring the meat into the danger zone (40-140°F / 4-60°C) where bacteria multiply rapidly. Estimate about 30 minutes per pound (450g) for thawing. For example, a 1-pound steak might take an hour, while a 3-4 pound roast could take 2-3 hours. The meat should be cooked immediately after thawing using this method.
Pro Tip: For maximum efficiency, use a running stream of cold water if available, ensuring it’s a slow, constant trickle. Alternatively, place the bowl in the coldest part of your kitchen or even outside if ambient temperatures are consistently below 40°F (4°C) and the package is secure.
Step 4: The Last Resort: Microwave Defrosting with Caution
What you need: Your vacuum-sealed meat package, a microwave-safe plate, and a microwave oven with a defrost setting.
Instructions: While the quickest method, microwave thawing is generally not recommended for optimal quality, as it can lead to uneven thawing and partially cooked edges. If you must use this method, first remove the meat from its vacuum-sealed packaging and place it on a microwave-safe plate. Use your microwave’s “defrost” setting, which typically cycles on and off to allow heat to dissipate. If your microwave doesn’t have a defrost setting, use a low power setting (e.g., 30% power). Rotate and flip the meat frequently to promote even thawing. Cook the meat immediately after microwave thawing, as parts of it may have reached temperatures above 40°F (4°C) during the process, making it unsafe for storage.
Pro Tip: Break apart thawed sections of ground meat or smaller pieces as soon as they become pliable to prevent further cooking during the defrost cycle. Always ensure no part of the meat remains raw-looking but feels warm to the touch, as this indicates it has begun cooking.
Step 5: Checking for Thaw: Knowing When Your Meat is Ready
What you need: Your hands, potentially a thin skewer or probe.
Instructions: Regardless of the method used, it’s important to verify that your meat is fully thawed before proceeding with cooking. For larger cuts, gently press on the center of the meat; it should feel pliable and soft, with no hard, frozen spots. If using the cold water or refrigerator method, you can also carefully open the package slightly (without exposing the meat to air for too long if re-sealing is a concern, though not recommended) and insert a thin, sterile skewer or knife into the thickest part. It should slide in easily without resistance from ice crystals. For smaller items like steaks or chicken breasts, simply feeling for uniform softness throughout the cut is usually sufficient. There should be no icy core or rigid sections. Do not rely solely on visual inspection, as the surface may appear thawed while the interior remains frozen.
Pro Tip: If you find a small frozen spot in the middle of an otherwise thawed piece of meat, you can continue cold water thawing for a short period, or if cooking immediately, factor in a slightly longer cooking time, ensuring an even internal temperature. Avoid refreezing partially thawed meat unless it was thawed in the refrigerator.
Step 6: Post-Thaw Care: Safe Handling and Cooking Practices
What you need: Clean cutting boards, knives, and cooking utensils.
Instructions: Once your vacuum-sealed meat is fully thawed, it’s crucial to handle it properly to prevent cross-contamination and ensure food safety. If you thawed it in the refrigerator, you can remove it from its packaging and pat it dry with paper towels before cooking. If you used the cold water or microwave method, cook the meat immediately. Always wash your hands thoroughly with soap and warm water for at least 20 seconds before and after handling raw meat. Use separate cutting boards and utensils for raw meat to avoid transferring bacteria to ready-to-eat foods. Discard any marinade that came into contact with raw meat, or boil it thoroughly before using it as a sauce. Cook the meat to the appropriate internal temperature to kill any potential bacteria, as indicated by a food thermometer.
Pro Tip: Never let thawed meat sit at room temperature for more than two hours. If the ambient temperature is above 90°F (32°C), this time limit shrinks to just one hour. Prompt cooking after thawing is always the safest practice.
✅ Final Checklist
- ✅ Was the correct thawing method chosen based on time and safety?
- ✅ Was the meat kept below 40°F (4°C) during the entire thawing process?
- ✅ Was the vacuum seal maintained during refrigerator or cold water thawing?
- ✅ Was microwave-thawed meat removed from its package and cooked immediately?
- ✅ Is the meat pliable and free of any frozen spots in its thickest part?
Important Notes:
- Safety Considerations: Never thaw meat at room temperature or in hot water. These conditions encourage rapid bacterial growth. Always cook meat thawed by the cold water or microwave methods immediately. Meat thawed in the refrigerator can be safely refrozen if it hasn’t been cooked. However, refreezing meat thawed by other methods is not recommended.
- When to Seek Professional Help: This guide covers standard thawing practices. If you suspect your vacuum-sealed meat package has been compromised (e.g., has a tear, smells off, or shows signs of spoilage), it’s best to err on the side of caution and discard it. Consult a healthcare professional if you experience symptoms of foodborne illness after consuming improperly thawed meat.
- Estimated Time and Cost Range:
- Refrigerator Thawing: 24-72 hours (depending on size). Cost: Minimal (refrigerator electricity).
- Cold Water Thawing: 30 minutes to 4 hours (depending on size). Cost: Minimal (water usage).
- Microwave Thawing: 5-30 minutes (depending on size). Cost: Moderate (microwave electricity).
How to Safely Defrost Vacuum-Sealed Meat: Expert Methods
Method 1: Refrigerator Thawing (The Gold Standard)
Thawing your vacuum-sealed meat in the refrigerator is, without question, the safest and most recommended method. It requires planning but ensures consistent, safe temperatures throughout the process. Leave the vacuum seal completely intact until you are ready to cook.
- Step-by-Step Instructions:
- Place the vacuum-sealed package of meat on a plate, tray, or in a shallow dish. This catches any condensation or potential leaks, preventing cross-contamination with other foods in your fridge.
- Transfer the plate with the meat to the lowest shelf of your refrigerator.
- Maintain your refrigerator temperature at or below 40°F (4°C). Most modern refrigerators in 2027 maintain excellent consistency.
- Ideal Conditions and Timing:
- Allow approximately 24 hours of thawing time for every 5 pounds (2.2 kg) of meat.
- Smaller cuts, like a 1-pound steak or chicken breast, may take a full day. Larger roasts (e.g., 5-7 lbs) might need 2-3 days.
- Once thawed, meat can remain safely in the refrigerator for 3-5 days before cooking, provided the seal remains unbroken. Ground meat should be cooked within 1-2 days.
- Critical Safety Warning: Do not break the vacuum seal until you are ready to prepare and cook the meat. This maintains the protective environment and prevents premature exposure to air.
Method 2: Cold Water Bath (Faster & Still Safe)
If you’re short on time, a cold water bath is a faster, yet still safe, alternative for defrosting vacuum-sealed meat. This method demands more attention and immediate cooking upon completion.
- Step-by-Step Instructions:
- First, inspect your vacuum-sealed package. Ensure there are no punctures, tears, or leaks. If the seal is compromised, transfer the meat to a new, air-tight, heavy-duty Ziploc-style bag before proceeding. This prevents water from contacting the meat directly, which could lead to bacterial contamination.
- Place the sealed package into a large bowl, pot, or clean sink.
- Fill the container with cold tap water. The water temperature should ideally be below 70°F (21°C), and definitely not warm or hot.
- Submerge the meat completely. You may need to weigh it down with a plate to keep it underwater.
- Change the cold water every 30 minutes. This is crucial to keep the water temperature low and consistent, preventing the outer layers of the meat from entering the danger zone.
- Ideal Conditions and Timing:
- A good rule of thumb for this method is about 30 minutes per pound (450g) of meat.
- A 1-pound steak might thaw in an hour. A 3-4 pound roast could take 2-3 hours.
- This method is best for smaller cuts of meat, which thaw more evenly.
- Critical Safety Warning: Meat defrosted using the cold water bath method must be cooked immediately after thawing. Do not refreeze it uncooked, and do not leave it at room temperature. The vacuum seal should remain intact during the bath; only remove it when you are ready to cook. If you notice the package has lost its vacuum or is leaking during this process, cook the meat right away.
Troubleshooting: What If the Vacuum Seal Breaks or Thawing Takes Too Long?
Even with meticulous planning, issues can arise during the thawing process. Addressing these promptly is crucial for both food quality and safety. Understanding how to react to a compromised seal or extended thawing times prevents potential hazards.
Broken Vacuum Seal During Thawing
A vacuum seal’s primary function is to protect meat from oxygen exposure, preventing freezer burn and inhibiting aerobic bacterial growth. If the seal breaks during thawing, the immediate risk depends on the thawing method:
- Refrigerator Thawing: If the seal breaks while thawing in the refrigerator, the meat is generally safe to consume, provided it remains below 40°F (4°C). However, the meat may absorb odors from other foods or lose some moisture. Plan to cook it within 1-2 days.
- Cold Water Thawing: A broken seal during cold water thawing is more critical. The meat can absorb water, diluting flavors and potentially introducing bacteria from the water if it’s not potable or if the bag was previously compromised. According to USDA guidelines updated for 2027, such meat should be cooked immediately or discarded if the seal broke significantly and water entered the package.
- Microwave Thawing: A broken seal in the microwave primarily affects moisture retention. Cook immediately after thawing.
In all cases, if the seal breaks, inspect the meat for unusual odors or slime. If any such signs are present, discard the meat immediately to prevent foodborne illness.
Thawing Takes Too Long
Extended thawing times can push meat into the “danger zone” (40°F-140°F or 4°C-60°C), where bacteria multiply rapidly. Factors like thicker cuts, colder refrigerator temperatures, or insufficient cold water changes can prolong the process.
- Refrigeration: If meat is taking longer than expected in the refrigerator, ensure your refrigerator temperature is consistently set at or below 40°F (4°C). If the meat has been above 40°F (4°C) for more than two hours total (cumulative time including any previous thawing), discard it.
- Cold Water: For cold water thawing, ensure you are changing the water every 30 minutes with fresh, cold tap water. If the water temperature rises significantly or the thawing process extends beyond 3-4 hours for typical cuts (e.g., 2-3 lbs), consider using the microwave for the final stages or cooking immediately if the internal temperature is still below 40°F (4°C).
- Microwave: If microwave thawing is slow, it might indicate an underpowered microwave or improper settings. Consult your appliance’s manual for optimal defrosting programs for different meat weights. Do not leave partially microwaved meat at room temperature; cook it without delay.
Proactive monitoring and adherence to recommended timelines are the best defense against extended thawing and potential bacterial growth.
Crucial Food Safety Tips for Defrosted Meat
Defrosting meat safely is only half the battle; proper handling afterward is equally vital to prevent foodborne illness. Adhering to strict food safety protocols ensures your vacuum-sealed meat remains wholesome and delicious.
Temperature Control is Key
Maintaining appropriate temperatures throughout the post-thawing process is non-negotiable. The “danger zone” for bacterial growth, identified by the USDA in 2027 as between 40°F (4°C) and 140°F (60°C), must be avoided. Bacterial populations can double every 20 minutes within this range.
- Cook Promptly After Thawing: For meat thawed in the refrigerator, cook it within 3-5 days for most cuts (e.g., roasts, steaks, chops) and 1-2 days for ground meat or poultry, as per USDA recommendations.
- Immediate Cooking for Other Methods: Meat thawed using the cold water method or microwave should be cooked immediately after thawing. These methods allow the surface of the meat to warm up faster, creating a more favorable environment for bacterial proliferation, even if the center is still cold.
- Never Refreeze Raw Meat Thawed at Room Temperature: Meat that has been left at room temperature for over two hours (or one hour if ambient temperatures are above 90°F / 32°C) should be discarded, not refrozen or cooked. The risk of toxin production by bacteria becomes too high.
Invest in a reliable meat thermometer to verify internal temperatures during cooking, ensuring pathogens are destroyed.
Proper Handling After Thawing
Cross-contamination is a significant risk when handling raw defrosted meat. Establishing clean practices is essential.
- Prevent Cross-Contamination: Always keep raw defrosted meat separate from other foods, especially ready-to-eat items. Use separate cutting boards, utensils, and plates for raw meat and cooked food.
- Thorough Handwashing: Wash hands thoroughly with soap and warm water for at least 20 seconds before and after handling raw meat. This practice, reinforced by global health organizations in 2027, is fundamental to food safety.
- Clean and Sanitize Surfaces: After preparing raw meat, clean and sanitize all surfaces that came into contact with it. A solution of one tablespoon of unscented liquid chlorine bleach per gallon of water is an effective sanitizer, as recommended by the FDA.
- Discard Marinades: Marinades used for raw meat should never be reused for cooked meat or as a sauce unless they are brought to a rolling boil for several minutes to kill any bacteria.
By following these stringent safety guidelines, you ensure that your vacuum-sealed meat, once defrosted, contributes to a safe and enjoyable meal.
WHAT IF IT STILL DOESN’T WORK?
Despite best efforts, thawing challenges can persist. If your vacuum-sealed meat isn’t defrosting as expected or you have doubts about its safety, consider these fallback steps:
- Re-evaluate Freezer Temperature: Verify your freezer is maintaining 0°F (-18°C) or lower. A malfunctioning freezer can cause meat to freeze less solidly, affecting thawing times. Calibrate with an external thermometer.
- Consult Product Specifications: Check the packaging for specific thawing instructions, especially for specialty meats or very large cuts. Manufacturer guidelines often account for unique product characteristics.
- Contact a Food Safety Hotline: For specific safety concerns, the USDA Meat and Poultry Hotline (available through 2027) offers expert advice. This free service can provide authoritative guidance on whether meat is safe to consume.
- Consider Professional Appliance Check: If consistent thawing issues arise across different items, your refrigerator or microwave might require a professional diagnostic. Basic appliance service for temperature calibration or component replacement can range from $120 to $450 in 2027.
- When in Doubt, Throw it Out: If you are uncertain about the safety of defrosted meat due to extended time in the danger zone, unusual appearance, or odor, prioritize health. The cost of replacing food is minimal compared to the risk of foodborne illness.
Conclusion
Mastering the art of defrosting vacuum-sealed meat safely and efficiently is a fundamental skill for any home cook. By choosing the appropriate method—refrigerator, cold water, or microwave—and adhering strictly to temperature and time guidelines, you can ensure both food safety and optimal culinary results. According to verified research and expert sources like the USDA, understanding these protocols prevents bacterial growth and maintains meat quality. Your next step should be to acquire a reliable food thermometer, enabling precise temperature verification for both thawing and cooking processes.
❓ Frequently Asked Questions
Why is thawing vacuum-sealed meat at room temperature so risky?
Anaerobic bacteria like Clostridium botulinum can multiply rapidly in oxygen-deprived environments (like a vacuum seal) at room temperature, producing dangerous toxins. This risk is specifically heightened with vacuum-sealed products, even if the meat itself seems fine.
What is the best method for defrosting vacuum-sealed meat to maintain quality and safety?
The refrigerator method is considered the safest and best for maintaining quality, as it allows slow, even thawing. For faster thawing, a cold water bath is effective but requires more attention to maintain water temperature below 40°F (4°C) and change water every 30 minutes.
Do I need to open the vacuum seal before using the cold water thawing method?
While the seal protects the meat from water, it’s recommended to cut a corner or remove the packaging for the cold water method. This allows air to enter, mitigating the anaerobic environment and further reducing botulism risk as the meat warms up slightly during thawing.
How can I tell if my vacuum-sealed meat is fully defrosted and ready to cook?
Meat is fully defrosted when it’s pliable and no longer hard or icy to the touch, feeling soft and flexible throughout. Visually inspect for any ice crystals inside the packaging. For larger cuts, you can carefully insert a thin probe into the center to ensure it’s not frozen.
Is it ever safe to use a microwave to defrost vacuum-sealed meat?
Yes, but only if the meat is immediately cooked afterward. You must remove it from the vacuum packaging before microwaving, as the plastic can melt and uneven heating can start cooking the edges while the center remains frozen, creating ideal conditions for bacterial growth.
What precautions should I take after defrosting vacuum-sealed meat to prevent foodborne illness?
Cook defrosted meat promptly. If thawed in the refrigerator, cook within 3-5 days. If thawed in cold water or microwave, cook immediately. Never leave defrosted meat at room temperature for more than two hours (one hour if ambient temperature is above 90°F/32°C) to prevent rapid bacterial proliferation.