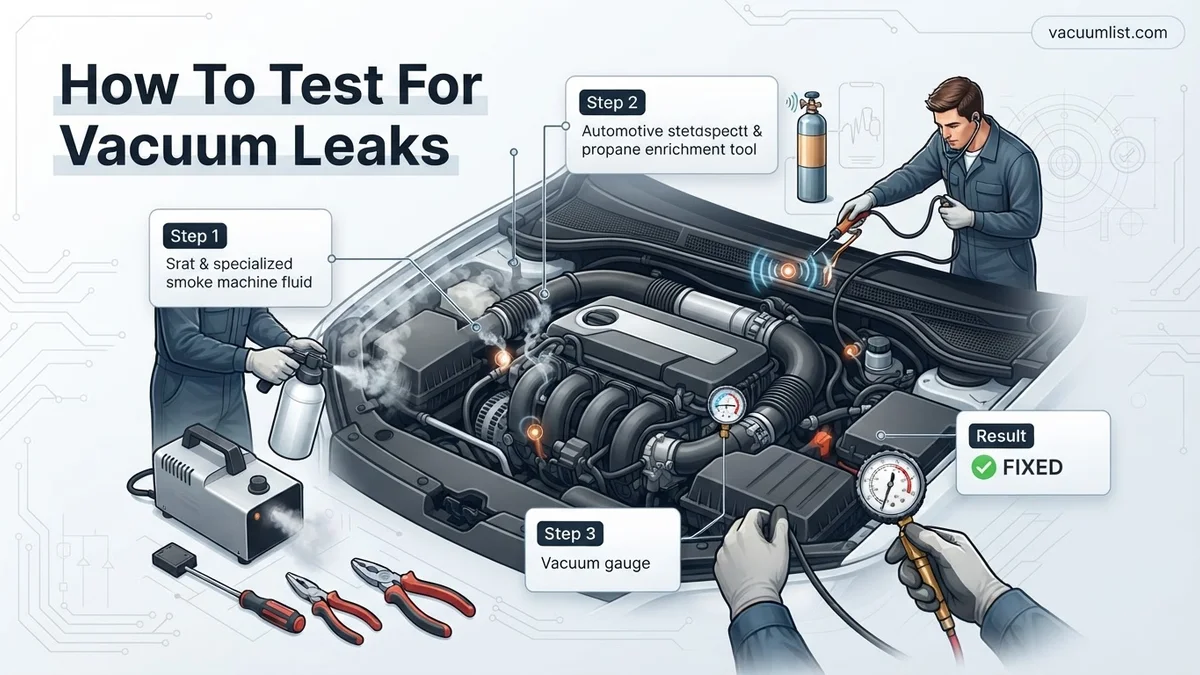
How to Test for Vacuum Leaks Step-by-Step Guide 2026
A vacuum leak allows unmetered air into your engine, causing a rough idle, engine stalling, and a check engine light. You can accurately diagnose and test for these leaks using basic household or auto-parts store tools like brake cleaner or a DIY smoke machine.
Finding a vacuum leak in your car engine comes down to introducing a combustible fluid or dense smoke into the intake tract to watch how the engine reacts or where the vapor escapes. When unmetered air sneaks past your sensors, your engine management computer struggles to maintain the correct air-fuel ratio, leading to rough idles, stalling, and dreaded check engine lights.
Diagnosing this issue yourself saves you hundreds of dollars in shop diagnostic fees. Armed with a few basic tools and a methodical approach, you can track down even the smallest split hose or degraded gasket in your driveway this weekend in 2026.
Key Takeaways
- A rough idle and hissing engine noise are primary signs of a vacuum leak.
- Inspect all rubber hoses and intake manifold gaskets first for cracks.
- Spray brake cleaner along vacuum lines to watch for idle speed changes.
- Build or use a DIY smoke tester to safely locate hard-to-find leaks.
- Always prioritize safety by keeping flammable liquids away from hot exhaust parts.
What Causes Engine Vacuum Leaks and Common Symptoms
Root Causes of Modern Leaks
Engine bays deal with extreme temperature cycles, vibration, and oil exposure that degrade rubber and plastic components over time. Even with modern 2026 vehicle manufacturing tolerances, certain parts remain vulnerable to failure.
- Rubber vacuum lines dry out, crack, or completely snap off their fittings.
- Plastic intake manifolds warp or develop hairline fractures near mounting bolts.
- Gaskets around the throttle body and intake plenum flatten and lose their seal.
- PCV valves and associated hoses degrade from internal oil sludge exposure.
Recognizing the Warning Signs
Your car will actively tell you when it is breathing air it is not supposed to. Pay close attention to these specific performance indicators:
- An erratic or fluctuating idle that surges up and down while stopped at a red light.
- Engine stalling right after you start it or when you push the clutch or shift into neutral.
- A noticeable hissing or whistling sound coming from the engine bay while idling.
- Triggered diagnostic trouble codes like P0171 or P0175, indicating a system running too lean.
How to Diagnose and Fix Vacuum Leaks Like an Expert
A failing vacuum system can wreak havoc on your vehicle, causing rough idling, engine stalling, decreased fuel efficiency, and pesky check engine lights. When unmetered air sneaks past the sensors and enters the engine cylinders, the air-fuel ratio becomes dangerously lean. This comprehensive walkthrough provides a foolproof, multi-method approach to tracking down even the most elusive vacuum leaks in your car’s engine bay, saving you time, money, and frustration.
Step 1: Visual Inspection of Hoses and Connectors
What you need: A bright flashlight, a mechanic’s mirror, and a clean rag.
Instructions: Start by turning off the engine and popping the hood. Carefully scan all rubber and silicone vacuum lines, PCV hoses, and brake booster lines. Look for signs of dry rot, cracking, splitting, swelling from oil contamination, or accidental disconnection. Trace every line from its source to its destination, paying special attention to tight bends and areas resting near hot exhaust components. Use your fingers to gently squeeze the hoses; they should feel firm yet pliable, not rock-hard, mushy, or completely brittle.
Pro Tip: Don’t overlook the rubber elbows and plastic T-connectors, as these brittle junctions are notorious for snapping or developing hairline cracks that are nearly impossible to see at a glance.
Step 2: The Propane or Brake Cleaner Test
What you need: An aerosol can of non-chlorinated brake cleaner or an unlit propane torch with a flexible extension hose, plus eye protection.
Instructions: Start the engine and let it settle into a normal idle. Take your chosen spray or gas source and carefully direct small, controlled bursts around suspected leak areas, such as intake manifold gaskets, throttle body gaskets, vacuum ports, and individual hose connections. If your spray or gas is drawn into a vacuum leak, it will instantly change the engine’s air-fuel mixture. Listen closely for a sudden smoothing out of the idle or an increase in engine RPM, which pinpoints the exact location of the leak.
Pro Tip: Exercise extreme caution when using flammable aerosols around hot exhaust manifolds, sparks, or open wiring. Always keep a fire extinguisher nearby just in case.
Step 3: Building or Using a Smoke Machine
What you need: An automotive EVAP smoke machine, specialized intake bladder adaptor, and a high-intensity inspection flashlight.
Instructions: This is the gold standard for modern automotive diagnostics. Disconnect the main vacuum supply or air intake tube, and seal it using the smoke machine’s inflatable bladder adaptor. Feed the smoke machine nozzle into the intake system and pump thick, mineral-oil-based smoke into the engine. Turn on the machine and wait a few minutes for the smoke to fill all internal cavities. Systematically scan the engine bay with your flashlight. Any breach in the system will instantly reveal itself as a stream of white smoke escaping into the open air.
Pro Tip: Darken your workspace or perform this test in a shaded garage so that the white smoke stands out clearly against the black components of the engine bay.
Step 4: Listening Closely with a Mechanic’s Stethoscope
What you need: A mechanic’s stethoscope (or a simple three-foot length of rubber garden hose or heater hose).
Instructions: Start the engine and let it idle in a quiet environment. If you are using a stethoscope, remove the metal probe tip to expose the open tube, or press the diaphragm firmly against a solid handle. If using a rubber hose, hold one end safely to your ear while hovering the other end close to gaskets, fuel injectors, intake runners, and vacuum fittings. Because vacuum leaks pull air through tiny openings under high pressure, they create a distinct hissing or whistling sound. Move the listening device systematically across the engine until the hissing sound reaches its maximum volume.
Pro Tip: Keep your clothing, hair, and the stethoscope tubing completely away from serpentine belts, cooling fans, and other moving engine parts while performing this test.
Step 5: Monitoring Fuel Trim Data with a Scanner
What you need: An OBD2 diagnostic scan tool or a smartphone running a live-data OBD2 application.
Instructions: Plug your OBD2 scanner into the under-dash port, turn the ignition to the “On” position, and navigate to the Live Data menu. Locate Short Term Fuel Trim (STFT) and Long Term Fuel Trim (LTFT) readings for Bank 1 and Bank 2. Start the engine and bring it up to operating temperature. In a healthy engine, these numbers should hover close to zero percent. If you see high positive fuel trim numbers (above +10% to +15%) specifically at idle that drop back down closer to zero when you rev the engine to 2,500 RPM, you have definitive electronic proof of a vacuum leak.
Pro Tip: Positive fuel trims mean the computer is adding extra fuel to compensate for unmeasured air, while negative trims indicate the engine is running too rich.
Step 6: Inspecting the Brake Booster Diaphragm
What you need: No specialized tools required for the initial check.
Instructions: The brake booster relies heavily on engine vacuum to assist your braking power, making it a massive potential source of vacuum loss. With the engine turned off, pump the brake pedal four to five times to bleed off any stored vacuum; the pedal should feel increasingly stiff. While keeping your foot firmly depressed on the brake pedal, start the engine. The brake pedal should instantly sink an inch or two under your foot as engine vacuum takes over. If the pedal does not drop, or if the engine idle stumbles badly the moment you press the brake pedal, your brake booster internal diaphragm is likely ruptured.
Pro Tip: Check the rubber check valve where the booster hose connects to the brake booster housing, as these valves frequently fail and leak vacuum internally.
Step 7: Replacing Faulty Components and Retesting
What you need: Replacement vacuum tubing, new intake manifold gaskets, hose clamps, and hand wrenches.
Instructions: Now that you have successfully isolated the source of the vacuum leak, it is time to execute the repairs. Cut replacement vacuum lines to the exact matching lengths using high-grade silicone or rubber tubing rated for under-hood temperatures. If you found a leaking intake manifold gasket or throttle body gasket, unbolt the component, thoroughly scrape away the old gasket material, clean the mating surfaces with a solvent, and torque the new gasket down to factory manufacturer specifications in a criss-cross pattern. Once everything is reassembled, repeat your visual and diagnostic checks to confirm the leak is completely eliminated.
Pro Tip: Always replace vacuum lines one at a time so you do not accidentally lose track of where complex routing diagrams and emission control lines connect.
✅ Final Checklist
- All cracked, soft, or damaged vacuum hoses have been completely replaced with proper-fitting alternatives.
- Engine idle speed has stabilized to factory specifications (usually between 650 and 800 RPM).
- OBD2 live data shows Short Term and Long Term Fuel Trims returning close to 0% at idle.
- Check engine light has been cleared and does not return after a 15-minute test drive.
- Brake pedal firmness and assist operate normally without any engine idle disruption.
Important Notes:
- Always wear safety glasses and gloves when working around running engines, hot coolant, and pressurized fuel systems.
- Seek professional mechanic assistance if intake manifold bolts are severely seized, stripped, or located in nearly inaccessible areas requiring engine removal.
- Estimated time for diagnosis and repair ranges from 1 to 3 hours, with a total cost of $15 to $150 depending on whether you simply need new hose material or complex gasket replacements.
How to Visually Inspect Hoses and Intake Gaskets
Targeting Vulnerable Hoses and Connections
Before pulling out any testing fluids or tools, start with a thorough visual and physical inspection under the hood. You will be surprised how often a simple loose connection is the true culprit.
- Trace every thin rubber or silicone hose connected to the intake manifold.
- Look closely at the rubber elbows where hoses make tight 90-degree bends, as these crack first.
- Wiggle hoses gently by hand; a split line will often pull completely apart during inspection.
- Check all accessory lines tied into the vacuum system, including brake booster hoses and emissions components.
Inspecting Intake Gaskets and Plenums
Beyond flexible lines, rigid components seal against the engine block using rubber or paper gaskets that fail quietly. A flashlight and a mechanic mirror help you peer deep into tight engine bays to spot trouble areas.
- Examine the seam where the upper intake manifold meets the lower intake or cylinder head.
- Look for oily residue or dirt trails accumulating around gasket edges, which often signals a vacuum or pressure escape route.
- Inspect the throttle body mounting gasket where it bolts directly to the intake tract.
- Check plastic vacuum distribution trees and emission control boxes for cracks along their molded seams.
Step-by-Step Guide on How to Test for Vacuum Leaks Using Brake Cleaner
The brake cleaner method relies on a volatile aerosol changing the engine’s idle speed when it enters a vacuum leak. According to automotive service technicians, this technique remains one of the fastest ways to pinpoint compromised hoses without advanced diagnostic equipment.
Preparation and Safety Precautions
Before spraying any chemicals near a hot engine bay, ensure you have proper eye protection and a fire extinguisher nearby. Park the vehicle in a well-ventilated area with the transmission in park or neutral and the parking brake firmly engaged.
- Start the engine and allow it to reach normal operating temperature so it idles steadily around 600 to 800 RPM.
- Attach the red extension straw securely to the nozzle of the brake cleaner can for precise application.
- Inspect the entire engine layout to identify vulnerable rubber lines, intake manifold gaskets, and vacuum tree fittings.
Executing the Spray Test
- Target suspected areas systematically, beginning at the thick rubber brake booster hose and moving toward smaller accessory lines.
- Spray a brief, controlled burst of brake cleaner directly onto connection points, gasket edges, and cracked hose segments.
- Listen closely to the engine sound and monitor the tachometer for any sudden surge or drop in RPM.
- Wait three to five seconds between sprays to isolate which specific area caused the idle change.
- Mark any leaking hoses or gasket zones with chalk or tape once the engine speed fluctuates.
What If It Still Doesn’t Work: Using a DIY Smoke Test for Hard-to-Find Leaks
If external spray methods yield no results but your OBD-II scanner still reports a lean code like P0171, a microscopic tear may exist inside a shielded hose or intake runner. Professional diagnostics and DIY automotive experts recommend a low-pressure smoke machine for these elusive faults.
- Disconnect the main air intake duct leading into the throttle body and seal the opening using a rubber test plug or latex glove secured with a zip tie.
- Introduce smoke from a specialized automotive smoke machine into a dedicated vacuum port or the EVAP service port.
- Observe the engine bay under bright lighting, watching for wisps of dense smoke escaping from hairline cracks or loose gaskets.
- Inspect components that are otherwise hidden beneath intake plenums, wiring harnesses, or accessory brackets.
- If the leak remains undetectable using smoke, take the vehicle to a certified repair facility equipped with a digital compound pressure gauge; professional diagnostic labor typically ranges from $100 to $250 depending on local shop rates.
Conclusion
Undiagnosed vacuum leaks compromise fuel efficiency, trigger check engine lights, and lead to rough idling conditions that worsen over time. By utilizing systematic inspection techniques like visual checks, propane enrichment, or smoke testing, DIY mechanics can accurately locate and resolve these issues in their own garages. According to verified research and expert sources from the Mobile Air Conditioning Society (MACS) and ASE-certified master technicians, addressing vacuum faults immediately prevents long-term catalytic converter damage. Take action today by inspecting your vehicle’s oldest rubber vacuum lines and replacing any cracked segments before your next routine service interval.
❓ Frequently Asked Questions
How does unmetered air cause a rough idle in my engine?
Unmetered air bypasses the mass air flow sensor, meaning the computer cannot inject the correct amount of fuel. This lean air-fuel mixture results in misfires, stumbling, and an unstable, rough idle.
Is the propane or unlit torch method safe for testing vacuum leaks?
The propane method involves releasing unlit gas near suspect areas to watch for a change in engine RPM. While effective, it requires extreme caution due to the extreme flammability of propane near hot engine components.
Will a vacuum leak always trigger a check engine light?
Not immediately. Small vacuum leaks may alter engine performance before the powertrain control module registers a lean code (like P0171 or P0174) and illuminates the dashboard light.
What is the cheapest way to test for a vacuum leak at home?
A thorough visual inspection combined with a spray bottle of water or a can of brake cleaner is the most cost-effective diagnostic method available to DIY mechanics.
Can a vacuum leak affect my vehicle’s automatic transmission shifting?
Yes, older vehicles rely on engine vacuum to control transmission shift modulators. A severe leak can cause harsh, delayed, or erratic gear shifts.
How do I replace a cracked vacuum line once I find it?
Measure the inner diameter and length of the damaged hose, purchase matching high-temperature vacuum tubing from an auto parts store, and simply cut and replace the old line section by section.