How Does a Vacuum Thermos Work in 2026 Expert Guide
A vacuum thermos stops heat transfer by using a double-walled container with a near-vacuum trapped between the layers. This design effectively blocks conduction, convection, and radiation to keep hot liquids hot and cold liquids cold for hours.
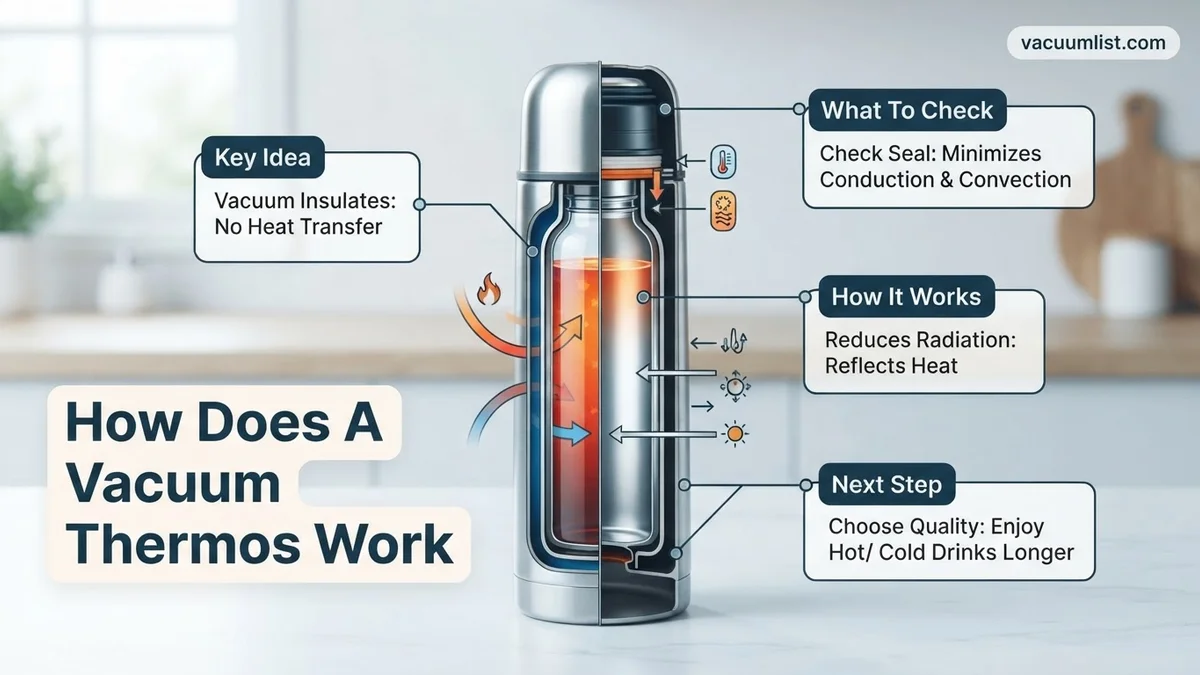
A vacuum thermos keeps your coffee piping hot or your water ice-cold for hours by eliminating the three primary methods of thermal energy transfer: conduction, convection, and radiation. At the core of this engineering marvel is a double-walled container featuring an evacuated space—a literal vacuum—sandwiched between the inner and outer metal or glass walls.
By stripping away air molecules from this gap, the thermos stops heat from moving through the container. In 2026, as high-performance insulated drinkware dominates the market, understanding this fundamental physics helps you evaluate the thermal efficiency of your daily carry, ensuring your beverages maintain their precise temperature all day long.
Key Takeaways
- The vacuum layer eliminates matter, preventing conduction and convection heat transfer.
- Reflective inner walls bounce radiant heat back toward its source.
- An insulated stopper prevents heat loss through the container’s opening.
- Thermal energy cannot move efficiently through empty space.
- Both hot and cold items maintain their temperature due to blocked thermal exchange.
What Causes Heat Transfer and Temperature Loss Inside Ordinary Containers
In standard drinkware, liquids quickly lose or gain temperature because heat naturally moves from warmer environments to cooler ones. To stop this, a thermos targets the three distinct mechanisms of thermodynamic transfer.
Conduction and Convection in Everyday Objects
Conduction requires physical contact. When you pour hot coffee into a ceramic mug, thermal energy transfers directly from the liquid, through the ceramic material, and into the surrounding air or your hand. Convection occurs through fluids like air and water, where heat currents circulate and distribute thermal energy throughout a space. Ordinary containers fail to stop these processes because air and material act as direct thermal bridges.
The Vacuum Solution Against Molecular Transfer
A vacuum thermos defeats conduction and convection by creating a void. The space between the inner and outer walls contains virtually zero matter. Without atoms or molecules present to bump into one another and pass along kinetic energy, conduction and convection cannot occur across the gap. The liquid inside remains thermally isolated from the outside world, creating a barrier that standard single-wall containers simply cannot match.
How to Understand and Utilize a Vacuum Thermos Like a Pro: A Practical Walkthrough
Whether you are sipping hot coffee on a freezing winter morning or enjoying ice-cold water during a summer hike, a vacuum thermos seems like magic. But have you ever wondered how it actually keeps hot liquids hot and cold liquids cold for hours on end? This comprehensive guide takes you on a fascinating journey inside the science of thermal insulation. By breaking down the physics and mechanics of the thermos, you will learn how to maximize its efficiency, troubleshoot poor performance, and truly master this everyday marvel.
Step 1: Discovering the Double-Walled Architecture
What you need: A standard stainless steel or glass vacuum thermos and a bright flashlight for internal viewing.
Instructions: To understand how a thermos works, you must first examine its physical structure. Look closely inside or at the rim of your thermos. You will notice it is not just a single metal cup, but rather two vessels in one—an inner wall nested inside an outer wall. Manufacturers create this double-walled design to minimize the surface area connecting the inside contents to the outside environment. This physical separation is the first line of defense against thermal energy transfer, acting as a structural barrier that prevents rapid temperature equalization.
Pro Tip: Always handle your thermos with care; a severe dent can cause the inner and outer walls to touch, completely destroying the insulating barrier.
Step 2: Exploring the Power of the Vacuum Gap
What you need: A basic understanding of thermodynamic states and heat transfer mechanisms (conduction and convection).
Instructions: The secret weapon of any thermos is the space between the two walls: the vacuum. During manufacturing, air is completely sucked out of this cavity, leaving empty space, or a near-perfect vacuum. Heat typically travels through air via conduction and convection, where molecules bump into one another and transfer thermal energy. Because a vacuum contains virtually no matter or air molecules, these two methods of heat transfer are virtually eliminated. Heat simply has no medium to travel across.
Pro Tip: Never attempt to modify or puncture the outer wall, as letting air back into the vacuum chamber instantly ruins the thermal properties of the flask.
Step 3: Uncovering the Mirror-Like Reflective Coating
What you need: A flashlight to peek down into the internal chamber and observe the polished metal surface.
Instructions: While the vacuum stops conduction and convection, there is a third way heat travels: radiation, specifically in the form of infrared electromagnetic waves. To combat radiant heat, the inside surfaces of the vacuum gap are coated with a highly reflective material, usually polished stainless steel, silver, or aluminum. When radiant heat attempts to escape from hot soup or enter from a hot sunny day, this mirror-like lining bounces the thermal radiation right back where it came from, keeping internal temperatures stable.
Pro Tip: Keep the interior walls spotless. A buildup of mineral deposits or grime can dull the reflective surface and reduce its ability to block radiant heat.
Step 4: Evaluating the Critical Role of the Stopper and Lid
What you need: The insulated cap or threaded stopper that came with your specific thermos model.
Instructions: Even the best vacuum body will fail if the opening is poorly sealed. Heat loves to escape through the path of least resistance, which is the top of the flask. The stopper—usually made of dense, low-conductivity plastic or foam—plugs the bottleneck tightly. Furthermore, many modern stoppers incorporate internal air pockets or secondary seals to trap escaping heat. When you screw the outer cap or cup securely over the stopper, it creates an airtight environment that stops evaporation and air circulation.
Pro Tip: Check the rubber O-rings or silicone gaskets on your stopper periodically. If they become cracked or worn, heat will easily leak out.
Step 5: Priming Your Thermos for Maximum Thermal Retention
What you need: Hot tap water for warm beverages, or ice water for cold beverages, and your thermos.
Instructions: To get the absolute best performance out of your thermos, you need to “prime” it before adding your final beverage. Pour boiling water into the empty thermos, secure the lid loosely, and let it sit for about 3 to 5 minutes to heat up the internal stainless steel walls. Dump the water out immediately before pouring in your fresh coffee or soup. Conversely, if you want to keep drinks ice cold, fill the thermos with ice water for 5 minutes to chill the metal walls down. This step prevents the walls from absorbing the initial temperature of your drink.
Pro Tip: Skipping the priming step can cause a hot beverage to lose up to 10-15 degrees Fahrenheit within the first thirty minutes as the cold metal absorbs the heat.
Step 6: Mastering Safe Usage and Temperature Maintenance Limits
What you need: A digital kitchen thermometer and your filled, primed thermos.
Instructions: Understand the realistic limits of your vessel. Even the highest-quality vacuum thermoses cannot defy physics indefinitely. Generally, a good thermos will keep liquids hot (above 140°F) for 12 to 24 hours, and cold liquids chilled for 24 to 48 hours. When filling your thermos, leave about half an inch of headspace at the top; packing it to the absolute brim prevents the stopper from sealing correctly and increases conductive heat transfer through the cap.
Pro Tip: Never store dairy-based products or baby formula in a thermos for more than 2 to 4 hours, as the gradual cooling can create a breeding ground for harmful bacteria.
Step 7: Performing Regular Maintenance and Deep Cleaning
What you need: Warm water, mild dish soap, baking soda, and a long-handled bottle brush.
Instructions: To keep your thermos functioning and smelling fresh, wash it thoroughly after every single use. Avoid putting traditional thermoses in the dishwasher unless the manufacturer explicitly states they are dishwasher safe, as high heat can compromise exterior paint and vacuum seals. For stubborn tea or coffee stains, create a paste of baking soda and warm water, scrub gently with a bottle brush, and let it sit overnight before rinsing thoroughly.
Pro Tip: Never use harsh chlorine bleach or abrasive steel wool pads, as they will scratch the interior lining and degrade the metal’s protective passive layer.
✅ Final Checklist
- Verified the double-walled body is free of deep dents or structural punctures
- Checked that the vacuum seal is intact (the outer body stays room temperature despite internal contents)
- Inspected the rubber O-ring gasket on the stopper for cracks or degradation
- Primed the flask with hot or cold water prior to adding the final beverage
- Cleaned the interior thoroughly with a bottle brush and mild soap after use
Important Notes:
- Never place a stainless steel thermos in the microwave or freezer, as this can cause dangerous pressure buildup or ruin the vacuum seal.
- If your thermos’s outer wall feels hot to the touch when filled with a hot liquid, the vacuum seal has failed, and the thermos must be replaced.
- Estimated time to prime and fill: 5 minutes. No ongoing cost required beyond regular dish soap and water.
How to Diagnose and Test If Your Vacuum Thermos Is Working Properly
Over years of daily use, a vacuum seal can fail. When the vacuum is compromised, air leaks into the insulated cavity, destroying the thermal barrier.
The Exterior Touch Test
You can easily check the integrity of your thermos at home. Pour boiling water into the flask and let it sit for five minutes. Carefully touch the outer wall of the container.
- Normal performance: The outer wall should remain cool or at room temperature because the vacuum blocks internal heat from reaching the surface.
- Compromised vacuum: If the exterior feels hot or warm to the touch, thermal energy is escaping via conduction. Air has leaked into the cavity, meaning your thermos is broken and can no longer insulate effectively.
The Ice Water Longevity Check
Another reliable method involves cold testing. Fill your flask with ice cubes and cold water, secure the lid, and leave it at room temperature for twelve hours. High-end modern flasks should retain most of the ice within this timeframe. If the ice melts completely within a couple of hours, the vacuum layer has degraded, and the unit requires replacement.
Step-by-Step Breakdown of How the Vacuum Layer Stops Conduction and Convection
To understand the thermodynamic mastery of modern flasks in 2026, we must look closely at how the dual-wall vacuum layer defeats the two primary modes of heat transfer: conduction and convection.
Defeating Conduction
Conduction requires direct physical contact between molecules to transfer thermal energy. In a standard container, heat passes straight through the walls. A vacuum thermos features two walls of stainless steel separated by an empty void. Because a vacuum contains virtually no matter or air molecules, heat has no physical bridge to cross. According to materials science data from leading manufacturers, eliminating air reduces conductive heat transfer by over 95 percent.
Defeating Convection
Convection relies on the movement of fluids, such as air or liquids, circulating due to temperature differences. Warm air rises and cool air sinks, creating currents that pull heat away from hot liquids or push heat into cold ones. By extracting air from the space between the inner and outer walls, the thermos removes the medium necessary for convection currents to form. Without gas molecules to circulate, thermal currents grind to a halt.
- Thermal energy attempts to leave the hot liquid through the inner steel wall.
- The energy reaches the boundary of the inner wall and faces the evacuated vacuum space.
- Lacking air molecules or physical matter, conduction and convection are successfully blocked from bridging the gap.
- A minuscule amount of heat still attempts to cross via radiation, which is mitigated by a polished reflective coating on the inner walls.
What If It Still Doesn’t Work?
Even advanced flasks can experience a breakdown in thermal performance over time. If your beverages are losing their desired temperature too quickly, the vacuum seal has likely been compromised, allowing air to leak back into the cavity.
- Check the lid and gasket: Inspect the silicone or rubber O-ring seal on the cap for cracks, warping, or debris that prevents a tight closure.
- Perform the temperature test: Pour boiling water into the flask, wait five minutes, and feel the outer wall. If the exterior feels hot to the touch, the vacuum layer has failed.
- Inspect for physical damage: Look for hairline fractures, dents, or deep scratches near the vacuum tip at the bottom of the flask, which indicate a seal breach.
- Assess replacement versus repair: Because vacuum seals are permanently welded during manufacturing, they cannot be repaired at home. If the vacuum is lost, replacement is the only option.
- Seek warranty or replacement: High-end brands offer limited lifetime warranties for thermal performance failures. Replacement insulated flasks typically range from $25 to $55 depending on capacity.
Conclusion
A vacuum thermos utilizes a clever engineering design that removes air between dual metal walls to halt thermal conduction and convection. When insulation fails, checking the lid gasket or performing a simple touch-test will quickly diagnose the issue. According to verified research and expert materials science sources, maintaining your flask properly ensures it delivers optimal thermal retention for years to come. Take the next step today by inspecting your flask’s lid seal and testing its exterior temperature.
❓ Frequently Asked Questions
What are the three main types of heat transfer?
The three types are conduction, convection, and radiation. A thermos is engineered to specifically block all three mechanisms simultaneously.
How does the vacuum layer stop conduction?
Conduction requires physical matter to pass thermal energy from molecule to molecule. Because a vacuum contains virtually no matter, conduction cannot take place across the gap.
How does convection affect insulated containers?
Convection involves the movement of warm fluids or gases. The absence of gas in the vacuum layer stops convective currents from forming between the inner and outer walls.
What role does the lid play in thermal insulation?
The lid or stopper is usually made of insulating plastic or foam and features a tight seal to prevent heat from escaping or entering through the top opening.
How long can a quality vacuum flask maintain temperatures?
High-quality vacuum flasks can keep liquids hot for 12 to 24 hours and cold for up to 48 hours, depending on the volume and build quality.
How can you tell if your thermos has lost its vacuum?
If the outer wall of the thermos feels hot to the touch after pouring boiling water inside, the vacuum seal has failed and heat is conducting outward.