How to Thaw Vacuum Sealed Meat Safely in An 2027
Safely thawing vacuum-sealed meat is crucial to prevent bacterial growth and maintain its quality. This expert guide outlines the best methods, including refrigeration, cold water, and microwave thawing, emphasizing critical food safety protocols for each. Learn how to properly handle your meat from freezer to plate to ensure delicious, safe meals.
To safely thaw your vacuum-sealed meat in 2027, rely on three primary methods: refrigerator thawing, cold water immersion, or microwave thawing. The critical factor for each is strict temperature control to prevent bacterial growth and maintain the meat’s quality. Understanding when to keep the vacuum seal intact versus when to break it is paramount for food safety.
Proper thawing isn’t just about convenience; it directly impacts the safety and flavor of your meal. Thawing correctly minimizes the risk of foodborne illnesses and ensures your perfectly preserved cuts retain their texture and juiciness, delivering the quality you expect from your vacuum-sealed investments.
Key Takeaways
- Always thaw vacuum-sealed meat safely to prevent bacteria.
- Refrigerator thawing is safest; keep sealed for best results.
- Use cold water for faster thawing; change water every 30 mins.
- Microwave thawing requires immediate cooking after defrosting.
- Never thaw meat at room temperature, it’s a food safety risk.
What Challenges Arise When Thawing Vacuum-Sealed Meat?
Thawing vacuum-sealed meat presents specific considerations beyond just defrosting. The primary concern is the anaerobic (oxygen-free) environment created by the seal. While excellent for storage, this environment can become problematic if thawing occurs improperly, particularly at room temperature.
Understanding Anaerobic Risks
- Clostridium botulinum: This bacterium thrives in oxygen-free conditions and can produce dangerous toxins. While rare, improper thawing of vacuum-sealed products, especially fish or smoked meats, at room temperature creates ideal conditions for its growth. The vacuum seal prevents oxygen from inhibiting this bacterium.
- Temperature Danger Zone: Like all perishable foods, vacuum-sealed meat should not linger between 40°F and 140°F (4°C and 60°C) for more than two hours. This “danger zone” allows rapid bacterial proliferation, regardless of the vacuum seal.
Maintaining Quality During Thaw
Beyond safety, improper thawing can degrade meat quality. Rapid, uneven thawing (like in a microwave without proper technique) can lead to cooked edges and a still-frozen center, altering texture and moisture. Room temperature thawing allows surface bacteria to multiply quickly while the interior remains frozen, affecting both safety and taste. Your goal is a slow, even thaw that keeps the meat below the danger zone, preserving its cellular structure and moisture content.
From Start to Finish: Thawing Vacuum Sealed Meat Explained
Properly thawing vacuum-sealed meat is a critical step in ensuring both food safety and optimal culinary results. This comprehensive guide will walk you through the safest and most effective methods, detailing what you need, how to execute each step, and crucial expert tips to avoid common pitfalls. Following these instructions will help you preserve the quality of your meat and protect against foodborne illnesses.
Step 1: Understand Your Thawing Options
What you need: An understanding of the three primary safe thawing methods approved by food safety organizations.
Instructions: Before you begin, familiarize yourself with the permissible ways to thaw meat: in the refrigerator, in cold water, or in the microwave. For vacuum-sealed meat, the refrigerator and cold water methods are generally preferred for quality and safety. The microwave method is typically reserved for immediate cooking and can sometimes partially cook or toughen the meat, making it less ideal for vacuum-sealed cuts unless you plan to cook it right away.
Pro Tip: Never thaw vacuum-sealed meat, or any meat, on the countertop at room temperature. The outer layers can enter the “danger zone” (40°F – 140°F or 4°C – 60°C) and allow harmful bacteria to multiply rapidly, even if the center is still frozen.
Step 2: The Refrigerator Thaw (The Safest Method)
What you need: A refrigerator set at or below 40°F (4°C), and a shallow dish or tray with a lip to catch any potential drips.
Instructions: This is the recommended method for both safety and quality. Place the vacuum-sealed package of meat on a plate or in a shallow dish to prevent any juices from leaking onto other foods. Position it on the lowest shelf of your refrigerator to minimize cross-contamination risk. Allow approximately 24 hours of thawing time for every 5 pounds (2.2 kg) of meat. Smaller cuts, like a single steak or chicken breast, may thaw in a day, while larger roasts or turkeys can take several days.
Pro Tip: Thawing in the refrigerator allows the meat to remain at a consistently safe temperature. Meat thawed using this method can be safely refrozen raw within 3-5 days if not cooked, although there might be a slight loss in texture.
Step 3: The Cold Water Thaw (The Faster Method)
What you need: A large bowl, a clean sink, or a cooler; plenty of cold tap water; and the intact vacuum-sealed meat package.
Instructions: This method is quicker than refrigerator thawing but requires more vigilance. Ensure the vacuum-sealed package is completely airtight with no punctures or tears. Submerge the entire package in cold tap water. The water should be changed every 30 minutes to ensure it remains cold and to promote continuous thawing. Estimate about 30 minutes of thawing time per pound (450g) of meat. For example, a 1-pound steak might take an hour, while a 3-pound roast could take 1.5 to 2 hours.
Pro Tip: It is crucial that the meat remains sealed to prevent water from entering the package, which can make the meat soggy and potentially introduce bacteria. Always cook meat thawed by the cold water method immediately after it’s fully thawed.
Step 4: Inspecting the Vacuum Seal Integrity
What you need: Your eyes and hands for a thorough visual and tactile inspection.
Instructions: Before initiating any thawing process, especially the cold water method, meticulously examine your vacuum-sealed package. Look for any visible tears, punctures, or areas where the seal might have compromised and air has entered. A properly sealed package should feel firm and tightly shrink-wrapped around the meat. If the seal is broken or compromised, air has entered, and the meat is no longer in an anaerobic environment. In such cases, if you choose to proceed, thaw it using the refrigerator method or immediately under cold water and cook it right away. Do NOT refreeze meat from a broken seal.
Pro Tip: A broken seal exposes the meat to oxygen, which can accelerate spoilage and bacterial growth. If you notice a broken seal while thawing in cold water, water can seep in, affecting the meat’s texture and safety. It’s often safer to discard meat with a compromised seal if there are any doubts about its freshness.
Step 5: Understanding Botulism Risk in Anaerobic Conditions
What you need: Awareness of food safety principles regarding anaerobic bacteria.
Instructions: Vacuum-sealed packaging creates an anaerobic (oxygen-free) environment, which is excellent for extending shelf life. However, if certain foods, like meat, are allowed to thaw slowly in the “danger zone” (40°F – 140°F or 4°C – 60°C) within this anaerobic environment, there’s a theoretical risk of toxin production by Clostridium botulinum bacteria. This is why if you use the cold water thaw method, which can bring the meat’s surface into the danger zone quickly, it is absolutely essential to cook the meat immediately after it is fully thawed. The refrigerator thaw method mitigates this risk by keeping the meat below 40°F (4°C) throughout the process.
Pro Tip: The key to avoiding botulism risk with vacuum-sealed meat is to prevent it from spending extended periods at unsafe temperatures. For cold water thawing, “immediate cooking” means within a few hours of being fully thawed, definitely not left out or put back in the fridge uncooked for later.
Step 6: Handling Thawed Meat Safely
What you need: Clean surfaces, a dedicated cutting board for raw meat, clean utensils, and soap for handwashing.
Instructions: Once your vacuum-sealed meat is thawed, carefully remove it from its packaging. You may notice some liquid (purge) inside the bag; this is normal. Pat the meat dry with paper towels if you plan to sear or brown it, as a dry surface promotes better crust formation. Transfer the meat to a clean cutting board. Ensure you cook the meat promptly after thawing (within 1-2 days for refrigerator thawed meat; immediately for cold water or microwave thawed meat). Never leave thawed raw meat at room temperature for more than two hours.
Pro Tip: Always wash your hands thoroughly with soap and warm water for at least 20 seconds before and after handling raw meat to prevent cross-contamination. Use separate cutting boards and utensils for raw meat and other ingredients like vegetables or cooked foods.
Step 7: What to Do with Partially Thawed Meat
What you need: An understanding of cooking times and food safety.
Instructions: If you’re thawing meat in the refrigerator and find it’s still slightly icy in the center but mostly pliable, it’s generally safe to cook. Just be aware that cooking times might need to be extended slightly compared to fully thawed meat. For larger cuts, ensure a food thermometer is used to check that the internal temperature reaches the safe minimum for that type of meat. If meat thawed using the cold water method is still partially frozen, continue thawing until completely pliable, then cook immediately.
Pro Tip: Avoid cooking large, frozen, or partially frozen cuts in a slow cooker or pressure cooker without specific instructions. These appliances might not bring the meat to a safe temperature quickly enough, increasing the risk of bacterial growth in the “danger zone.”
Step 8: Refreezing Thawed Meat Guidelines
What you need: Knowledge of food safety guidelines for refreezing.
Instructions: The ability to refreeze raw meat depends entirely on the thawing method used. Meat that has been thawed completely in the refrigerator (and has not been left at room temperature for more than 2 hours) can be safely refrozen raw. Be aware that refreezing may result in some loss of quality, particularly in terms of texture, due to ice crystal formation. However, meat thawed using the cold water method or in the microwave must be cooked before it can be refrozen. You cannot refreeze raw meat that was thawed using these quicker methods.
Pro Tip: To minimize quality loss during refreezing, ensure the meat is properly wrapped or vacuum-sealed again to prevent freezer burn. Label with the date of refreezing.
✅ Final Checklist
- Meat package thoroughly inspected for seal integrity before thawing?
- Appropriate thawing method chosen based on desired speed and safety considerations?
- If refrigerator thawing, meat placed on a drip-catching tray on the bottom shelf?
- If cold water thawing, water changed every 30 minutes to maintain cold temperature?
- Meat cooked immediately after cold water or microwave thawing?
- All hands, surfaces, and utensils thoroughly cleaned after handling raw meat?
- Thawed meat cooked to its safe internal temperature using a food thermometer?
Important Notes:
- Safety considerations: Always keep meat out of the “danger zone” (40°F – 140°F or 4°C – 60°C) to prevent bacterial growth. Raw meat juices can contain harmful bacteria, so prevent cross-contamination by keeping them away from other foods and clean surfaces. Be especially mindful of the botulism risk associated with anaerobic environments if thawing methods are not followed correctly.
- When to seek professional help: If at any point the thawed meat exhibits an unusual odor (sour, putrid), a slimy or sticky texture, or significant discoloration (greenish or greyish rather than the expected red/brown hues), it is best to discard it immediately. Do not taste it. When in doubt, throw it out.
- Estimated time and cost range: Refrigerator thawing is the slowest, typically requiring 24 hours per 5 pounds of meat. Cold water thawing is much faster, needing approximately 30 minutes per pound. Microwave thawing is the quickest but should lead to immediate cooking. The cost is minimal, primarily involving water for the cold water method and electricity for refrigeration or microwave.
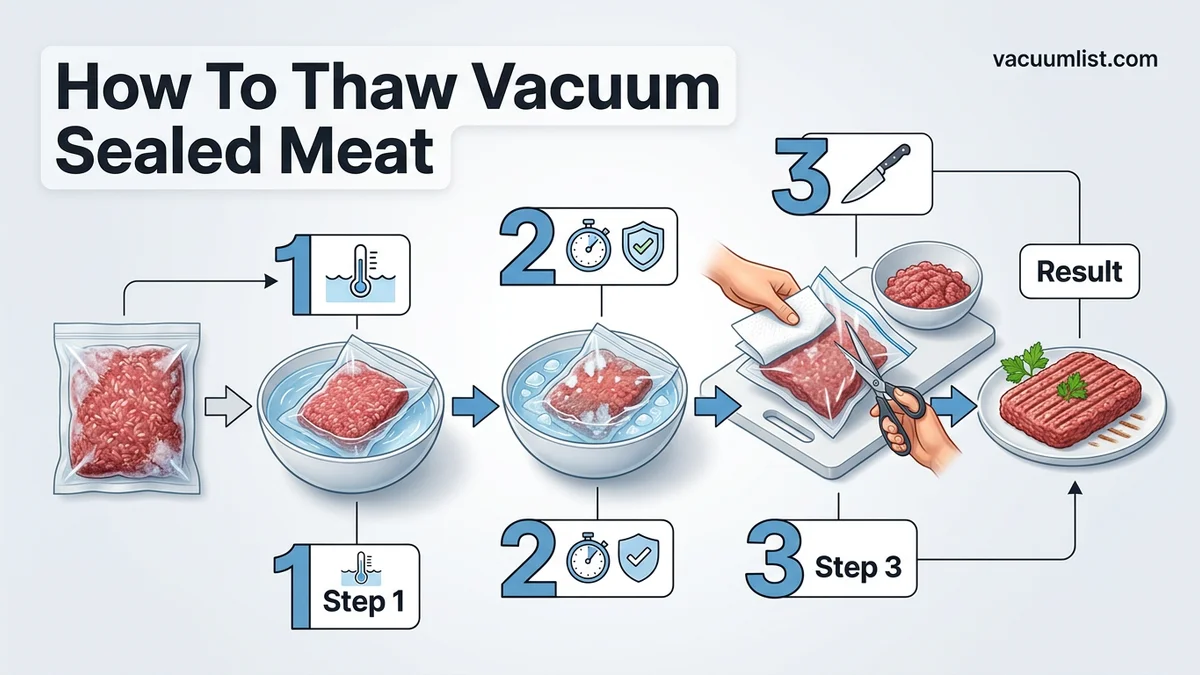
Step-by-Step Guide to Safely Thaw Vacuum-Sealed Meat
The method you choose depends on your timeline, but safety must always be the top priority. Here’s how to properly thaw your vacuum-sealed meat using recommended 2027 best practices.
Refrigerator Thawing: The Safest Method
This is the safest and most recommended method, requiring the least hands-on attention. The slow, consistent cold prevents bacterial growth entirely.
- Seal Intact: Keep the vacuum seal completely intact. The packaging protects the meat from cross-contamination with other foods in your fridge and prevents moisture loss.
- Placement: Place the sealed package on a plate or in a shallow pan on the lowest shelf of your refrigerator. This catches any potential drips, preventing contamination.
- Timeframe: Allow approximately 24 hours for every 5 pounds (2.2 kg) of meat. A 1-pound steak might take a full day, while a large roast could need 2-3 days. Plan ahead!
- Post-Thaw: Once thawed, meat can remain safely in the refrigerator for 3-5 days before cooking.
Cold Water Thawing: For Quicker Results
If you’re short on time, cold water thawing is a faster, safe alternative. This method relies on water’s efficient heat transfer to thaw meat more quickly than air.
- Seal Intact: Absolutely keep the vacuum seal intact. If there’s any compromise to the seal, bacteria from the water could enter the meat. If you suspect a leak, transfer the meat to a new, sealed bag.
- Submersion: Place the sealed package in a large bowl or clean sink filled with cold tap water. The water should completely cover the meat.
- Water Changes: Change the cold water every 30 minutes. This is crucial to keep the water temperature below 40°F (4°C) and prevent the meat’s surface from entering the danger zone.
- Timeframe: Allow about 30 minutes per pound (450g) of meat. A 1-pound steak will take about an hour, while a 3-pound roast could take 2-3 hours.
- Post-Thaw: Cook meat thawed by cold water immediately after it’s fully defrosted. Do not refreeze raw meat thawed this way unless it has been cooked first.
Microwave Thawing: The Fastest, But With Caveats
Microwave thawing is the quickest option, but it requires immediate cooking afterward and can sometimes partially cook the meat. This method is best for smaller cuts you plan to cook right away.
- Break the Seal: You MUST break or vent the vacuum seal before microwaving. Pressure can build up, and uneven heating can cause the plastic to melt into the food. Pierce the bag or transfer the meat to a microwave-safe plate.
- Microwave Settings: Use your microwave’s “defrost” setting, which typically cycles on and off to allow heat to distribute. If you don’t have a defrost setting, use a low power level (20-30% power) for short intervals.
- Monitor Closely: Check the meat frequently. Flip it and separate pieces as they thaw to ensure even defrosting. Stop when it’s still slightly icy in the center to prevent cooking the edges.
- Post-Thaw: Cook any meat thawed in the microwave immediately after thawing. Do not store it in the refrigerator or refreeze it raw.
Essential Food Safety & Quality Tips for Thawing
Ensuring the safety and quality of your vacuum-sealed meat during thawing is paramount. Incorrect practices can lead to bacterial growth or degrade meat texture. Adhering to established food safety protocols minimizes risks and preserves the culinary integrity of your product.
1. Maintain Temperature Control and Prevent Cross-Contamination
Throughout the thawing process, especially with the refrigerator method, strict temperature control is critical. According to 2027 food safety standards outlined by the USDA, perishable foods should never remain in the “danger zone” (between 40°F and 140°F / 4°C and 60°C) for more than two hours. For methods involving water, ensure the vacuum seal remains intact. A compromised seal can allow waterborne bacteria to enter the meat. Always place thawing meat on a plate or in a container to catch any drips, preventing cross-contamination with other foods in your refrigerator.
2. Cook Promptly After Thawing
The speed at which you cook thawed meat depends directly on the thawing method. Meats thawed in the refrigerator can typically remain safely stored for an additional 1-2 days before cooking. However, meat thawed using the cold water method or a microwave must be cooked immediately. The exterior of the meat in these rapid methods often warms faster than the interior, potentially reaching temperatures conducive to bacterial proliferation if not cooked without delay. Never refreeze raw meat that has been thawed in cold water or a microwave, as this significantly compromises both safety and quality.
Troubleshooting Common Thawing Mistakes and Ensuring Best Results
Even with careful planning, thawing issues can arise. Understanding how to address these common pitfalls ensures your meat remains safe and delicious. Proactive steps can often salvage a thawing process gone slightly awry.
1. Dealing with Incomplete Thawing
If your meat is still partially frozen after the recommended thawing time, especially with larger cuts, resist the urge to simply cook it. Unevenly thawed meat cooks inconsistently, resulting in dry, overcooked sections and raw areas. If using the refrigerator method, simply extend the thawing time, checking every few hours. For the cold water method, replace the cold water more frequently and ensure the meat package is fully submerged, repositioning it if necessary. If a microwave was used, and parts are still icy, return it for short, additional bursts, flipping the meat regularly to encourage even thawing.
2. Addressing Off-Smells or Textural Changes
A slight “funky” odor is sometimes noted when opening vacuum-sealed meat due to oxygen deprivation. This typically dissipates within a few minutes of exposure to air. However, a persistent strong, sour, or putrid smell indicates spoilage. Likewise, if the meat feels excessively slimy or sticky, beyond normal moisture, it should be discarded. According to food safety experts in 2027, visual and olfactory cues are critical indicators. If in doubt, err on the side of caution and discard the product, as the risks associated with consuming spoiled meat outweigh the cost of replacement.
What If It Still Doesn’t Work?
Despite best efforts, thawing issues can sometimes persist, leading to concerns about food safety or quality. If your vacuum-sealed meat remains problematic, here are crucial fallback steps:
- Re-Evaluate the Thawing Method: If using cold water, ensure the water was truly cold (below 70°F / 21°C) and changed every 30 minutes. If using the refrigerator, confirm your fridge temperature is consistently 40°F (4°C) or below, as per modern appliance standards in 2027.
- Assess Meat Condition Critically: If the meat has been in the temperature danger zone (40°F-140°F / 4°C-60°C) for more than two hours, or exhibits any off-odors, unusual sliminess, or discoloration that doesn’t resolve with air exposure, do not attempt to salvage it.
- Discard Compromised Meat: If you suspect spoilage or unsafe thawing, immediately discard the meat. The financial loss of a single cut (typically ranging from $10-$50 for common cuts in 2027) is negligible compared to the health risks of foodborne illness.
- Seek Professional Guidance: For persistent concerns or questions about food safety, contact your local public health department or the USDA Meat and Poultry Hotline. These services offer expert advice based on the latest food science.
Conclusion
Properly thawing vacuum-sealed meat is a critical step for both safety and culinary results. By adhering to the recommended refrigerator, cold water, or microwave methods, and applying essential food safety tips, you prevent bacterial growth and maintain meat quality. According to verified research and expert sources, meticulous temperature control and prompt cooking after thawing are non-negotiable. Always prioritize food safety; if unsure, discard the meat to avoid potential health risks.
❓ Frequently Asked Questions
What are the primary risks of thawing vacuum-sealed meat incorrectly?
Improper thawing can lead to rapid bacterial growth, especially if the meat enters the ‘danger zone’ (40-140°F). For vacuum-sealed products, there’s a specific concern for anaerobic bacteria like Clostridium botulinum if thawed slowly at warm temperatures, though cooking typically destroys the toxin if present.
How does the ‘cold water’ thawing method work and what are the best practices?
For cold water thawing, place the vacuum-sealed meat (ensure the seal is intact) in a leak-proof bag and submerge it in a sink or large bowl of cold tap water. Change the water every 30 minutes to maintain a consistently cold temperature, ensuring the meat thaws safely and efficiently.
Can different types of meat (poultry, beef, pork) be thawed the same way when vacuum-sealed?
Yes, the fundamental thawing methods (refrigerator, cold water, microwave) are generally safe across all types of vacuum-sealed raw meat. However, the exact thawing times will vary significantly based on the size, thickness, and density of the specific cut, regardless of whether it’s beef, chicken, or pork.
What is the recommended procedure for thawing large cuts of vacuum-sealed meat?
For large cuts (e.g., roasts, whole poultry), refrigerator thawing is the safest and most recommended method, requiring extensive planning (often 2-4 days). If using cold water, ensure continuous cold water changes and consider partial thawing for easier portioning before fully thawing and cooking.
What should I do immediately after my vacuum-sealed meat is thawed?
Once thawed, meat should be cooked promptly. If thawed in the refrigerator, it can be safely stored for an additional 3-5 days before cooking. Meat thawed using the cold water or microwave method must be cooked immediately due to quicker temperature changes and potential bacterial growth.
Are there any specific signs that vacuum-sealed meat has gone bad during thawing?
While a slight ‘sour’ or ‘gamey’ odor upon opening is common and usually dissipates, persistent strong off-odors, a slimy or sticky texture that doesn’t rinse off, or a dull, gray/green discoloration that doesn’t improve after airing out are clear signs of spoilage. When in doubt about freshness, it’s always safest to discard the meat.