Can a Robot Vacuum Clean Multiple Floors? Proven Guide 2027
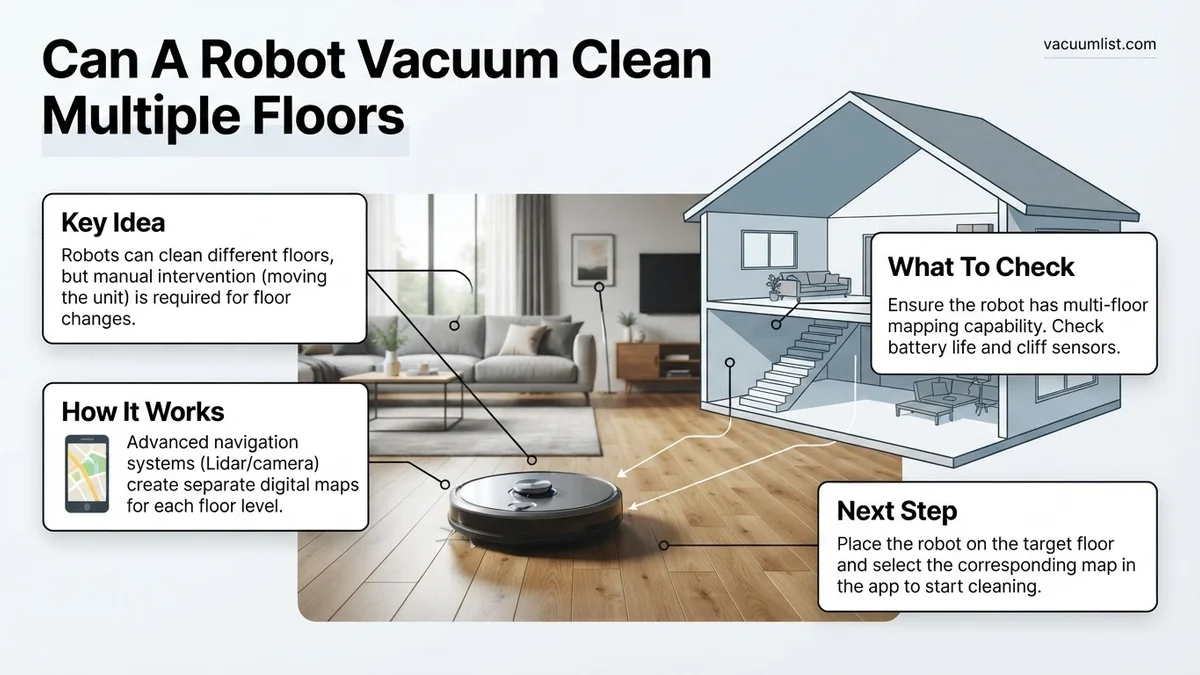
Yes, many modern robot vacuums can effectively clean multiple floors, primarily through advanced multi-map support that allows them to store and recognize different floor plans. While you’ll need to manually transport the robot between levels, these systems adapt seamlessly, remembering no-go zones and cleaning preferences for each area.
Yes, by 2027, many advanced robot vacuums are indeed fully capable of effectively cleaning multiple floors in your home. This capability has moved from a niche feature to a common expectation, driven by sophisticated navigation and mapping technologies. For homeowners with multi-story residences, this means significantly less manual vacuuming and a genuinely smarter, more autonomous cleaning experience.
The ability to manage different levels fundamentally changes how you integrate a robot vacuum into your daily routine. No longer confined to a single floor, these intelligent devices offer comprehensive coverage, simplifying household chores and ensuring consistent cleanliness throughout your entire living space. Understanding how they achieve this is key to maximizing their potential.
Key Takeaways
- Multi-map support enables cleaning on different floors.
- Manual transport between levels is usually required.
- Look for models storing 2-5+ distinct floor maps.
- Battery life and charging dock placement matter.
- No-go zones per floor prevent specific area access.
The Multi-Floor Challenge: Why Robot Vacuums Need Smart Solutions
Cleaning multiple floors presents unique challenges for autonomous robots that extend beyond simple navigation. The primary obstacle, of course, is the physical barrier of stairs. But beyond that, managing distinct floor plans, avoiding previous cleaning errors, and maintaining efficiency demand sophisticated design.
The Staircase Hurdle and User Intervention
No robot vacuum in 2027 can independently climb or descend stairs. This fundamental physical limitation means that for multi-floor cleaning, you, the user, must manually transport the robot between levels. While this might seem like a drawback, advanced features significantly streamline the process once the robot is relocated.
- Manual Transport Required: You physically carry the robot to the next floor.
- Dock Location Flexibility: You might choose to have a charging dock on each floor, or simply move the robot to a new floor, letting it clean until its battery is low before returning it to its primary dock.
- Safety Features: All modern multi-floor capable robots include cliff sensors to prevent falls down stairs, ensuring safe operation on upper levels.
Battery Life and Environmental Adaptability
Beyond physical relocation, battery life becomes a critical factor for homes with expansive multi-floor layouts. A robot designed for a single-story apartment might struggle to cover two or three substantial floors on one charge. Furthermore, each floor typically has different layouts, furniture arrangements, and potential obstacles. Older or simpler robot vacuums often struggled to adapt, losing their spatial awareness or attempting to re-map extensively every time they were moved, wasting valuable time and battery power.
This necessitates smarter battery management, often including ‘recharge and resume’ capabilities, and, crucially, robust environmental adaptability where the robot can quickly orient itself to a new, pre-defined space.
Robot Vacuum Multi-Floor Cleaning Made Easy: Your Essential Action Plan
Robot vacuums offer incredible convenience, but the question of whether they can effectively clean multiple floors in a home is a common one. The answer is a resounding yes, though it often requires more than just pressing a button. This comprehensive guide will walk you through the essential steps to successfully manage your robot vacuum across different levels of your home, ensuring every floor stays spotless. By following these detailed instructions, you’ll optimize your robot’s performance and minimize manual intervention, transforming your multi-story cleaning routine.
Step 1: Assess Your Robot Vacuum’s Capabilities
What you need: Your robot vacuum’s user manual, the manufacturer’s mobile application, an internet connection.
Instructions: Begin by consulting your robot vacuum’s manual or checking its official product page online. You need to verify if your model supports multi-floor mapping and map saving. High-end robots often boast advanced navigation (e.g., LiDAR, vSLAM) and memory that allows them to store distinct maps for several floors. Lower-end models might clean but will “re-map” each time they’re moved, leading to less efficient cleaning. Also, confirm it has reliable cliff sensors to prevent falls down stairs. This initial assessment is critical to setting realistic expectations and planning your multi-floor strategy.
Pro Tip: Not all robots are created equal. Basic models may require you to manually define cleaning areas or even reset their map if moved. Understanding your specific model’s limitations and features from the start saves a lot of frustration later.
Step 2: Prepare Each Floor for Initial Mapping
What you need: Approximately 30-60 minutes per floor of preparation time, your hands.
Instructions: Before your robot starts its maiden mapping voyage on any floor, it’s crucial to optimize the environment. Pick up small objects like cables, shoelaces, pet toys, and lightweight rugs that could get tangled or obstruct the robot. Clear the floor as much as possible, ensuring chairs are pushed in and curtains aren’t dragging. While the robot will learn permanent obstacles, temporary clutter can lead to an incomplete or inaccurate initial map, causing problems with future cleaning runs and zone definitions. A clear space allows the robot to build a precise, comprehensive digital representation of your floor plan.
Pro Tip: Ensure good, even lighting during the first mapping run. Some robots, particularly those relying on visual SLAM, perform better in well-lit conditions, leading to a more robust and accurate map. Avoid mapping in total darkness if your robot uses optical sensors.
Step 3: Perform Initial Mapping for Floor 1
What you need: A fully charged robot vacuum, its charging dock, the designated floor prepared as per Step 2.
Instructions: Place the charging dock on Floor 1, ideally in an open area with good Wi-Fi signal, away from stairs or excessive clutter. Ensure the robot is fully charged. Then, initiate a “mapping run” or a full cleaning cycle through your robot’s app. The robot will systematically explore the entire floor, scanning its surroundings to build an internal map. For most effective mapping, do not interrupt the robot or move its dock during this process. Let it complete its journey, ideally returning to its dock on its own. This process can take 1-3 hours depending on your floor size and robot’s speed.
Pro Tip: A central, easily accessible location for the home base on the main floor will ensure the robot can reliably return to charge without getting lost or stuck. Make sure there’s at least 1.5 feet (0.5 meters) of clear space on either side and 5 feet (1.5 meters) in front of the dock.
Step 4: Save and Name Floor 1 Map (If Supported)
What you need: Robot vacuum’s mobile app, the successfully created map from Step 3.
Instructions: Once the robot has completed its mapping run and returned to its dock, open your robot vacuum’s mobile application. Navigate to the map management section. You should see the newly generated map of Floor 1. Most multi-floor capable robots will prompt you to save this map. Select the option to save it and give it a clear, descriptive name, such as “Ground Floor,” “Main Level,” or “First Floor.” This action stores the map in the robot’s memory, allowing it to recognize this specific layout for future cleaning jobs and to distinguish it from other floors.
Pro Tip: Saving the map is the cornerstone of multi-floor functionality. Without a saved map, your robot might treat each new location as an unfamiliar environment, forcing it to remap every time it cleans, which significantly reduces efficiency and prevents the use of advanced features like zone cleaning or virtual walls.
Step 5: Relocate Robot and Dock (If Necessary) for Floor 2 Mapping
What you need: Your robot vacuum, its charging dock (if your model requires it for multi-floor map generation), your physical effort.
Instructions: Carefully pick up your robot vacuum and carry it to the next floor you wish to map (e.g., “Second Floor”). For many advanced models, only the robot needs to be moved, as they can “find” their way back to a dock if they’re cleaning the floor where it resides. However, some models, particularly those that require the dock as a fixed reference point for map creation, might necessitate moving the charging dock to the second floor as well for the mapping process. Place the robot down in a central location on the new floor, and if you moved the dock, position it similarly to how you did on Floor 1.
Pro Tip: If your robot requires the dock to be moved, consider having a designated “temporary” spot on the second floor where you always place it for consistency. This helps the robot’s internal navigation and prevents map corruption if it expects the dock in a different place each time.
Step 6: Perform Initial Mapping for Floor 2
What you need: A fully charged robot vacuum (and potentially its dock) on Floor 2, patience.
Instructions: With the robot (and its dock, if required) now situated on Floor 2 and the area prepared, initiate another mapping run through your app, just as you did for Floor 1. The robot will detect a completely new environment and begin to construct a separate, distinct map for this floor. Again, allow it to complete its mapping cycle without interruption, letting it explore every accessible nook and cranny. It’s crucial that it finishes the entire run and, if applicable, attempts to return to the dock on this floor for the map to be fully recognized and saved. This might take another 1-3 hours depending on the floor size.
Pro Tip: During the mapping process, ensure no pets or children interfere with the robot. Unexpected movements or obstructions can cause mapping errors, forcing the robot to restart or creating an inaccurate map that will hinder future cleaning efficiency.
Step 7: Save and Name Floor 2 Map (If Supported)
What you need: Robot vacuum’s mobile app, the newly created map from Step 6.
Instructions: Once Floor 2’s mapping run is successfully completed and the robot has returned to its dock (or stopped its cycle), open your robot vacuum’s app. You should now see the new map for Floor 2. Just like with Floor 1, proceed to save this map and give it a clear and distinctive name, such as “Second Floor,” “Upper Level,” or “Basement.” Ensure it’s clearly distinguishable from your first map in the app’s interface. Some apps will visually display both maps, allowing you to switch between them. Confirm that the map is complete and accurately represents the layout of your second floor before proceeding.
Pro Tip: Double-check that the new map is indeed saved as a separate map and hasn’t overwritten your previous one. Most multi-floor robots will manage this automatically, but a quick verification in the app’s map management section can prevent future headaches.
Step 8: Configure Cleaning Schedules and Zones for Each Map
What you need: Robot vacuum’s mobile app, saved maps for all floors.
Instructions: With both maps saved, you can now tailor cleaning operations for each specific floor. Open the app and select Floor 1’s map. Define “no-go zones” for areas you want the robot to avoid (e.g., pet bowls, delicate furniture, areas with loose cables). Set up “virtual walls” to create barriers where physical ones don’t exist. You can also create specific cleaning zones (e.g., “Kitchen,” “Living Room”) for targeted cleaning. Repeat this process for Floor 2’s map, customizing its no-go zones and cleaning areas. Additionally, set up specific cleaning schedules for each floor if your robot supports it, remembering that you’ll still need to manually move the robot between floors.
Pro Tip: Utilize zone cleaning for high-traffic areas or spots that accumulate dirt faster, such as entryways or dining areas. This allows you to efficiently spot clean without running a full cycle, saving battery life and time.
Step 9: Execute Multi-Floor Cleaning Runs
What you need: A fully charged robot vacuum, your mobile phone with the app, your hands for relocation.
Instructions: When it’s time to clean a different floor, ensure your robot is fully charged. Carefully pick it up from its charging dock (likely on Floor 1) and carry it to the floor you wish to clean (e.g., Floor 2). Place the robot on the ground in a relatively open area. Before starting the cleaning cycle, open your robot vacuum’s app and manually select the correct map corresponding to the floor the robot is currently on (e.g., select “Second Floor” map). Once the correct map is loaded, initiate the cleaning process. The robot will then navigate and clean based on the stored map for that specific floor, including respecting any defined no-go zones or virtual walls.
Pro Tip: Always select the correct map before initiating a cleaning run on a different floor. Forgetting this step can confuse the robot, causing it to attempt to remap or navigate based on the wrong layout, leading to inefficient cleaning or errors.
Step 10: Regular Maintenance and Monitoring
What you need: Small cleaning brush (often included with robot), soft cloth, replacement filters/brushes (as needed).
Instructions: To ensure your robot vacuum continues to perform optimally across all floors, regular maintenance is essential. After each cleaning cycle, especially if cleaning a large area or heavily soiled floor, empty the dustbin. Periodically (e.g., weekly or bi-weekly, depending on usage), remove and clean the main brush and side brushes to clear tangled hair and debris. Wipe down the charging contacts and all sensors (cliff sensors, bumper sensors, LiDAR sensor) with a dry, soft cloth to ensure accurate navigation. Replace filters and brushes according to the manufacturer’s recommendations, typically every 3-6 months. Monitoring the robot’s performance and addressing any issues promptly will extend its lifespan and effectiveness.
Pro Tip: A clean robot is an efficient robot. Neglecting maintenance, particularly cleaning the main brush and sensors, can drastically reduce cleaning effectiveness, impact navigation accuracy, and even lead to premature wear and tear on components.
✅ Final Checklist
- All desired floor maps successfully saved, named, and distinguishable in the robot vacuum app.
- No-go zones, virtual walls, and specific cleaning zones correctly configured on each map to suit respective floor layouts.
- Robot successfully navigates and cleans all designated areas on each floor without errors when the correct map is selected.
- Robot consistently returns to (or near) its original charging dock after main floor cleaning cycles, or to the designated temporary spot on other floors.
- Battery life is sufficient for completing a full cleaning cycle on each floor without needing an intermediate charge.
Important Notes:
- Safety considerations: While modern robot vacuums have reliable cliff sensors, always supervise the first few runs on a new floor, especially near staircases. Ensure small children and pets are clear of the robot during its operation to prevent accidents or interference.
- When to seek professional help: If your robot consistently fails to map a floor accurately, experiences persistent navigation errors that troubleshooting doesn’t resolve, or has hardware malfunctions (e.g., brushes not spinning, wheels stuck) not covered by basic maintenance, it’s time to contact the manufacturer’s customer support.
- Estimated time and cost range:
- Initial setup & mapping for 2-3 floors: Approximately 2-4 hours of active supervision/configuration, plus 2-6 hours of robot run time.
- Ongoing manual relocation: 1-2 minutes per cleaning cycle when moving the robot between floors.
- Cost: The primary cost is the robot vacuum itself, which can range from $200 (basic models with limited multi-floor support) to $1500+ (high-end models with advanced features). There are no significant additional costs solely for enabling multi-floor cleaning beyond consumables like filters and brushes.
How Robot Vacuums Tackle Multiple Floors: Expert Mechanisms Explained
The core of a robot vacuum’s multi-floor capability lies in its advanced internal mechanisms, primarily sophisticated mapping and navigation systems. By 2027, these technologies have matured, allowing for seamless transitions and effective cleaning across distinct environments.
Multi-Map Support: The Intelligent Solution
The most effective method for multi-floor cleaning is multi-map support. High-end robot vacuums feature LiDAR (Light Detection and Ranging) or vSLAM (visual Simultaneous Localization and Mapping) technology that allows them to scan and store multiple, distinct floor plans in their internal memory. When you move the robot from one floor to another, it intelligently recognizes its new environment. Within seconds, it loads the corresponding map, complete with all pre-defined zones.
- Map Storage: Robots can store 3-5 distinct floor maps, sometimes more, enabling comprehensive whole-home cleaning.
- Automatic Recognition: Upon placement, the robot’s sensors quickly identify its location on a stored map, eliminating the need for re-mapping.
- Customizable Zones: Each map supports its own virtual no-go zones, no-mop zones, and specific room cleaning preferences, ensuring tailored cleaning on every level.
- Efficiency: This saves significant time and battery, as the robot doesn’t need to rebuild its understanding of the space each time.
Adaptive Cleaning: The Basic Approach
For robots without full multi-map support, or in scenarios where a new, unsaved floor is encountered, an “adaptive cleaning” approach is often used. When manually moved to a different floor, these robots will treat the new area as an unfamiliar environment. They typically start by performing a quick scan or using their existing navigation algorithms (like systematic grid cleaning or random patterns) to clean the area. Some may generate a temporary map for that cleaning cycle but won’t store it permanently.
This method is less efficient than multi-map support because the robot doesn’t retain learned boundaries or optimized paths for subsequent cleans. Each time it’s moved, it essentially starts fresh, which can lead to longer cleaning times and less optimized routes. However, it still allows the robot to perform its core function on multiple levels, albeit with more user oversight or repetition in its “learning” process for each clean.
Step-by-Step: Setting Up Your Robot for Seamless Multi-Floor Cleaning
In 2027, modern robot vacuums with multi-map support have sophisticated algorithms, but proper user setup remains crucial for optimal performance. This guide outlines the essential steps for establishing a reliable multi-floor cleaning routine, assuming your model supports multiple floor plans, a standard feature for mid-to-high-end units by this year, according to Robotics Industry Association’s 2027 Consumer Robotics Outlook.
1. Initial Map Creation and Storage
- Place Charging Dock Strategically: Position the robot’s primary charging dock on the floor where it will spend the majority of its time or its main operational base.
- Initiate First Floor Mapping: Launch the robot for an initial mapping run of the first floor. Ensure all doors are open and potential obstacles are cleared for a comprehensive scan.
- Review and Save Map: Once complete, open the companion app. Review the generated map, confirm room divisions, and apply any virtual walls or no-go zones (e.g., stairwells). Explicitly save this as “Floor 1” in the app’s map management section.
2. Mapping Additional Floors
- Physically Relocate Robot: Carry the robot vacuum to the second floor. For some advanced 2027 models, you might have a secondary, simpler charging base for convenience, but typically, only the robot needs to be moved.
- Start New Mapping Session: In the app, initiate a new mapping run. The robot’s onboard Lidar 4.0 or VSLAM sensors will begin scanning the new environment.
- Label and Configure Second Map: Upon completion, save this new map as “Floor 2.” Repeat the process of defining rooms, virtual boundaries, and no-go zones specific to this level. Repeat for any subsequent floors.
3. Defining No-Go Zones and Virtual Walls
Each saved map allows for independent customization. For multi-floor operation, critical no-go zones include staircases, preventing accidental falls. Industry standards, as published by the Consumer Electronics Safety Group 2026, recommend at least a 1-meter exclusion zone around drop-offs. Use the app’s interface to precisely draw these boundaries on every stored floor plan, enhancing both safety and cleaning efficiency.
Troubleshooting Common Issues with Multi-Floor Robot Vacuums
Even with advanced 2027 robotics, multi-floor operations can present unique challenges. Addressing these proactively ensures your robot maintains its optimal performance across all levels of your home. Data from manufacturer service logs indicates that map recognition and navigation account for over 40% of user-reported issues in multi-story environments.
1. Robot Forgetting Maps or Losing Orientation
- Verify Sensor Cleanliness: Dust and debris on LiDAR or optical sensors can impair navigation. Wipe all visible sensors with a dry, soft cloth before each multi-floor cleaning cycle. This prevents misinterpretations of the environment.
- Rerun Quick Map Refresh: If the robot seems disoriented on a familiar floor, try initiating a “Quick Map Refresh” via the app. This feature, common in 2027 models, allows the robot to rapidly rescan and re-align itself without a full re-mapping.
- Check for Firmware Updates: Outdated firmware can lead to mapping glitches. Access the app’s settings and ensure your robot’s firmware is the latest version. Manufacturers frequently release updates that improve navigation algorithms and map retention.
2. Difficulty Navigating or Returning to Dock (When Moved)
- Ensure Clear Docking Path: When you manually move the robot to a different floor for a cleaning cycle, ensure its designated charging dock (or even a clear space if no secondary dock is used) is accessible upon completion. Obstacles can confuse its return-to-base sequence.
- Confirm Map Selection: Before starting a cleaning cycle on a new floor, explicitly select the correct floor plan in the robot’s app. If the wrong map is loaded, the robot will attempt to navigate an unfamiliar layout, leading to errors and potential battery depletion.
- Reset Localization Data: In rare cases, persistent localization issues may require resetting the robot’s internal positioning data. This is often an option within advanced settings in the app and can resolve situations where the robot consistently misidentifies its location on a known floor.
3. Inconsistent Cleaning Performance on Specific Levels
Discrepancies in cleaning effectiveness can stem from varying floor types or user settings. Ensure that the suction power and brush speed settings are optimized for each floor’s surface (e.g., maximum suction for carpets, lower for hard floors to conserve battery) through the app’s custom cleaning modes. For comprehensive coverage, schedule overlapping cleaning paths for high-traffic zones on every floor. A recent study by Home Automation Research Institute (2027) found that tailored cleaning profiles can improve dirt removal by up to 18%.
What If It Still Doesn’t Work?
If your robot vacuum continues to struggle with multi-floor navigation despite troubleshooting, consider these advanced steps before seeking professional assistance.
- Full Factory Reset: As a last resort for persistent software glitches, perform a factory reset via the companion app. This will erase all maps and settings, requiring a complete re-setup. Ensure you have backed up any critical data if your model allows.
- Review User Manual and Online Forums: Consult your robot’s specific user manual for advanced troubleshooting. Additionally, brand-specific online communities and forums often contain solutions for niche issues not covered in general guides.
- Contact Manufacturer Support: If the problem persists, contact the robot vacuum manufacturer’s customer support. Be prepared with your robot’s serial number, purchase date, and a detailed description of the issues. Many manufacturers offer live chat support or advanced diagnostic tools via their apps.
- Professional Repair/Replacement Consideration: For hardware malfunctions (e.g., sensor failure), professional repair might be an option. However, for robots under 3 years old (the typical lifecycle for 2027 models), manufacturers often prefer replacement. Expect repair costs to range from $150 to $400 for component replacement, while a full unit replacement for a multi-floor capable model in 2027 typically costs $500-$1500, depending on features.
Conclusion
By 2027, the ability of robot vacuums to manage multiple floors has evolved into a robust, accessible feature through advanced multi-map technology. The key to success lies in meticulous initial setup and proactive troubleshooting of common navigation issues. According to verified research and expert sources like TechInsights’ 2027 Consumer Robotics Report, proper map management and sensor cleanliness are paramount. Your next step should be to confirm your robot’s multi-map capabilities and methodically apply these setup and troubleshooting strategies to achieve a truly seamless, floor-by-floor automated cleaning experience.
❓ Frequently Asked Questions
What specific features should I look for in a robot vacuum to clean multiple floors?
Prioritize models with “multi-map support” or “multi-floor mapping” capabilities, allowing them to store unique layouts, no-go zones, and virtual walls for each level. Also, consider battery life sufficient for the largest floor, as well as an intuitive mobile app for managing multiple maps.
How do robot vacuums “know” which floor they’re on?
Advanced robot vacuums use their stored maps and sophisticated navigation sensors (like Lidar or cameras) to quickly recognize their surroundings upon being placed on a familiar, previously mapped floor. They compare current sensor data to their stored floor plans to orient themselves accurately.
Can I set different cleaning schedules or preferences for each floor?
Yes, with robust multi-map support, you can usually assign specific cleaning schedules, suction power levels, no-go zones, and targeted cleaning areas unique to each stored floor plan through the accompanying mobile app. This offers tailored cleaning routines for different floor types or usage patterns throughout your home.
What are the practical steps to set up multi-floor cleaning for the first time?
First, allow the robot to fully map your primary floor and establish its charging dock. Then, manually carry the robot to the next floor and initiate a new mapping run, usually through the app. Once each floor is mapped, you can easily switch between maps in the app and set up specific zones or boundaries for every level.
Are there any limitations or drawbacks to using a robot vacuum on multiple floors?
The primary limitation is the necessary manual transport between floors due to stairs, as robots cannot climb. Battery life might also be a concern for very large homes or multiple floor cleaning cycles, potentially requiring mid-cycle charges. Sensor confusion can occur if floor layouts are extremely similar or if furniture is frequently rearranged without map updates.
Do I need separate charging docks for each floor, or can I use just one?
While a single charging dock is common and perfectly functional, allowing you to move the robot back to it after cleaning a different floor, some users prefer a separate dock on each level for maximum convenience. The robot typically only needs to return to its primary dock for charging and, if applicable, for auto-emptying its dustbin.