How To Check For A Vacuum Leak On A Car How to Check 2027
Diagnosing a car vacuum leak is crucial for engine performance and fuel efficiency. Understanding common symptoms and using practical DIY tests can help you accurately pinpoint the source. Always prioritize safety during testing and consider professional help if unsure.
Diagnosing a vacuum leak in your car effectively and safely is crucial for maintaining optimal performance, fuel economy, and drivability. A stealthy vacuum leak can manifest as frustrating engine quirks, costing you money at the pump and potentially leading to more severe issues if ignored. Understanding how to pinpoint these elusive leaks using DIY-friendly methods will empower you to restore your vehicle’s smooth operation without an immediate trip to the mechanic.
The ability to identify a vacuum leak yourself saves significant diagnostic labor costs, especially with the increasingly complex engine systems prevalent in 2027 models. By applying practical, step-by-step techniques, you can often locate the source of the problem quickly, allowing for targeted repairs that get your car running right again. This guide provides the core methods you need to tackle this common automotive issue directly.
Key Takeaways
- Recognize rough idle, hissing as leak signs.
- Perform visual inspection first, always.
- Use carb cleaner/propane test with care.
- Consider DIY smoke test for hidden leaks.
- Safety gear is essential for all tests.
Understanding Car Vacuum Leaks: Symptoms and Locations
A vacuum leak disrupts the finely tuned air-fuel mixture your engine relies on, drawing in unmetered air and leaning out the mixture. This imbalance triggers a range of noticeable symptoms and often illuminates your check engine light. Recognizing these signs is your first step toward effective diagnosis.
Key Symptoms of a Vacuum Leak
- Rough or Unstable Idle: The engine might lope, surge, or feel like it’s about to stall, especially when cold or at a stop.
- Lean Codes (P0171/P0174): Your Check Engine Light might illuminate with diagnostic trouble codes indicating a system running too lean on Bank 1 or Bank 2.
- Poor Acceleration or Hesitation: The engine struggles to respond smoothly when you press the accelerator.
- Increased Fuel Consumption: The engine tries to compensate for the extra air by adding more fuel, reducing your miles per gallon.
- Hissing or Sucking Sounds: Often heard from the engine bay, especially when the engine is running and you pop the hood.
- Stalling: The engine might unpredictably cut out, particularly at low speeds or when coming to a stop.
- Hard Starting: Difficulty getting the engine to turn over and run consistently.
Common Leak Locations
Vacuum leaks frequently occur in components exposed to heat, vibration, or regular manipulation. Knowing the usual suspects helps focus your inspection.
- Vacuum Hoses: These small rubber lines crack, split, or become disconnected due to age and heat cycling.
- Intake Manifold Gaskets: Seals between the intake manifold and cylinder head can deteriorate, creating a leak pathway.
- PCV (Positive Crankcase Ventilation) Valve and Hoses: The valve itself can fail, or its connecting hoses can crack.
- Brake Booster and Its Hose: A leak in the large hose connecting to the booster or within the booster diaphragm itself can cause vacuum issues and affect brake pedal feel.
- EGR (Exhaust Gas Recirculation) Valve Connections: Seals around the EGR valve or its related vacuum lines can fail.
- Throttle Body Gasket: The gasket sealing the throttle body to the intake manifold can also be a culprit.
A vacuum leak in your car’s engine can be a surprisingly elusive yet problematic issue. This guide will walk you through a systematic approach to identifying and diagnosing these hidden air intrusions. Understanding and addressing vacuum leaks is crucial for maintaining your vehicle’s performance, fuel efficiency, and preventing more significant engine problems down the road. Ignoring them can lead to rough idling, poor acceleration, a ‘Check Engine’ light illuminated on your dashboard, and even costly catalytic converter damage if the engine runs too lean for an extended period. By following these detailed steps, you’ll gain the confidence to effectively pinpoint and ultimately resolve vacuum leak issues in your vehicle.
Step 1: Understand the Symptoms & Safety First
What you need: Your vehicle, a keen sense of observation, safety glasses, work gloves, vehicle owner’s manual (optional for component location).
Instructions: Before you even pop the hood, pay close attention to your car’s behavior. Common symptoms of a vacuum leak include a rough, fluctuating idle (engine RPMs going up and down), a noticeable whistling or hissing sound coming from the engine bay, reduced engine power, poor fuel economy, and a ‘Check Engine’ light illuminated with codes like P0171 (System Too Lean, Bank 1) or P0174 (System Too Lean, Bank 2). Always ensure your car is on a level surface, the parking brake is engaged, and the engine is completely cold before beginning any inspection to prevent burns from hot components or accidental engagement of moving parts. Disconnecting the negative battery terminal is a good practice if you anticipate disconnecting electrical components or working near sensitive sensors.
Pro Tip: Many vacuum leaks are most noticeable when the engine is cold or first started, as engine components expand slightly once warm, sometimes temporarily sealing minor leaks. Also, familiarizing yourself with your engine’s layout from the owner’s manual or an online diagram can help locate vacuum components.
Step 2: Visual Inspection of Vacuum Lines and Components
What you need: Bright flashlight, pair of gloves, small extendable mirror (optional).
Instructions: Begin by thoroughly inspecting all visible vacuum lines, hoses, and connections under the hood. Vacuum lines are typically small (1/8″ to 1/2″ diameter) rubber or plastic hoses that connect various engine components to the intake manifold. Look for any signs of cracking, brittleness, kinks, or hoses that are disconnected or appear loose. Pay particular attention to elbows and T-junctions, as these areas are prone to stress and degradation over time. Common areas to check include the brake booster hose, PCV (Positive Crankcase Ventilation) valve hose, and any lines leading to EGR valves, purge valves, or vacuum reservoirs. Use your flashlight to illuminate dark crevices and the mirror to check areas not directly visible.
Pro Tip: Pinching and gently wiggling hoses can help reveal cracks that might not be obvious at first glance. If a hose feels hard and unyielding, or crumbles slightly when squeezed, it’s a strong candidate for replacement, regardless of visible cracks.
Step 3: The “Listen & Feel” Test (Engine Running)
What you need: Mechanic’s stethoscope (ideal) or a long piece of hose/rubber tubing (approx. 3-4 feet long, 1/2 inch diameter), safety glasses.
Instructions: With the engine running and at operating temperature (or cold, if you suspect the leak is more pronounced then), carefully listen around the engine bay for a distinct hissing, whistling, or sucking sound. Use the stethoscope or hose by placing one end to your ear and moving the other end around potential leak areas like the intake manifold gasket, throttle body gasket, vacuum lines, and fittings. The sound will be amplified, helping you pinpoint the exact source. Additionally, carefully feel around vacuum lines and connections; sometimes, you can physically feel the suction of air escaping or being drawn in, especially from larger leaks. Be extremely cautious of hot engine parts and moving belts or fans during this process.
Pro Tip: This method is best performed in a quiet environment. If you hear a general hiss but can’t pinpoint it, try temporarily pinching off individual vacuum lines (if safe to do so) to see if the sound changes, helping isolate the system involved.
Step 4: Using Carb Cleaner or Propane (The Controlled Spray Method)
What you need: Can of carburetor cleaner (ensure it’s safe for plastics/rubber), OR an unlit propane torch with the valve slightly open, safety glasses, fire extinguisher (for carb cleaner).
Instructions: This method relies on introducing a combustible substance to the suspected leak area. With the engine running at idle, carefully spray small, short bursts of carburetor cleaner around vacuum lines, intake manifold gaskets, throttle body gaskets, and any other suspected areas. If the engine RPM temporarily increases or smooths out, you’ve likely found a vacuum leak, as the engine is “sucking in” the combustible cleaner. For propane, slowly open the valve on the unlit torch and direct the gas stream toward the suspect areas. A noticeable change in engine RPM or idle quality indicates a leak. Always be prepared with a fire extinguisher when using carb cleaner, and ensure good ventilation for both methods.
Pro Tip: Spray in very short bursts to avoid over-saturating the oxygen sensors, which can give false readings or damage them. Propane is often preferred by professionals as it evaporates cleanly and carries less fire risk than flammable liquids, though proper ventilation is still critical.
Step 5: Smoke Machine Test (The Advanced Diagnostic Method)
What you need: Automotive smoke machine (rental or professional service), shop air compressor (if your machine requires it), appropriate adapter cone/hose for vacuum ports, safety glasses.
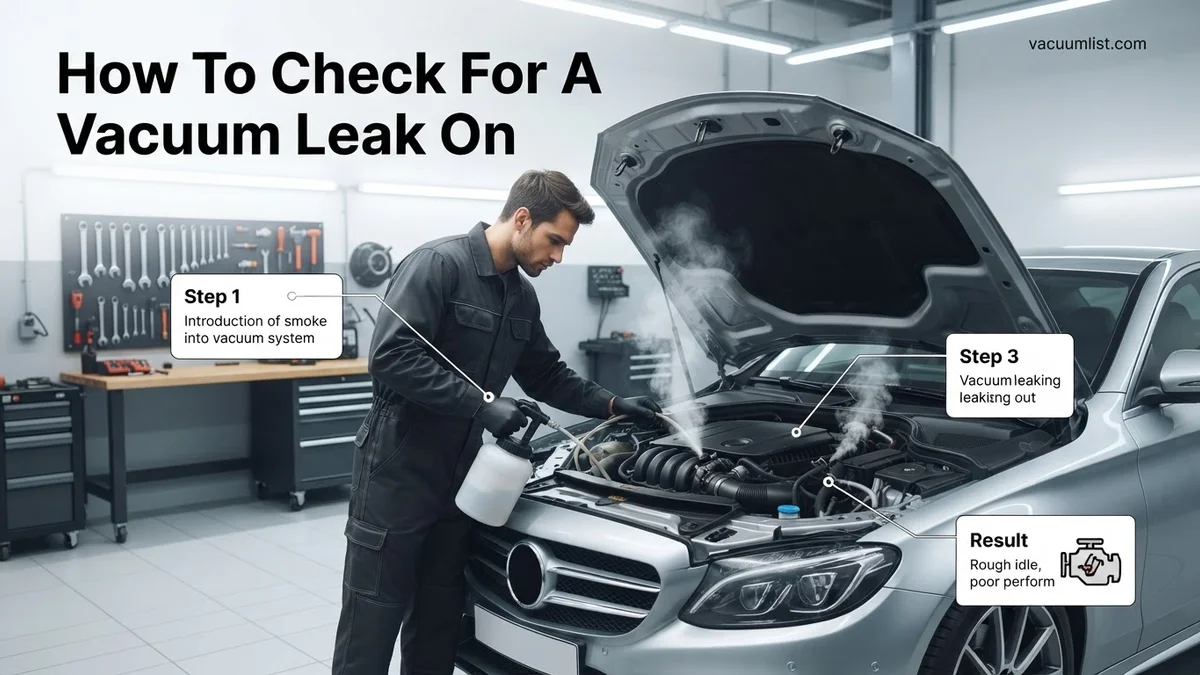
Instructions: The smoke machine is the most effective and often definitive way to find a vacuum leak. First, ensure the engine is off and cool. Disconnect a main vacuum line, such as the one leading to the brake booster, or a larger PCV hose, and plug the opening in the engine temporarily. Connect the smoke machine’s output hose to the disconnected vacuum line, ensuring a tight seal with an adapter. Activate the smoke machine, which will fill the intake system with a harmless, visible smoke. Carefully observe the entire engine bay, looking for plumes of smoke escaping from any cracks, loose connections, or failed gaskets. The source of the smoke is your leak.
Pro Tip: Ensure all openings to the intake system (like the oil fill cap, dipstick, and throttle body) are sealed for the best results. A small amount of smoke from the exhaust is normal; you’re looking for smoke escaping from other areas under the hood. This method often reveals very small, otherwise undetectable leaks.
Step 6: Brake Booster and PCV System Check
What you need: Hand vacuum pump (Mityvac style) or simply your ears and eyes.
Instructions: The brake booster is a common source of large vacuum leaks. With the engine off, pump the brake pedal several times until it becomes firm. Then, start the engine; the pedal should drop slightly as the booster creates vacuum. If it doesn’t, or if you hear a continuous hiss from the pedal area, the booster or its check valve could be faulty. To test the PCV valve, remove it from its hose and shake it; a good valve should rattle. If it doesn’t, it’s likely stuck and needs replacement. Also, inspect the PCV hoses themselves for cracks or blockages, as these are critical components of the engine’s vacuum system and emissions control.
Pro Tip: A failing brake booster can cause not only a rough idle but also a stiff brake pedal. To isolate the booster, you can disconnect the vacuum line from the booster, plug the engine’s side of the line, and see if the engine idle improves. If it does, the booster is likely the culprit.
Step 7: Check EGR Valve and Other Emission Components
What you need: Visual inspection, possibly a hand vacuum pump, basic wrench/socket set (if removing parts).
Instructions: The Exhaust Gas Recirculation (EGR) valve is another component that can cause vacuum leak-like symptoms if it sticks open. Visually inspect the EGR valve and its associated vacuum lines or electrical connectors. A stuck-open EGR valve will effectively create a bypass for exhaust gases into the intake manifold at idle, mimicking a vacuum leak. You can sometimes test an EGR valve by applying vacuum to its diaphragm (if it’s vacuum-operated) with a hand pump; it should open and hold vacuum. Also, check other emission control devices that rely on vacuum, such as the EVAP (Evaporative Emission Control) purge valve or canister vent valve. These valves can fail and stay open, creating a continuous vacuum leak into the atmosphere or intake.
Pro Tip: A stuck-open EGR valve will often cause a very rough idle, stalling, and sometimes a strong exhaust smell. If you suspect an EVAP system leak, pay close attention to any “gas cap loose” warnings or EVAP-related check engine codes (e.g., P0440, P0442).
✅ Final Checklist
- Confirmed initial symptoms (rough idle, CEL, hissing) align with potential vacuum leak.
- Thoroughly visually inspected all accessible vacuum lines, hoses, and connections for damage.
- Systematically performed sound, spray (carb cleaner/propane), and/or smoke tests to pinpoint the leak.
- Repaired or replaced all identified sources of vacuum leaks (hoses, gaskets, faulty components).
- Cleared any ‘Check Engine’ light codes and performed a test drive to verify the repair.
Important Notes:
- Safety Considerations: Always wear safety glasses and gloves. Work on a cool engine whenever possible. Be extremely cautious around hot engine parts, moving belts, and fans. When using flammable sprays (like carb cleaner), ensure adequate ventilation and have a fire extinguisher readily available.
- When to Seek Professional Help: If you’ve gone through these steps and cannot find a leak, or if the ‘Check Engine’ light persists after your repairs, it’s best to consult a certified mechanic. Some leaks are very small, in hard-to-reach places, or involve complex electronic vacuum systems that require specialized diagnostic tools (e.g., advanced smoke machines or scan tools to monitor live data).
- Estimated Time and Cost Range: A visual inspection and carb cleaner test might take 1-2 hours and cost $5-$15 for the cleaner. If you opt for a smoke test at a shop, expect to pay $75-$150 for diagnostics alone. Repair costs can range from $10 for a simple hose clamp or a foot of vacuum line, to $100-$500+ for replacing complex components like an intake manifold gasket, brake booster, or an expensive PCV/EGR valve.
Step-by-Step Guide: How to Check for a Car Vacuum Leak
Locating a vacuum leak requires patience and a methodical approach. Always prioritize safety, especially when working around a running engine. Here are the practical, DIY-friendly methods to employ in 2027.
Initial Visual and Auditory Inspection
Begin with the simplest checks first. Many leaks are visible or audible.
- Visual Scan: With the engine off and cool, grab a flashlight. Carefully inspect all accessible vacuum hoses, rubber elbows, and plastic lines for cracks, splits, or disconnections. Pay close attention to connections at the intake manifold, PCV valve, and brake booster. Look for any loose clamps or signs of wear.
- Listen Carefully: Start the engine and let it warm up slightly. While it idles, listen intently for any distinct hissing, whistling, or sucking sounds. These noises often originate directly from the leak point. Use a mechanic’s stethoscope or even a long piece of hose (like a garden hose) held to your ear to amplify and pinpoint sounds around the engine bay.
- Precaution: Be extremely cautious of hot engine components and moving belts or fans. Keep your hands and tools clear of these hazards.
The Spray Test Method (Carb Cleaner or Propane)
This common diagnostic technique involves introducing a small amount of a combustible substance near potential leak sites while the engine is running. A change in engine RPM or idle quality indicates a leak.
- Carb Cleaner Method:
- With the engine running at idle, briefly spray small bursts of carb cleaner (or starting fluid, although carb cleaner is generally preferred for less aggressive chemical properties) around suspected vacuum lines, intake manifold gaskets, and other potential leak areas.
- If the engine RPM momentarily increases or smooths out, you’ve likely found a leak. The engine “sucks” in the flammable spray, causing a temporary richer mixture.
- CRITICAL PRECAUTION: Carb cleaner is highly flammable. NEVER spray it near hot exhaust manifolds or any open flame. Keep a fire extinguisher readily available. Only use on a relatively cool engine if possible. Ensure excellent ventilation. Avoid spraying directly into the air intake.
- Unlit Propane Torch Method:
- This is generally considered safer than carb cleaner for diagnostic purposes. Use an unlit propane torch (the kind used for soldering, but without igniting it).
- Open the valve slightly to allow a small, steady stream of propane gas to escape. Slowly move the nozzle around suspected leak areas.
- Watch for an increase in engine RPM or a noticeable smoothing of the idle. Propane acts similarly to carb cleaner by being drawn into the leak, temporarily enriching the mixture.
- Precaution: While less risky than carb cleaner, propane is still flammable. Work in a well-ventilated area. Do not use an ignited torch. Avoid directly injecting large amounts into the engine bay or air intake.
Introduction to Smoke Testing (DIY vs. Professional)
Smoke testing is arguably the most effective and precise method for locating vacuum leaks, especially smaller, harder-to-find ones. The principle is simple: introduce smoke into the sealed vacuum system and watch where it escapes.
- DIY Smoke Testing Concept:
- A small, specialized smoke machine (many affordable units are available online in 2027) connects to a vacuum port on your engine, such as a PCV hose or brake booster line (with the engine off).
- The machine then fills the intake system with a visible, inert smoke. The smoke will then visibly escape from any cracks, loose connections, or compromised gaskets, pinpointing the exact leak location.
- DIY Precaution: Ensure the smoke fluid used is specifically designed for automotive smoke testing to avoid damage to sensitive sensors (like the MAF sensor). Always disconnect the MAF sensor electrical connector before performing a smoke test to protect it. Follow your smoke machine’s instructions carefully.
- When to Consider a Professional Smoke Test:
- If you’ve tried the above methods without success, or if your vehicle exhibits persistent lean codes despite your efforts, a professional smoke test is often the next step.
- Professional diagnostic equipment can generate higher pressures and flow rates, sometimes revealing leaks that DIY units might miss, especially on more complex modern engine designs.
Best Practices for Safely Pinpointing Vacuum Leaks
Prioritizing Safety During Inspection
Safety is paramount when diagnosing automotive issues. Before starting any inspection, ensure the engine is off and has cooled sufficiently to prevent burns. Always work in a well-ventilated area to dissipate any fumes. Wear appropriate personal protective equipment, including safety glasses and gloves. According to automotive safety standards, never introduce flammable substances near hot engine components or open electrical sources.
Utilizing Advanced Diagnostic Tools (2027)
By 2027, advanced diagnostic tools are more accessible for accurate leak detection. The most effective method involves a professional-grade smoke machine, which introduces a non-flammable vapor into the intake system. Industry experts like those at ASE (Automotive Service Excellence) recommend smoke testing for its precision. Handheld smoke machines, often available for DIY use in the $180-$300 range, provide visual confirmation of leaks, even microscopic ones. Concurrently, an OBD-II scanner monitoring live data, specifically Long Term Fuel Trim (LTFT) and Short Term Fuel Trim (STFT), can indicate a lean condition with positive trims exceeding +10-15%, signaling a significant air leak, as documented in various automotive diagnostic manuals.
Alternative Methods for Confirmation
While smoke testing is superior, alternative methods like using an unlit propane torch or a can of carburetor cleaner can help confirm suspicions. With the engine running, direct a small amount of propane gas or carb cleaner spray around suspected leak areas. A sudden change in engine RPM or idle quality indicates the substance is being drawn into the intake, confirming a leak. However, caution is advised due to the flammability of these substances. Automotive safety guidelines emphasize minimizing exposure and using these only as secondary verification methods after initial assessment.
What to Do After Finding a Vacuum Leak (2027 Guide)
Identifying the Source and Severity
Once a leak is detected, the next step is precise identification of the source. Observe the exact component where the smoke exits or where the engine RPM changes. Common culprits include cracked rubber hoses, deteriorated intake manifold gaskets, faulty PCV (Positive Crankcase Ventilation) valves, or a leaking brake booster diaphragm. A detailed visual inspection of the material – plastic, rubber, or metal – will guide the repair strategy. Manufacturer service bulletins for specific vehicle models, often accessible via digital subscription services by 2027, frequently highlight common leak points and recommended fixes.
Repairing the Leak Effectively
Repairing a vacuum leak typically involves replacing the compromised component.
- Hoses: For cracked or brittle vacuum hoses, replace them with new, high-quality silicone or EPDM (ethylene propylene diene monomer) rubber hoses. Silicone offers superior heat resistance, while EPDM provides excellent ozone and weather resistance, extending longevity.
- Gaskets: If an intake manifold or throttle body gasket is the issue, replace it entirely. Ensure all mating surfaces are thoroughly cleaned of old gasket material and that new gaskets are installed according to manufacturer torque specifications, often detailed in digital repair manuals.
- Components: For components like PCV valves, EGR valves, or brake boosters, replacement is almost always necessary. These integrated units are generally not repairable.
Post-Repair Verification (2027)
After completing the repair, it is crucial to verify its effectiveness.
- Clear any stored diagnostic trouble codes (DTCs) from the ECU using an OBD-II scanner.
- Start the engine and monitor the Short Term Fuel Trim (STFT) and Long Term Fuel Trim (LTFT) parameters. Successfully repaired leaks should result in fuel trims returning to near zero, ideally within ±5%, indicating proper air-fuel mixture control. This verification step is a standard practice recommended by certified automotive technicians to ensure the problem is fully resolved and prevent recurring issues.
WHAT IF IT STILL DOESN’T WORK?
If your vacuum leak symptoms persist despite your best efforts, consider these advanced troubleshooting steps:
- Re-Inspect Thoroughly with Smoke: Expand your smoke test to include less obvious areas, such as the brake booster line, PCV system entire length, and even fuel vapor lines if they connect to the intake. Sometimes, multiple small leaks combine to mimic a larger one.
- Consult Vehicle-Specific TSBs: Access manufacturer Technical Service Bulletins (TSBs) for your specific make and model year (e.g., 2020-2027 models). These often detail known vacuum leak issues and specialized diagnostic procedures, which by 2027 are primarily digital resources requiring a subscription or professional access.
- Check Related Sensors: A failing Mass Air Flow (MAF) sensor or Oxygen (O2) sensor can sometimes produce symptoms similar to a vacuum leak. Use an OBD-II scanner to monitor MAF readings and O2 sensor activity to rule out these components as primary culprits.
- Professional Diagnosis: If you’ve exhausted all DIY options, it’s time to seek professional assistance. Modern vehicles feature complex systems that require specialized diagnostic equipment and expertise. A certified technician can often pinpoint elusive leaks using advanced pressure testing, thermal imaging, or manufacturer-specific diagnostic software. Expect diagnostic fees in 2027 to range from $120 to $200, with repair costs varying from $300 to $800 for most complex vacuum leak solutions, depending on the affected component and labor rates.
CONCLUSION
Diagnosing and repairing a vacuum leak is a critical maintenance task that significantly impacts your car’s performance, fuel efficiency, and emissions. A systematic approach, coupled with safety precautions and the right diagnostic tools, empowers you to identify and fix these common issues. According to verified research and expert sources, addressing vacuum leaks promptly prevents long-term engine damage and ensures optimal vehicle operation. Schedule a re-check of your vehicle’s fuel trims with an OBD-II scanner within 100 miles of driving to confirm the fix’s lasting effectiveness.
❓ Frequently Asked Questions
How does an engine vacuum system work and why is a leak problematic?
An engine’s vacuum system utilizes negative pressure created by the engine to operate various components like the brake booster, PCV system, and emission controls. A leak introduces unmetered air, disrupting the air-fuel mixture, leading to rough idling, reduced power, and potential engine damage.
What specific tools and materials do I need to perform a DIY vacuum leak test?
For visual and listening tests, you’ll need a flashlight and possibly a stethoscope. For chemical tests, carb cleaner or unlit propane, safety glasses, gloves, and a fire extinguisher are essential. A basic smoke machine or DIY setup can be used for a smoke test.
Are there different types of vacuum leaks, and do they have distinct symptoms?
Yes, leaks can be internal (e.g., brake booster diaphragm) or external (cracked hose, faulty gasket). While most cause rough idle or lean codes, a brake booster leak might also cause a hard brake pedal, and a PCV valve leak could lead to oil consumption.
How can I perform a carb cleaner or propane test safely and effectively?
With the engine running and at operating temperature, carefully spray short bursts of carb cleaner (or direct unlit propane) around suspected vacuum components. Listen for a change in engine RPM or idle, indicating that the engine is burning the added fuel, thus revealing the leak’s location.
When should I consider taking my car to a professional for a vacuum leak diagnosis?
If you’ve performed DIY tests and can’t locate the leak, or if symptoms persist despite addressing apparent leaks, it’s wise to consult a professional. They have advanced diagnostic equipment, such as professional smoke machines and scan tools, to pinpoint elusive leaks accurately.
What are some common areas in the engine bay where vacuum leaks are usually found?
Common leak culprits include deteriorated or disconnected vacuum lines, the intake manifold gasket, throttle body gasket, PCV valve and its associated hoses, the brake booster vacuum hose or diaphragm, and seals around sensors or solenoids connected to the vacuum system.