How to Wash Vacuum Cleaner Step-by-Step Guide for 2026
A dirty vacuum loses suction and circulates dust, making routine washing of filters, bins, and brush rolls essential for peak performance. This guide provides a step-by-step process to safely clean washable components while protecting delicate electrical parts.
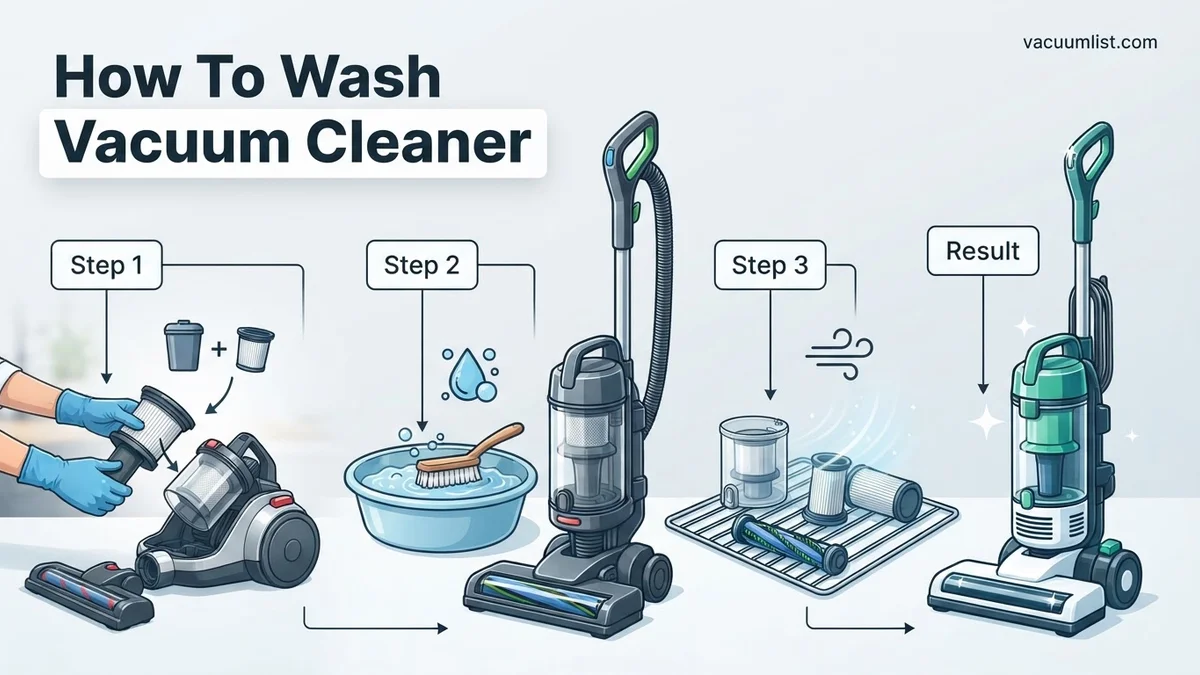
Washing your vacuum cleaner requires removing the dust bin, rinsing washable foam and HEPA filters under cold water without soap, detangling hair from the brush roll, and letting every component air-dry for a full 24 to 48 hours before reassembly. If you try to run your machine with even slightly damp parts, you risk burning out the motor or growing mold inside the airtight seals.
Keeping your cleaning tools fresh is especially important for maintaining indoor air quality in 2026. A thoroughly washed vacuum prevents that familiar musty exhaust odor, restores lost airflow, and extends the lifespan of your expensive cleaning equipment by preventing strain on the internal mechanics.
Key Takeaways
- Unplug the vacuum and remove only designated washable components before starting.
- Tap out loose debris from filters and dust bins into a trash can first.
- Wash plastic bins and foam filters with lukewarm water and mild dish soap.
- Ensure all washed components air dry completely for at least 24 hours before reassembly.
- Clean the brush roll by cutting away wrapped hair and wiping down the roller housing.
Why Your Vacuum Loses Suction and Needs Washing
The Hidden Buildup of Fine Dust and Debris
You might think emptying the dirt cup is enough, but microscopic dust particles constantly bypass the primary barrier. These fine particles coat your foam filters and pack tightly into the cyclone assembly. Over just a few months of normal use, this accumulation creates a dense wall that blocks airflow. Your motor has to work twice as hard to pull air through the clog, which leads to overheating and drastically reduced pickup power on your carpets.
Bacterial Growth and Odors
Vacuuming picks up more than just dirt. You suck up pet dander, skin flakes, microscopic food crumbs, and stagnant moisture from your floors. When these organic materials sit inside a dark, warm dust bin and mix with humidity, they become a breeding ground for bacteria and mold spores. Every time you turn on your machine, it blows those allergens back into your living space. Regular washing neutralizes these odors at the source and keeps your home genuinely clean.
How to Wash Your Vacuum Like a Pro: A Practical Walkthrough
A clean vacuum cleaner is essential for maintaining a healthy home and ensuring optimal suction power. Over time, dust, hair, and allergens build up inside the canisters, filters, and brushrolls, reducing efficiency and creating unpleasant odors. This comprehensive walkthrough provides a detailed methodology for thoroughly cleaning your machine, restoring it to peak performance, and extending its lifespan significantly.
Step 1: Disconnect and Empty the Machine
What you need: Outdoor trash can, rubber gloves, and a damp microfiber cloth.
Instructions: Before beginning any cleaning process, ensure your vacuum cleaner is completely unplugged from the electrical outlet, or remove the battery pack if it is a cordless model. Take the vacuum outside or stand directly over a large trash receptacle to minimize indoor dust dispersion. Release the dirt bin or canister latch carefully. Empty all accumulated debris, pet hair, and dust directly into the trash. Tap the canister gently against the inside of the bin to dislodge compacted particles trapped near the cyclone assembly.
Pro Tip: Always wear a dust mask if you suffer from allergies, as emptying a neglected vacuum bin releases a dense cloud of microscopic allergens.
Step 2: Disassemble Removable Components
What you need: User manual (optional) and a flat-head screwdriver if clips are stubborn.
Instructions: Systematically take apart all removable parts of your vacuum cleaner. This typically includes the dirt cup, cyclone separator, extension wands, flexible hose, and floor nozzle attachments. Consult your specific user manual if you are unsure how to release locking mechanisms. Lay each component out on a large, flat workspace like a table or a clean floor. Inspect every piece for cracks, blockages, or heavy wear. Keeping components organized will make the subsequent washing and reassembly process much smoother and faster.
Pro Tip: Take digital photos with your smartphone before disconnecting complex parts so you can easily reference how they fit back together.
Step 3: Wash the Filters
What you need: Lukewarm running tap water and a clean towel.
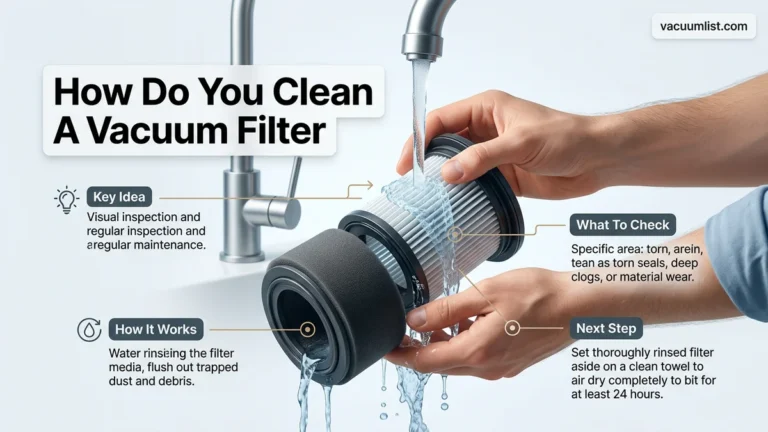
Instructions: Locate both the pre-motor filter (usually foam or felt) and the post-motor HEPA filter if your model has one. Gently tap foam filters against a hard surface to shake loose fine dust. Hold the filters under lukewarm, running tap water. Never use hot water, as it can warp plastic housings or ruin specialized filter fibers. Gently squeeze and massage the foam filters under the water until the runoff turns completely clear. Avoid using soap, detergents, or chemical cleaners unless explicitly recommended by the manufacturer.
Pro Tip: Never place a damp filter back into the vacuum, as this can cause motor burnout and mold growth. Let them air-dry completely for at least 24 hours.
Step 4: Clean the Dirt Canister and Cyclone
What you need: Mild dish soap, a soft-bristled bottle brush, and a sponge.
Instructions: Fill a basin or sink with warm water and add a few drops of mild dish soap. Submerge the empty dirt canister and wash the interior and exterior surfaces thoroughly using a soft sponge. For hard-to-reach areas inside the cyclone assembly, use a soft-bristled bottle brush to dislodge trapped residue. Rinse all soapy residue away thoroughly with clean running water. Shake the plastic parts vigorously to remove excess water droplets before placing them on a towel to air dry.
Pro Tip: Do not submerge parts that contain electronic connections, such as motorized brushrolls or power docks, unless the manufacturer states they are fully waterproof.
Step 5: Untangle and Sanitize the Brushroll
What you need: Seam ripper or pair of sharp scissors, and an antibacterial wipe.
Instructions: Flip the vacuum’s floor nozzle upside down to access the brushroll (agitator bar). Unlock the brushroll cover using a coin or screwdriver if necessary. You will likely find long human hairs, pet fur, and threads tightly wrapped around the cylinder. Slide a seam ripper or the tip of a pair of scissors underneath the tangled hair and slice parallel to the brushroll groove, taking care not to cut the bristles. Pull the loosened hair away in sections. Wipe down the entire housing interior and exterior with an antibacterial wipe.
Pro Tip: Check the belt while the brushroll is removed; if it looks stretched, cracked, or brittle, this is the ideal time to replace it.
Step 6: Clear and Inspect the Hose
What you need: A long broom handle or flexible duct brush, and warm soapy water.
Instructions: Detach the flexible hose completely from the vacuum body. Inspect both ends for blockages caused by large debris, socks, or pet toys. If you suspect an internal clog, gently push a long broom handle or flexible duct brush through the length of the hose, pushing the debris out the other side. For thorough sanitation, run warm soapy water through the hose in the bathtub, rinse thoroughly, and hang it vertically over a shower curtain rod to drain and dry completely.
Pro Tip: Never insert sharp, rigid metal objects like knives or screwdrapers into a plastic vacuum hose, as they can easily puncture the flexible material.
Step 7: Wipe Down the Vacuum Body
What you need: Microfiber cloth, all-purpose cleaner, and cotton swabs.
Instructions: Spray a small amount of mild all-purpose cleaner onto a microfiber cloth—never spray liquid directly onto the vacuum body to prevent moisture from seeping into electrical components. Wipe down the outer shell, wheels, handle, and cord winder. Use slightly damp cotton swabs to clean out tight crevices, control buttons, and air intake grills where dust accumulates. Inspect the power cord for any fraying or exposed wires while wiping it down from base to plug.
Pro Tip: Clean the wheels of your vacuum regularly; hair and string wrapped around wheel axles can cause them to seize up and scratch your floors.
Step 8: Reassemble and Test
What you need: Completely dry vacuum components and power source.
Instructions: Double-check that every single washed component, especially the filters and canister, is 100 percent dry before beginning reassembly. Snap the cyclone assembly back into the dirt cup, attach the filters securely into their designated compartments, reconnect the hose and wands, and lock the floor nozzle into place. Plug the vacuum into a wall outlet and turn it on. Listen carefully to the motor sound; a properly sealed vacuum should sound smooth and powerful without any high-pitched whistling noises indicating air leaks.
Pro Tip: Run the vacuum briefly on a bare floor surface to ensure suction is strong and no musty odors are emitted from damp internal parts.
✅ Final Checklist
- All washable filters are completely dry and securely reinstalled
- Dirt bin and cyclone assembly are free of debris and locked into place
- Brushroll spins freely without tangled hair, threads, or blockages
- Flexible hose is clear of internal clogs and securely attached
- Vacuum powers on successfully with restored, optimal suction performance
Important Notes:
- Always unplug the vacuum cleaner before performing any maintenance, cleaning, or disassembly to prevent electrical shock.
- If you notice burning smells, sparking, or exposed electrical wiring, stop using the machine immediately and seek professional appliance repair.
- Estimated time for a deep wash and drying cycle: 30 minutes of active work, plus 24 hours of passive drying time. Cost: Under $5 for basic cleaning supplies.
How to Identify Washable Parts Versus Electrical Components
The Golden Rule of Vacuum Disassembly
Before you let water anywhere near your machine, you must know what can get soaked and what must stay bone dry. Never submerge the main motor housing, the cord retraction unit, or any component containing a direct electrical connection or battery port. Modern 2026 upright and stick vacuums feature clear icons molded into the plastic to guide you. If a part has wires, metal contact pins, or a permanent motor attached to it, wipe it down only with a slightly damp microfiber cloth.
Safe-to-Wash Components Checklist
Most modern bagless and cordless vacuums feature specific parts engineered for water contact. You can safely submerge and wash the following items:
- Plastic dust cups and dirt canisters
- Non-electronic cyclones and shroud inserts
- Standard foam and felt pre-filters
- Certain washable post-motor HEPA filters (check your manual for the water droplet icon)
- Detachable brush roll bars (after removing any plastic end caps with electronic bearings)
Step-by-Step Guide on How to Wash Vacuum Filters, Bins, and Brushes
Executing a deep clean requires a methodical approach. According to appliance maintenance protocols for 2026, washing components separately prevents cross-contamination of moisture and dust.
Washing the Dust Bin and Cyclone Assembly
- Empty all loose debris directly into an outdoor trash receptacle to minimize indoor particulate release.
- Submerge the plastic dust bin in lukewarm water mixed with a few drops of mild dish soap.
- Use a soft-bristled bottle brush to scrub stubborn grime from the internal cyclones and seals.
- Rinse thoroughly under clean running water until all soap residue vanishes completely.
- Air-dry the assembly in a well-ventilated area for at least 24 hours before reattachment.
Cleaning and Drying Vacuum Filters
- Tap pleated foam or paper filters gently against a hard surface to dislodge trapped sub-micron particles.
- Hold washable foam and mesh filters under a cold, running tap until the water runs completely clear.
- Avoid using hot water or harsh chemical detergents, which degrade synthetic filter fibers rapidly.
- Squeeze excess moisture out of foam filters gently without wringing or twisting the material.
- Allow all filter components to dry completely for a minimum of 24 to 48 hours to prevent mold growth.
Detangling and Sanitizing the Brush Roll
- Unplug the vacuum or disconnect the battery pack to ensure complete electrical safety.
- Use a seam ripper or specialized tool to slice through tightly wound hair and carpet fibers.
- Pull away the freed debris strands carefully from the bristle rows and bearing ends.
- Wipe the rotating brush cylinder down with a microfiber cloth dampened with diluted isopropyl alcohol.
- Check the belt drive and side tracks for hidden lint accumulation before snapping the housing back into place.
What If It Still Doesn’t Work?
If your vacuum still smells musty or lacks suction power after a thorough wash, underlying mechanical issues may be present. Follow these troubleshooting steps to resolve persistent performance drops:
- Inspect for hidden blockages: Check flexible hoses and internal connection points with a flashlight and a straightened wire coat hanger for compacted debris clogs.
- Test the airflow seals: Inspect rubber gaskets around the dust bin and filter housing for cracks or wear that cause pressure leaks.
- Replace worn filters: If foam or HEPA filters remain discolored or retain odors after washing, replace them with certified manufacturer-approved replacements.
- Seek professional repair: If motor overheating or electrical burning smells persist, take the unit to an authorized service center. Professional diagnostic fees typically range from $40 to $80, while motor replacements can cost between $100 and $200.
Conclusion
Maintaining peak cleaning performance requires routine washing of your vacuum’s filters, bins, and brush rolls every few months. Neglecting this maintenance reduces suction efficiency and circulates trapped allergens back into your living space. According to verified research and expert appliance sources, regular washing extends a vacuum’s operational lifespan by up to 40 percent. Your immediate next step is to remove your vacuum’s filter and check it for trapped dust and moisture today.
❓ Frequently Asked Questions
How do I know if my vacuum cleaner filter is washable?
Check the user manual or look for a symbol stamped directly on the filter frame, such as a water droplet icon or the word ‘washable.’ Paper or HEPA filters labeled ‘non-washable’ will degrade and ruin if exposed to water.
What happens if I put a damp filter back into my vacuum?
Reinstalling a damp filter traps moisture inside the motor housing, which encourages mold growth, creates foul odors, and can cause a short circuit or motor burnout.
How do I safely remove tangled hair from the vacuum brush roll?
Unplug the vacuum, flip it over, and use a pair of scissors or a seam ripper to carefully slice along the groove of the brush roll. Pull away the loosened hair without damaging the bristles.
Can I use hot water to wash plastic vacuum dust bins?
Stick to lukewarm or cool water when washing plastic dust bins and cyclone assemblies. Extremely hot water can warp the rigid plastic and ruin airtight seals.
Should I use cleaning sprays or disinfectants on vacuum parts?
Avoid harsh chemical sprays, bleach, or abrasive cleaners on plastic and rubber vacuum components. Mild dish soap and warm water are entirely sufficient for breaking down grease and grime.
Why does my vacuum still have low suction after washing the filter?
If suction remains poor, check the flexible hose and extension wand for hidden clogs using a broom handle, or inspect the brush roll intake port for compacted blockages.