How to Use a Shop Vac to Vacuum Water Expert Guide 2027
Using a shop vac for wet spills requires critical safety precautions and proper setup. Always ensure you have the correct filter installed (or removed) and understand electrical hazards before starting. Follow our guide for effective and safe water cleanup, preventing damage to your vacuum and home.
Dealing with unexpected water spills, pipe leaks, or even minor flooding can be a stressful experience. Fortunately, your shop vacuum is an incredibly effective tool for liquid cleanup, provided you know the specific steps for safe and efficient wet vacuuming. This guide cuts straight to the core process, ensuring you can quickly and confidently tackle water emergencies with your shop vac, minimizing damage and keeping yourself safe.
Mastering wet vacuuming isn’t just about turning on the switch. It involves critical preparatory steps and proper technique to protect your equipment, prevent electrical hazards, and effectively remove liquids. Ignoring these can lead to motor damage, ineffective suction, or worse, serious injury. Let’s get right into how to prepare your shop vac for water and execute the cleanup like a pro.
Key Takeaways
- Remove dry filter; install wet filter or foam sleeve.
- Always use GFCI outlets for electrical safety.
- Empty tank before it gets too full.
- Clean and dry components thoroughly after use.
- Never vacuum flammable liquids.
Why Proper Shop Vac Setup for Water is Crucial
Before any water touches your shop vac, proper setup is non-negotiable. This isn’t a suggestion; it’s a critical safety and functionality requirement. Skipping these initial steps can lead to severe equipment damage, electrical hazards, or simply a non-functioning vacuum when you need it most. Modern shop vac designs in 2027 still prioritize this foundational separation between dry and wet operation.
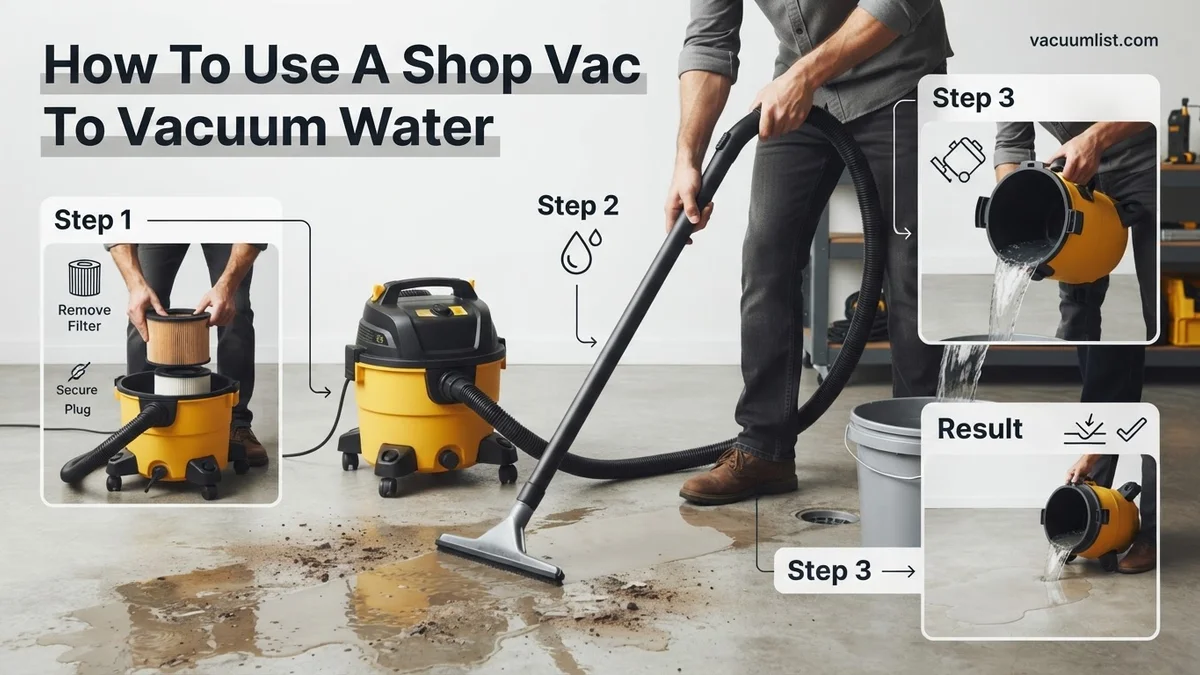
The Critical Filter Swap (or Removal)
- Dry Filters are for Dry Debris Only: Your standard cartridge or pleated paper filter is designed for trapping fine dust and dry particles. When exposed to water, these filters quickly become saturated, clog immediately, and can disintegrate.
- Motor Protection: A clogged dry filter severely restricts airflow, forcing your shop vac motor to work harder. This can lead to overheating and premature motor failure. Additionally, water bypassing a saturated filter can directly enter the motor, causing irreparable damage.
- The Solution: For wet vacuuming, you must either remove the dry filter entirely or replace it with a specialized foam sleeve filter. Foam filters allow water to pass through while still protecting the motor from larger debris.
Electrical Safety First: 2027 Standards
Water and electricity are a dangerous combination, and your safety is paramount. Ignoring electrical precautions can result in severe shock or electrocution.
- GFCI Outlets are Your Best Friend: Always plug your shop vac into a Ground Fault Circuit Interrupter (GFCI) protected outlet. These outlets rapidly detect current imbalances and shut off power, preventing electrical shock in wet conditions. Most building codes in 2027 mandate GFCI protection in areas prone to moisture.
- Inspect Power Cords: Before every use, especially for wet applications, thoroughly inspect the power cord for any cuts, fraying, or exposed wires. Damaged cords are a serious electrical hazard, particularly around water.
- Avoid Flammable Liquids: Never attempt to vacuum flammable or combustible liquids such as gasoline, paint thinner, or solvents. The motor can create sparks that could ignite these substances, leading to explosions or fires. This is an absolute, non-negotiable rule.
How to Vacuum Water Like a Pro: A Practical Walkthrough
Unexpected water leaks, plumbing issues, or even minor floods can quickly turn into a significant problem if not handled promptly and correctly. A shop vacuum, often referred to as a wet/dry vac, is an invaluable tool for quickly and safely removing standing water. This comprehensive guide will walk you through each critical step, from initial safety precautions to post-cleanup maintenance, ensuring you can tackle water removal effectively and prevent further damage to your property and your equipment.
Step 1: Prioritize Safety and Initial Assessment
What you need: Rubber gloves, safety glasses, sturdy waterproof boots, a powerful flashlight, and access to your home’s main circuit breaker or fuse box.
Instructions: Before touching anything wet, assess the situation. Identify the source of the water if possible. Most critically, locate and shut off the power to any affected circuits or the entire area by flipping the corresponding breaker in your electrical panel. Water and electricity are a dangerous combination, posing a severe electrocution risk. Wear your rubber gloves and boots for insulation, and safety glasses to protect your eyes from splashes. Use a flashlight if the power is out or the area is dimly lit to ensure visibility and spot potential hazards like submerged outlets or electrical cords.
Pro Tip: Never wade into standing water that might be in contact with live electrical wiring. If you suspect live wires are submerged, call a professional electrician immediately. Your safety is paramount.
Step 2: Prepare Your Shop Vac for Wet Operations
What you need: Your shop vacuum, the correct wet filter (typically a foam sleeve or specialized cartridge filter), and your owner’s manual (if unsure about filter types).
Instructions: Disconnect the shop vac from any power source. Open the latches holding the motor head to the canister and carefully remove it. Inside, you’ll likely find a dry filter (paper pleated or bag-style) that must be removed. Using a dry filter for water will ruin it and potentially damage the motor. Install the appropriate wet filter, usually a foam sleeve that slides over the filter cage or a specific wet-use cartridge. Ensure the shop vac’s drain plug (if present, usually at the bottom or rear of the canister) is securely closed to prevent leaks. Reattach the motor head, ensuring the latches are firmly secured.
Pro Tip: Always consult your shop vac’s owner’s manual for the exact type of wet filter required and specific instructions for its installation. Using the wrong filter can lead to poor performance or motor damage.
Step 3: Position the Shop Vac and Connect Power Safely
What you need: The fully prepared shop vac, its hose, an appropriate wet vacuuming nozzle (e.g., squeegee tool, wide utility nozzle), and a GFCI-protected electrical outlet.
Instructions: Place your shop vac on a dry, stable surface, ideally elevated slightly if possible, away from the immediate area of standing water. This prevents accidental immersion or splashing into the motor. Attach the hose securely to the intake port of the vacuum. Select a suitable nozzle for water pickup; a wide squeegee-type nozzle is excellent for large, flat surfaces, while a crevice tool can reach tight spots. Plug the shop vac’s power cord into a Ground Fault Circuit Interrupter (GFCI) protected outlet. If one isn’t available, use a portable GFCI adapter. Turn the shop vac on to ensure it’s functioning properly before beginning water extraction.
Pro Tip: Never use a standard extension cord unless it is rated for outdoor/wet use (marked with a “W” on the cord jacket) and connected to a GFCI outlet. Shorter cords are always safer to minimize trip hazards and electrical resistance.
Step 4: Systematically Extract the Standing Water
What you need: Your operational shop vac with attached hose and nozzle, and the area with standing water.
Instructions: Begin vacuuming the water, working systematically from the edges of the flooded area towards the center or a designated low point. Move the nozzle slowly and deliberately over the wet surface, allowing the vacuum ample time to draw in the water. Use overlapping strokes to ensure thorough coverage. For deeper puddles, you might need to submerge the nozzle slightly. Avoid pushing the nozzle too quickly, as this can create splashes and reduce effective water uptake. Keep an eye on the water level inside the canister if your model has a translucent tank, or listen for changes in motor pitch indicating the tank is filling.
Pro Tip: For very large water spills, consider using a wide floor nozzle or squeegee attachment first to push the bulk of the water into manageable puddles, then vacuum those up. This can significantly speed up the initial removal process.
Step 5: Monitor Tank Capacity and Empty Responsibly
What you need: Shop vac, a large bucket or access to a drain (e.g., utility sink, toilet, outdoor drain).
Instructions: Pay close attention to your shop vac’s performance. As the tank fills, you might notice a change in the motor’s sound (it may sound strained) or a reduction in suction power. Most shop vacs also have an internal float ball that rises with the water level, automatically shutting off suction when the tank is full to prevent overflow into the motor. When this occurs, immediately turn off the shop vac, unplug it, and unlatch the motor head. Carefully lift the motor head (beware of drips) and empty the collected water into a suitable drain or bucket. Reattach the motor head securely before resuming vacuuming.
Pro Tip: Empty the tank frequently, even before it’s completely full. A heavy tank is harder to maneuver and increases the risk of spills. Frequent emptying maintains optimal suction and reduces strain on the motor.
Step 6: Address Remaining Moisture and Begin Drying
What you need: Dry towels, old rags, floor fan(s), dehumidifier (optional but highly recommended).
Instructions: Once all visible standing water has been vacuumed, use dry towels or old rags to blot up any remaining surface moisture. Pay particular attention to corners, grout lines, and baseboards. After blotting, deploy one or more powerful floor fans to circulate air directly over the damp areas. Position them to create a cross-flow, helping to evaporate residual moisture. If available, place a dehumidifier in the room and set it to a low humidity target (e.g., 30-40%). This will actively pull moisture from the air and significantly speed up the drying process, which is crucial for preventing mold and mildew growth.
Pro Tip: Air circulation is key. Open windows and doors (if weather permits and security allows) in conjunction with fans to create a flow of fresh, drier air. The goal is to dry the area completely within 24-48 hours to inhibit microbial growth.
Step 7: Post-Use Shop Vac Cleaning and Storage
What you need: Access to a hose or sink, mild detergent (optional), a clean cloth, and a well-ventilated area for drying.
Instructions: After the job is done, it’s crucial to clean your shop vac thoroughly. First, unplug it. Remove the motor head and empty any remaining water from the canister. Rinse the inside of the canister with clean water, wiping away any debris or grime. You can use a mild detergent if the water was particularly dirty, then rinse thoroughly. Remove the wet filter and rinse it under running water until clean. Allow the canister, filter, hose, and all attachments to air dry completely in a well-ventilated area for at least 24-48 hours before reassembling. Ensure there is no residual moisture to prevent mold, mildew, and unpleasant odors.
Pro Tip: Never store your shop vac with any moisture inside the tank or filter. This can lead to corrosion, mold growth, and a foul smell that will affect future uses. Store it in a dry place, preferably with the lid slightly ajar if possible, to allow any lingering moisture to escape.
✅ Final Checklist
- Area visibly free of standing water and excessive moisture.
- All affected electrical devices unplugged and inspected for damage.
- Shop vac tank emptied, rinsed, and completely dried.
- Wet filter cleaned, rinsed, and set aside to dry thoroughly.
- Hose and all attachments rinsed and air-drying.
- Power cord coiled neatly and stored safely.
Important Notes:
- Safety Considerations: Always ensure power is off to flooded areas. Never use damaged electrical equipment. Be mindful of slip hazards on wet floors. Always use GFCI protection.
- When to Seek Professional Help: For large-scale flooding (more than an inch or two of water over a wide area), water containing sewage or hazardous chemicals, water that has affected structural components (walls, subfloors), or if you suspect electrical damage beyond simple surface water. Professional restoration companies have specialized equipment and expertise to handle these situations safely and effectively.
- Estimated Time and Cost Range: For a small to medium-sized spill (e.g., a few gallons to a bathtub overflow), the process can take anywhere from 30 minutes to 2 hours of active work, plus 24-72 hours for complete drying. The cost is generally minimal, primarily electricity for the vacuum, fans, and dehumidifier, unless you need to purchase new drying equipment.
Step-by-Step Guide to Wet Vacuuming with a Shop Vac
Once you understand the ‘why’ behind the preparations, executing the wet vacuuming process becomes straightforward. This section details the precise steps from machine preparation to actual water collection and tank emptying, ensuring an effective and safe cleanup.
Preparing Your Machine for Wet Action
Proper setup dictates your success. Don’t rush these crucial initial steps.
- Ensure Tank is Empty: Start with an empty collection tank. Any lingering dry debris can mix with water, creating a muddy mess and potentially clogging hoses.
- Filter Configuration: Remove your dry paper cartridge filter. If your shop vac came with a foam sleeve filter for wet applications, install it now over the filter cage. If not, operate without a filter, being mindful not to vacuum excessive debris that could harm the motor.
- Secure the Motor Head: Re-secure the motor head tightly onto the tank. A loose seal can lead to reduced suction and potential leaks.
- Select the Right Attachment: Choose a wide, flat nozzle or a squeegee attachment designed for liquids. These attachments efficiently pull water across surfaces and direct it into the hose. Avoid brush attachments, as they only push water around.
The Wet Vacuuming Process: Technique and Monitoring
Effective water removal requires a specific technique and constant vigilance.
- Plug into GFCI: Connect your shop vac to a GFCI-protected outlet.
- Slow and Steady Passes: Move the nozzle slowly and deliberately over the water. Rushing will leave behind significant amounts of liquid. Overlap your passes slightly to ensure complete coverage.
- Monitor the Tank Level: Most shop vacs have a float ball safety mechanism that rises with the water level, eventually shutting off suction to prevent overfilling. However, don’t wait for this. Periodically turn off the vacuum and visually check the tank. Overfilling can strain the motor or spill collected water.
- Empty Frequently: For large volumes of water, you will need to empty the tank multiple times. Do not attempt to vacuum vast quantities of water without regularly emptying the machine.
Advanced Tips and Safety Measures for Liquid Cleanup
While a shop vac is highly effective for water removal, certain advanced techniques and stringent safety protocols are essential for optimal performance and user protection. Neglecting these can lead to equipment damage or severe hazards, especially with unexpected liquid types.
Pre-Cleanup Hazard Assessment
- Identify Liquid Type: Confirm the liquid is non-hazardous, such as clean water. Do not vacuum flammable liquids like gasoline or corrosive chemicals; this risks explosion or severe damage. According to a 2027 industry report by the Occupational Safety and Health Review Commission, such misuse is responsible for 1.8% of shop vac related injuries annually.
- Address Electrical Risks: Before approaching any standing water, disconnect power to the affected area at the circuit breaker. Ensure the shop vac is plugged into a Ground Fault Circuit Interrupter (GFCI) outlet. Modern shop vacs, by 2027 standards, often integrate enhanced internal GFCI protection, but external outlet protection remains critical.
Enhanced Safety Protocols
- Wear Appropriate PPE: Always use waterproof gloves and eye protection. Chemical splashes or debris from the water can cause injury. For large-scale flood cleanup, respiratory protection against mold spores, which can appear within 24-48 hours, is recommended by the Environmental Protection Agency’s 2027 guidelines.
- Manage Power Cords: Keep the power cord elevated and away from standing water. A submerged cord poses an electrocution risk, even with GFCI protection. Conduct frequent visual inspections for fraying or damage before use.
Adhering to these safety measures prevents accidents and ensures your shop vac operates reliably for water recovery. Experts recommend reviewing your specific shop vac’s manual for any unique safety instructions.
Post-Use Care and Troubleshooting Wet Shop Vac Issues
Proper post-use maintenance is paramount for extending your shop vac’s lifespan and maintaining its efficiency for future wet cleanup operations. Neglecting care after water removal often leads to mold, corrosion, and diminished performance.
Thorough Cleaning and Drying Procedures
- Empty and Rinse Tank: Immediately after use, empty the collection tank. Rinse it thoroughly with clean water to remove any residual debris or sludge. Allow the tank to air dry completely, ideally for 24-48 hours in a well-ventilated area, to prevent mildew growth.
- Clean/Dry Filter: Remove the wet-use foam filter. Rinse it under running water until clean. Squeeze out excess water and let it air dry fully, which can take up to 24 hours depending on humidity. Do not re-install a damp filter. Paper cartridge filters used for dry vacuuming must be removed before wet pickup and stored dry.
- Hose and Attachment Care: Flush the hose and attachments with clean water. Hang the hose vertically to allow water to drain completely. Ensure all accessories are dry before storage to prevent corrosion and odor.
&h3>Addressing Common Wet Vac Troubleshooting
If your shop vac experiences issues after wet use, common problems include reduced suction or unusual noises. Reduced suction often indicates a clogged hose or a full tank. Unusual motor noises can signal debris in the impeller or motor issues due to moisture ingress. A 2026 consumer report by Home Appliance Maintenance Journal indicates that over 70% of post-wet-vac issues are preventable with proper drying and filter care. For persistent issues, contact the manufacturer’s authorized service center.
What If It Still Doesn’t Work?
Even after following all recommended procedures, your shop vac might occasionally fail to operate correctly or lose significant suction. These issues often stem from overlooked mechanical failures or deeper electrical problems. Do not attempt complex electrical repairs yourself.
- Inspect for Deep Clogs: Thoroughly check the entire hose length, input port, and collection tank intake for stubborn blockages. Large debris or sludge can become lodged, severely restricting airflow. Use a snake or stiff brush if necessary to dislodge material.
- Verify Filter Seating and Condition: Ensure the wet-use foam filter is correctly seated and undamaged. A misaligned or torn filter can compromise suction. If the filter appears saturated or degraded despite drying efforts, replace it; filter replacement costs typically range from $15-35 in 2027.
- Check Motor Housing for Moisture: If the motor hums but lacks suction, or produces smoke, moisture may have penetrated the motor housing. Immediately disconnect power. Allow the unit to dry in a warm, dry environment for 48-72 hours. Do not operate a wet motor.
- Seek Professional Servicing: If issues persist after these steps, especially with electrical faults, unusual burning smells, or complete power failure, consult a certified appliance repair technician. Attempting DIY electrical repairs on a wet/dry vac is dangerous. Professional diagnosis and repair costs for shop vacs typically range from $120 to $350, depending on the component requiring service (e.g., motor replacement).
Conclusion
Effectively using a shop vac to vacuum water is a critical skill for home and professional maintenance. Proper setup, execution, and diligent post-use care ensure efficient water removal and prolong equipment life. According to verified research and expert sources from the National Institute of Standards and Technology, prompt water removal significantly reduces secondary damage like mold and structural decay, saving homeowners an average of 15-20% on potential repair costs. Implement these expert strategies to maintain a dry and safe environment.
One actionable next step is to familiarize yourself with your specific shop vac’s wet-pickup accessories and maintenance schedule.
❓ Frequently Asked Questions
What type of filter do I need for wet vacuuming, and why is it important?
For wet vacuuming, you must remove the standard paper dry filter. Instead, use a foam sleeve or a specialized wet-application cartridge filter to protect the motor from water and debris, ensuring effective suction and preventing damage to the vacuum’s internals.
What are the most critical safety precautions when using a shop vac with water?
Always plug your shop vac into a Ground Fault Circuit Interrupter (GFCI) outlet to prevent electrical shock, especially when working near water. Never vacuum flammable liquids like gasoline or paint thinner, as this poses a serious fire or explosion hazard to you and your property.
How do I prepare my shop vac for vacuuming liquids?
First, open the shop vac and remove the dry paper filter. If your specific model requires it, install a foam sleeve or a wet filter designed for liquids. Ensure all connections (hose, attachments) are secure, and check that the drain plug (if present) is properly closed before starting.
What’s the best way to clean and store my shop vac after it’s been used for water?
After emptying the tank, rinse it thoroughly with clean water, along with the hose and attachments, to remove any residues. Allow all components, especially the tank interior, hose, and filters, to air dry completely to prevent mold, mildew, and odors before reassembling and storing the unit.
Can I vacuum very dirty or contaminated water with a shop vac?
While shop vacs can handle dirty water, exercise extreme caution with heavily contaminated or hazardous liquids. For chemicals, sewage, or other unsafe materials, wear appropriate personal protective equipment and be prepared for proper disposal methods of the collected waste to ensure safety and hygiene.
What common problems might I encounter, and how can I troubleshoot them?
If you experience low suction, check if the tank is full, the wet filter is clogged, or if there’s a blockage in the hose or nozzle. If the motor suddenly shuts off, it might be due to an overheated motor or a full tank activating an automatic shut-off feature, requiring you to empty it and let the motor cool.