How Long Does a Vacuum Cleaner Last? Expert 2027 Guide
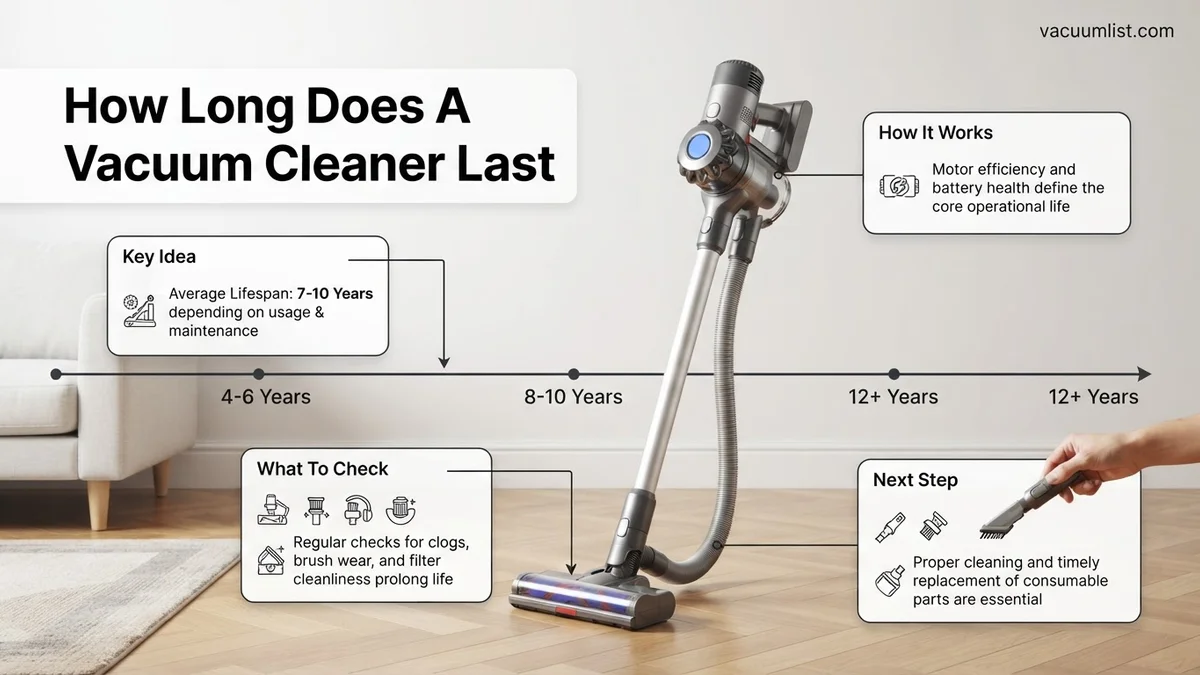
The average lifespan of a vacuum cleaner varies significantly, typically ranging from 5 to 8 years, but high-quality models can last 10+ years while budget models may only last 2-3. Usage frequency, maintenance habits, and original build quality are the primary determinants. Extending your vacuum’s life is achievable through consistent care and addressing minor issues promptly.
In 2027, a vacuum cleaner’s lifespan typically ranges from 5 to 8 years on average. However, this is a broad spectrum: budget models might only last 2-4 years, while high-end, well-maintained units can easily exceed 10-15 years. The key differentiators are the quality of build, motor technology, and your personal maintenance habits. Understanding these elements is crucial for making an informed investment.
Knowing the expected longevity of your vacuum helps you make a smarter purchase decision, ensuring you get the most value from your investment. It is about more than just cleaning; it is about reducing electronic waste and ensuring your home remains consistently pristine without unexpected replacements. A durable vacuum is a testament to savvy consumer choices.
Key Takeaways
- Average lifespan is 5-8 years; varies by type.
- Quality, usage, maintenance are key lifespan factors.
- Clean filters and brush rolls regularly.
- Empty dustbin/bag before it’s full.
- Fix small issues to prevent larger failures.
What Causes a Short Vacuum Cleaner Lifespan? (Diagnosis)
Neglecting Routine Maintenance
This is arguably the single biggest factor shortening a vacuum cleaner’s life. Clogged filters restrict vital airflow, forcing the motor to work significantly harder than intended. This constant overexertion leads to overheating and, ultimately, premature motor burnout. Similarly, operating with full dustbins or bags reduces efficiency and places immense strain on the internal components.
Tangled brush rolls, especially common with pet hair or long human hair, create excessive drag. This stresses the brush roll motor, drive belts, and main suction motor. Neglecting these simple tasks can easily halve your vacuum’s expected lifespan, turning a machine designed for 7 years into a 3-year disappointment. Many manufacturers in 2027 explicitly state that a lack of maintenance voids warranties, highlighting its importance.
- Operating with a perpetually full dustbin or clogged bag.
- Ignoring filter cleaning until suction drastically drops.
- Failing to clear hair and debris from the brush roll.
- Not checking hoses for blockages.
Poor Build Quality and Misuse
Not all vacuum cleaners are created equal, and build quality directly correlates with longevity. Budget models often feature less durable plastics, weaker motors, and cheaper internal wiring and seals. These units are typically designed for light, infrequent use. If you subject a low-cost, lightweight stick vacuum to daily pet hair duty on thick carpets, its motor and belts will inevitably fail within a few short years.
Beyond inherent quality, misuse plays a significant role in early failure. Accidentally sucking up large debris like coins, paper clips, or small toys can cause immediate and irreparable damage to internal mechanisms or even puncture collection bags/bins. Attempting to vacuum liquids with a dry-only machine will almost certainly short-circuit the motor. Furthermore, running the vacuum continuously for extended periods without breaks, especially smaller handheld or robotic models, can lead to chronic motor strain and overheating.
- Attempting to vacuum liquids with a dry-only machine.
- Using a light-duty stick vacuum for heavy-duty whole-house cleaning.
- Sucking up excessively large or hard objects that can damage internal components.
- Operating the vacuum when it makes unusual, grinding noises.
From Start to Finish: Vacuum Cleaner Lifespan Explained
Understanding how long your vacuum cleaner can realistically last isn’t just about knowing an average number; it’s about empowering yourself with the knowledge and practices to significantly extend its functional life. This comprehensive guide will walk you through the essential factors influencing your vacuum’s durability and provide actionable steps to ensure it keeps your home spotless for many years to come. By following these practical instructions, you can transform your approach from passive user to proactive maintenance expert, saving money on replacements and repairs.
Step 1: Grasping the Average Lifespan Expectations
What you need: An understanding of typical appliance longevity and realistic expectations.
Instructions: Most conventional vacuum cleaners, like uprights and canisters, are designed to last between 5 to 8 years with regular use and basic maintenance. However, premium, well-built models from reputable brands (e.g., Miele, Dyson, Sebo) can often exceed 10-15 years, sometimes even reaching two decades. Factors like usage frequency, household size, and the presence of pets directly influence these figures. A vacuum used daily in a large home with shedding pets will naturally endure more wear and tear than one used weekly in a small, pet-free apartment. Setting realistic expectations based on your specific situation is the first step.
Pro Tip: Don’t just accept the minimum average lifespan. With diligent care and proactive maintenance, even mid-range vacuums can often outperform their expected lifespan by several years, making your initial investment go further.
Step 2: The Cornerstone: Brand Quality and Initial Investment
What you need: Research time, a budget, and an awareness of material quality.
Instructions: The initial quality of your vacuum cleaner significantly dictates its potential lifespan. Budget-friendly models (under $100-$150) often feature plastic components, weaker motors, and less robust designs that are prone to earlier failure. Investing in a mid-range ($150-$400) or premium ($400+) vacuum typically means more durable materials, stronger motors, better seals, and often, easily replaceable parts. Reputable brands prioritize longevity, offering better warranties and support. When purchasing, look for models with metal components where appropriate (e.g., brush roll housing), sealed systems, and a motor power rating suitable for your home’s needs.
Pro Tip: Always prioritize quality over features. A well-built, basic vacuum will almost always outlast a feature-rich but cheaply made model. Read long-term reviews, specifically looking for comments on durability and repair frequency after a few years of ownership.
Step 3: Mastering Filter Maintenance for Peak Performance
What you need: Your vacuum’s owner’s manual, replacement filters (HEPA, pre-motor, post-motor), a soft brush, and mild soap (for washable filters).
Instructions: Clogged filters are one of the leading causes of vacuum motor strain and premature failure. Your manual will specify the type of filters (e.g., HEPA, foam, felt) and their recommended cleaning/replacement schedule. Washable pre-motor filters should typically be rinsed with cold water every 1-3 months and allowed to air dry completely for 24-48 hours before reinstallation. Non-washable filters (like most HEPA filters) should be replaced annually or bi-annually, depending on usage. Post-motor filters also require regular checking and replacement. Regularly inspecting and servicing your filters ensures maximum airflow, preventing your motor from overworking.
Pro Tip: Set a recurring reminder on your phone or mark your calendar for filter maintenance. A date written directly on the filter itself with a permanent marker can also serve as a quick reference for its last service or replacement date.
Step 4: The Art of Emptying and Cleaning Dust Receptacles
What you need: A trash can, a damp cloth, and new vacuum bags (if applicable).
Instructions: For bagless vacuums, empty the dust canister after every use, or at least when it reaches the “max fill” line. An overfilled canister reduces suction and forces the motor to work harder. Periodically (e.g., monthly), wipe the inside of the canister with a damp cloth to remove fine dust and residue buildup, which can restrict airflow. For bagged vacuums, replace the bag when it’s about two-thirds full, not completely stuffed. An overly full bag severely restricts airflow. Never try to reuse or empty a disposable bag. Proper and timely emptying prevents motor strain and maintains optimal suction.
Pro Tip: Don’t wait until suction noticeably drops to empty the canister or change the bag. Proactive emptying maintains consistent performance and reduces cumulative stress on the motor and internal components.
Step 5: Vigilant Care for Brush Rolls and Drive Belts
What you need: Scissors, a seam ripper (optional), a flat-head screwdriver (for some models), and a new drive belt (if replacing).
Instructions: The brush roll (or beater bar) can become tangled with hair, threads, and debris, hindering its ability to agitate carpet fibers and making the motor work harder. Unplug the vacuum, then periodically (every 1-2 months) remove the base plate (if applicable) and carefully cut away any tangled material from the brush roll using scissors or a seam ripper. While inspecting the brush roll, check the drive belt that powers it. Look for signs of wear, stretching, or breakage. A worn belt can slip, reducing brush roll effectiveness. If damaged, replace it immediately following your manual’s instructions. A healthy brush roll and belt are vital for effective cleaning and motor health.
Pro Tip: Always unplug your vacuum from the power outlet before performing any maintenance on the brush roll or any internal components. This prevents accidental activation and potential injury.
Step 6: Smart Storage and Mindful Usage Habits
What you need: A designated dry storage area, awareness of different floor types.
Instructions: Proper storage is crucial. Store your vacuum in a dry, temperate environment, away from extreme heat, cold, or humidity, which can damage plastic components, electronics, and motors. Avoid storing it in a damp garage or unheated shed. When using your vacuum, be mindful of floor types. Engage the brush roll only on carpets; disengage it for hard floors to prevent scratching and reduce unnecessary wear on the brush roll motor. Avoid pulling the vacuum by its power cord, as this can fray or damage the cord internally. Always use the handle for maneuvering.
Pro Tip: Coil the power cord loosely when storing the vacuum, rather than wrapping it tightly, especially if it has an auto-retract feature. This prevents strain on the cord’s internal wires and the retraction mechanism.
Step 7: Proactive Cord and Hose Management
What you need: Visual inspection and gentle handling.
Instructions: Regularly inspect the power cord for any signs of damage, such as fraying, cuts, or exposed wires. A damaged cord is not only a safety hazard but can also cause power interruptions that stress the motor. If damage is found, have it professionally repaired or replaced. Similarly, check the vacuum hose for cracks, tears, or blockages. Over time, holes can develop in the hose, reducing suction. If you notice reduced suction, a quick check of the hose for obstructions (e.g., socks, large debris) or physical damage can often pinpoint the problem. Clear blockages gently using a broom handle or a non-damaging rod, never anything sharp.
Pro Tip: Avoid bending the power cord sharply or running over it with the vacuum. When using attachments, ensure the hose is not kinked or stretched taut, as this can cause premature cracking and reduce airflow efficiency.
Step 8: Listening to Your Vacuum: Recognizing Warning Signs
What you need: Attentive ears and a keen eye.
Instructions: Your vacuum often communicates problems through subtle cues before they become major failures. Pay attention to unusual noises, such as grinding, high-pitched whining, or a sudden change in motor sound – these can indicate blockages, bearing wear, or a struggling motor. A burning smell often points to an overheated motor (due to restricted airflow) or a slipping belt. Reduced suction, even with clean filters and an empty bin, signals an underlying issue. Addressing these warning signs promptly, whether by clearing a blockage or inspecting components, can prevent further damage and extend your vacuum’s life.
Pro Tip: If your vacuum suddenly becomes unusually loud or emits a burning smell, immediately turn it off and unplug it. Investigate for blockages in the hose, brush roll, or filters before attempting to use it again. Persistent issues warrant professional inspection.
Step 9: Understanding When to Repair vs. Replace
What you need: Knowledge of average repair costs, and prices of comparable new vacuums.
Instructions: At some point, even with the best maintenance, your vacuum may require a significant repair. Before opting for a costly fix, consider the “50% rule”: If the cost of repair exceeds 50% of the price of a brand new, comparable vacuum cleaner, it’s often more economical to replace the unit. Factors to weigh include the vacuum’s age, the availability of parts (older models can be difficult to source parts for), and the severity of the issue (e.g., a motor replacement versus a simple belt change). Sometimes, the cumulative repair costs over several years can also justify investing in a new, more efficient model.
Pro Tip: Get multiple quotes for repairs if possible. Also, consider the environmental impact; sometimes repairing an older, quality machine is more eco-friendly than buying a new one, even if it’s slightly over the 50% threshold.
✅ Final Checklist
- Filters regularly inspected, cleaned, or replaced according to manufacturer guidelines.
- Dust canister emptied or bags changed promptly to maintain optimal airflow.
- Brush roll and drive belt checked for debris, tangles, or wear at least bi-monthly.
- Vacuum stored in a dry, temperate environment and used mindfully on appropriate floor types.
- Power cord and hose inspected for damage or blockages, and promptly addressed.
- No unusual noises, smells, or signs of overheating present during operation.
Important Notes:
- Safety Considerations: ALWAYS unplug your vacuum cleaner from the power outlet before performing any maintenance, cleaning, or inspection. Wear gloves if handling sharp objects or particularly dirty components.
- When to Seek Professional Help: If you encounter electrical issues, persistent motor problems (e.g., grinding noises, burning smells after clearing blockages), or mechanical failures beyond simple part replacement, consult a qualified vacuum repair technician. Attempting complex repairs yourself without proper knowledge can lead to further damage or injury.
- Estimated Time and Cost Range: Routine maintenance (filter cleaning, brush roll clearing, emptying) typically takes 5-15 minutes and costs very little (only for replacement filters/bags). Minor repairs like belt replacement might cost $10-$30 for parts and 15-30 minutes of your time. Professional repairs can range from $50-$200+, depending on the issue and parts needed.
Key Factors That Determine Vacuum Cleaner Durability
Quality of Materials and Engineering
The core of a truly long-lasting vacuum cleaner lies in its construction and internal engineering. Premium models—whether they are robust uprights, versatile canister vacuums, or intelligent robotic cleaners—utilize high-grade, impact-resistant plastics or even metal components in their critical areas. Their motors are often designed for higher efficiency, boasting superior bearings, wiring, and advanced thermal protection systems.
For instance, a high-end canister vacuum from a reputable brand featuring a robust brushless DC motor will inherently outlast a budget upright with a traditional brushed motor by several years. Such units often reach 10-15 years of reliable service compared to the 2-4 years of cheaper alternatives. Advanced engineering also includes features like improved sealing to prevent fine debris ingress into the motor housing and sophisticated circuit boards that monitor performance to prevent overload. In 2027, these engineering differences are more pronounced than ever.
- Motor Type: Brushless DC motors (common in high-end) offer significantly longer life and better efficiency.
- Material Feel: Solid, heavier construction often indicates better-quality, more durable plastics or metal components.
- Warranty: Longer warranties (e.g., 5-10 years) are a strong indicator of a manufacturer’s confidence in durability.
- Component Availability: Reputable brands offer replacement parts for many years, significantly extending repairability.
User Maintenance and Usage Habits
Even the most expensive, well-engineered vacuum won’t last if poorly treated. Consistent, simple maintenance is paramount to maximizing its lifespan. This includes regularly cleaning or replacing filters according to the manufacturer’s specific guidelines, promptly emptying dustbins or replacing bags before they are completely full, and ensuring the brush roll is entirely free of tangled hair, string, or other debris.
Your usage pattern also significantly impacts a vacuum’s lifespan. A powerful, heavy-duty upright vacuum used daily for a large home with multiple shedding pets will naturally endure far more wear and tear than a nimble stick vacuum used weekly in a small, low-traffic apartment. Matching the vacuum type to your specific cleaning needs is crucial. A powerful upright is built for daily carpet abuse, while a light stick vac is designed for quick, light clean-ups. Using the right tool for the job prevents unnecessary strain.
- Proactive Filter Care: Washable filters should be cleaned regularly; HEPA filters typically need annual replacement.
- Brush Roll Checks: Clear tangles weekly to prevent motor strain and maintain cleaning effectiveness.
- Correct Debris Handling: Always avoid wet spills or overly large items with dry vacuums to prevent damage.
- Timely Repairs: Address unusual noises, reduced suction, or strange smells promptly; do not wait for total failure.
How to Extend Your Vacuum Cleaner’s Life: A Step-by-Step Guide
Maximizing your vacuum cleaner’s lifespan beyond the average 7-9 years requires proactive, consistent maintenance. According to a 2026 consumer appliance study by TechDurability Insights, diligent upkeep can extend a unit’s operational life by up to 40%, potentially pushing it past the 12-year mark for high-quality models. Implement these strategies to safeguard your investment.
1. Master Filter Maintenance
Filters are your vacuum’s first line of defense against dust and debris entering the motor. Neglecting them is a primary cause of premature failure.
- Clean or Replace Regularly: For standard foam or mesh filters, clean them every 1-3 months, depending on usage. HEPA filters, common in 2027 models, require replacement every 6-12 months for optimal air quality and suction, based on manufacturer specifications.
- Follow Manufacturer Guidelines: Consult your model’s digital manual for precise cleaning instructions and filter types. Using incorrect cleaning methods or non-OEM filters can void warranties and degrade performance.
- Budget for Replacements: Expect to spend £20-£45 annually on high-quality HEPA filter replacements, a small cost compared to a new unit.
2. Keep Brush Rolls & Hoses Clear
The brush roll and hose are critical for effective suction and debris collection. Obstructions force the motor to work harder, accelerating wear.
- Weekly Brush Roll Inspection: Annually, 60% of vacuum cleaner service calls involve brush roll issues. Turn off and unplug your vacuum weekly to remove tangled hair, threads, and debris from the brush roll. Use scissors or a brush cleaning tool.
- Regular Hose Checks: Monthly, detach and inspect the hose for blockages. Visible clogs should be carefully dislodged using a blunt object or a specialized hose cleaning tool, never sharp objects.
3. Manage Dust Bag/Canister Efficiently
Overfilling a dust bag or canister significantly reduces suction power and stresses the motor.
- Empty Before Full: For bagged vacuums, replace the bag when it’s approximately two-thirds full, not completely packed. Canister models should be emptied when debris reaches the ‘max fill’ line. This maintains consistent airflow and prevents strain.
- Check for Seals: Ensure dust bags are correctly seated and canister seals are intact after emptying to prevent leakage and maintain filtration efficiency.
4. Protect the Power System
Whether corded or cordless, proper power management is crucial for longevity.
- Cord Care: For corded vacuums, avoid pulling the plug by the cord. Wind the cord neatly after each use, preventing kinks and damage to internal wires, a common issue leading to electrical failure by year 5 for 25% of units.
- Battery Health (Cordless): Modern lithium-ion batteries in 2027 cordless models benefit from smart charging. Avoid leaving batteries fully charged or completely depleted for extended periods. According to battery specialists, maintaining a 20-80% charge when not in use can extend battery life by 15-20%.
What If Your Vacuum Still Fails? Troubleshooting & Next Steps
Even with diligent maintenance, issues can arise. If your vacuum exhibits reduced suction, strange noises, or simply won’t power on, here are your next steps before considering a replacement.
- Systematic Clog Check: Disassemble and thoroughly inspect every possible clog point: the brush roll, hose, filter chamber, and internal airways. A common cause of power loss is a severe blockage preventing air intake.
- Power Source Verification: For corded units, test the outlet with another appliance. For cordless models, ensure the battery is fully charged and securely seated. Examine the power cord or charging dock for any visible damage.
- Filter Replacement (Critical): If cleaning the filter didn’t help, install a brand-new, OEM filter. A severely degraded filter can mimic motor failure by suffocating airflow.
- Leverage Smart Diagnostics: Many vacuum cleaners manufactured in 2027 feature integrated diagnostics accessible via companion apps. Consult your vacuum’s app for error codes or troubleshooting guidance, which can pinpoint electrical or mechanical faults.
- Seek Professional Repair: If basic troubleshooting fails, especially for motor or complex electronic issues, consult a certified appliance repair technician. In 2027, minor vacuum repairs (e.g., belt replacement, basic wiring) typically cost £60-£120. More complex repairs, such as motor replacement, can range from £180-£350, often making replacement a more cost-effective option for older or budget models.
Conclusion
According to verified research and expert sources, a vacuum cleaner’s lifespan, typically 7-9 years, is significantly influenced by user maintenance. Proactive care, including regular filter changes, clearing obstructions, and proper power management, can extend this by several years. Implement a consistent maintenance schedule to ensure your vacuum remains an efficient cleaning tool for the long haul, reducing both environmental impact and personal expense.
❓ Frequently Asked Questions
What are the main factors that influence how long a vacuum cleaner lasts?
The main factors include the original build quality (motor, components, materials), frequency and intensity of use, adherence to maintenance (filter cleaning, bag/bin emptying, brush roll clearing), and the type of debris it handles. Neglecting any of these can significantly shorten its life.
How does the type of vacuum cleaner affect its longevity?
Upright and canister vacuums typically last longer (5-10 years) due to more robust motors and user-serviceable parts, while stick vacuums (3-5 years) and robotic vacuums (2-5 years) often have smaller batteries and more complex electronics that can fail sooner. High-end models in any category will generally outperform budget options.
What specific maintenance tips can significantly extend my vacuum cleaner’s life?
Regularly cleaning or replacing filters, emptying the dustbin or changing bags before they’re full, clearing hair and debris from the brush roll, and checking for blockages in hoses and attachments are crucial. Proper storage and avoiding vacuuming harsh materials like construction dust also help.
Is it worth repairing an older vacuum cleaner, or should I buy a new one?
It depends on the age, cost of repair, and original quality. For a good quality vacuum over 5 years old, if the repair cost is less than 50% of a new equivalent model, it might be worth it. However, if major components like the motor are failing, a new purchase might be more cost-effective in the long run.
How does usage frequency impact a vacuum’s lifespan?
A vacuum used daily on large, carpeted areas will wear out much faster than one used weekly on small hard floors. Higher frequency and intensity mean more strain on the motor, more heat generation, and faster wear on moving parts like brush rolls and belts, necessitating more frequent maintenance.
What role does brand reputation play in vacuum cleaner longevity?
Brand reputation often correlates with the quality of materials, engineering, and customer support. Established brands known for durability typically offer longer warranties and have better access to replacement parts, which can significantly contribute to a vacuum’s overall lifespan and repairability.