How To Remove Air From Ac System Without Vacuum Pump 2027
Removing air from an AC system without a vacuum pump is possible using methods like refrigerant purging, but it is not as effective as a deep vacuum pull. These DIY approaches can help in a pinch but do not remove moisture and carry inherent risks. Always prioritize safety and understand the limitations.
While a dedicated vacuum pump is the gold standard for properly evacuating an AC system, circumstances sometimes call for alternative methods. Yes, you can attempt to remove air from your automotive or home AC system without a vacuum pump, primarily through a process known as “purging with refrigerant.” This DIY approach is often considered when a vacuum pump isn’t accessible, but it’s crucial to understand its significant limitations and inherent risks, especially regarding moisture removal and potential system damage.
This method, while detailed below, serves as a compromise solution for removing the bulk of non-condensable gases (air). It categorically does not achieve the deep vacuum necessary to boil off and eliminate moisture from the system. If you proceed with this technique, recognize you are accepting reduced efficiency and a higher risk of long-term component failure compared to a professional vacuum evacuation in 2027.
Key Takeaways
- Refrigerant purging is the primary DIY method.
- Manifold gauges are essential for monitoring pressures.
- DIY methods do not remove system moisture effectively.
- Professional vacuum evacuation is always superior.
- Always wear safety gear during refrigerant handling.
Why Air and Moisture in Your AC System Are a Problem
Introducing air or moisture into your AC system, whether during a component replacement or simply from an open line, is detrimental to its performance and lifespan. Air is a non-condensable gas that takes up space within the system, increasing operating pressures and forcing your compressor to work harder. This translates to reduced cooling capacity and higher energy consumption.
Moisture, however, is far more insidious. When water vapor mixes with refrigerant, particularly R-134a or R-1234yf (common in automotive) or R-410A/R-32 (common in home units), it can create corrosive acids, specifically hydrochloric and hydrofluoric acids. These acids attack internal components, leading to premature failure of the compressor, expansion valve, and other vital parts.
Reduced Efficiency and Component Damage
- Air pockets act as insulators, disrupting the efficient transfer of heat and forcing your compressor to run longer and hotter. This means your vehicle’s engine or home’s power grid expends more energy for less cooling output.
- Moisture-induced acids slowly but surely corrode the delicate internal workings of your AC system. The compressor is particularly vulnerable, and its failure is one of the most expensive AC repairs.
- Water can also freeze at the expansion valve or orifice tube, creating a blockage that intermittently or completely halts refrigerant flow, leading to erratic cooling performance.
The Danger of Contamination
Even a small amount of moisture can be enough to significantly compromise your system’s integrity over time. A professional vacuum pump pulls the system into a deep vacuum (below 500 microns), boiling off any moisture at room temperature. Without this critical step, residual moisture will remain, slowly degrading your system from the inside. This can manifest as a perfectly working AC failing within a year or two, even after new components were installed.
From Start to Finish: AC Air Purging Explained
Welcome to this practical guide on how to perform a rudimentary air purge from your vehicle’s AC system without the use of a professional vacuum pump. While a vacuum pump is the gold standard for thoroughly evacuating air and moisture, circumstances sometimes call for an alternative. This method, often referred to as a “purge” or “flush” using refrigerant, is less effective than a vacuum but can be a temporary solution or a last resort to improve AC performance by removing gross amounts of air. Following these steps carefully is crucial to minimize refrigerant waste and ensure your safety.
Step 1: Understand the Method and Gather Your Tools
What you need: R-134a or R-1234yf refrigerant can (ensure correct type for your vehicle), manifold gauge set (appropriate for your refrigerant type), adjustable wrench or service port tool, safety glasses, chemical-resistant gloves, shop rags, vehicle service manual (optional but recommended).
Instructions: First, understand that this method does not remove moisture from the system, which can cause long-term damage. It primarily pushes out air. Begin by ensuring you have the correct refrigerant type for your vehicle. Most modern vehicles use R-134a, but newer models may use R-1234yf. Mixing refrigerants or using the wrong type can cause serious damage. Lay out all your tools in an organized manner within easy reach to avoid fumbling during the process.
Pro Tip: Do not attempt this method if you suspect a significant leak in your system, as you will be wasting refrigerant. This process is best suited for systems that have been opened for a short period (e.g., component replacement) and sealed quickly, where only air ingress is suspected.
Step 2: Ensure Safety and System Preparation
What you need: Safety glasses, chemical-resistant gloves, well-ventilated area, vehicle turned off and cool.
Instructions: Safety is paramount when working with refrigerants. Always wear safety glasses to protect your eyes from refrigerant splashes, which can cause severe frostbite, and chemical-resistant gloves to protect your skin. Ensure your work environment is well-ventilated; refrigerants can displace oxygen, especially in enclosed spaces. Your vehicle should be turned off, and the engine cool to the touch to prevent burns. Locate both the high-pressure (usually smaller line, “H” cap) and low-pressure (usually larger line, “L” cap) service ports on your AC system. Remove the caps carefully.
Pro Tip: Familiarize yourself with the location and type of service ports (Schrader valves) before connecting your gauges. Some vehicles might have less accessible ports, requiring a bit of maneuvering. Never open the high-pressure port without proper gauges, as it’s under significant pressure.
Step 3: Connect the Manifold Gauge Set
What you need: Manifold gauge set (with blue hose for low side, red hose for high side, yellow hose for service/refrigerant), service port adapters (if necessary).
Instructions: Connect the blue hose of your manifold gauge set to the low-pressure service port on your AC system. The connection is usually a quick-disconnect fitting that snaps into place. Next, connect the red hose to the high-pressure service port. Ensure both connections are secure and listen for any hissing sounds, which would indicate a poor seal. Keep the yellow service hose (the middle one) unconnected for now; this is where your refrigerant can will attach. Make sure both the high-side and low-side valves on your manifold gauge are closed (turned clockwise fully).
Pro Tip: Always double-check that you’re connecting the correct hose to the correct port. Reversing them can lead to dangerous pressure readings and potential damage. The low-side port is typically larger than the high-side port to prevent accidental misconnection, but always confirm.
Step 4: Initial Purge of Hoses (Optional but Recommended)
What you need: Manifold gauge set, refrigerant can, refrigerant can tap with piercing valve.
Instructions: Before introducing refrigerant into the main system, it’s good practice to purge the air from your manifold gauge’s yellow service hose. Attach your refrigerant can to the can tap, then connect the can tap to the yellow service hose. Now, with the can tap valve closed, pierce the refrigerant can. With your manifold gauge’s low and high side valves still closed, slightly crack open the yellow hose connection at the manifold for just one to two seconds, allowing a small puff of refrigerant to escape. This pushes any air out of the yellow hose before it enters the system.
Pro Tip: This tiny purge significantly reduces the amount of air introduced during the charging process. Listen for a brief hiss, then quickly tighten. Don’t overdo it, as you’re releasing refrigerant into the atmosphere.
Step 5: Low-Side Purge and First Refrigerant Introduction
What you need: Manifold gauge set, connected refrigerant can.
Instructions: Start the vehicle and turn the AC to its maximum setting (full cold, high fan, recirculate). With the engine running, ensure the compressor is cycling. Open the valve on your refrigerant can tap fully. Now, slowly open the low-side (blue) valve on your manifold gauge, allowing refrigerant to flow into the system. As refrigerant enters, it will push any air present towards the high-pressure side. Monitor your low-side gauge. Once you see a positive pressure reading (above 0 PSI), slowly and very briefly crack open the high-side (red) valve on your manifold for about 1-2 seconds, allowing a small amount of air/refrigerant mix to escape. Close it quickly. Repeat this small high-side crack two to three times over 30-60 seconds while refrigerant is flowing into the low side. This pushes some air out.
Pro Tip: The goal here is to use the incoming refrigerant to create positive pressure and “flush” the air out. Do not open the high-side valve for too long, as you’ll lose a lot of refrigerant. It’s a quick, controlled burst. Keep an eye on your low-side pressure; it should be within acceptable operating ranges (check your manual).
Step 6: Continue Charging and Monitor Pressures
What you need: Manifold gauge set, connected refrigerant can, thermometer (optional).
Instructions: Continue to charge the system with refrigerant through the low-side port. Do not open the high-side valve again for purging. Monitor both the low and high-side pressures on your manifold gauge. Refer to a pressure chart for your refrigerant type and ambient temperature to determine target pressures. Charge until the low-side pressure is typically between 25-45 PSI and the high-side between 150-250 PSI (these are general ranges and vary by vehicle/temperature). Feel the AC lines; the low-side line should be cool to cold, and the high-side line warm to hot. Check the air coming from your vents; it should be noticeably cooler.
Pro Tip: Avoid overcharging the system. Overcharging can lead to poor cooling, increased strain on the compressor, and potential damage. It’s better to be slightly undercharged than significantly overcharged. Listen to the compressor; it should cycle smoothly, not continuously or rapidly.
Step 7: Final Check and Disconnection
What you need: Manifold gauge set, service port caps.
Instructions: Once the system pressures are within the appropriate range and you feel adequate cooling, close the valve on your refrigerant can tap and then close the low-side valve on your manifold gauge. Allow the system to run for a few more minutes to stabilize. Then, with the engine still running, carefully disconnect the blue hose from the low-pressure service port. There will be a slight hiss as residual refrigerant escapes from the hose – this is normal. Next, disconnect the red hose from the high-pressure service port. Immediately replace the service port caps on both the high and low-pressure ports to prevent dirt and moisture ingress.
Pro Tip: Always disconnect the low-side hose first to avoid exposure to high pressure. Ensure the service port caps are tightly secured. These caps are not just for dirt; they also provide a secondary seal against slow leaks from the Schrader valves.
✅ Final Checklist
-
Safety gear (glasses, gloves) worn throughout the process.
-
Correct refrigerant type used for your vehicle.
-
Manifold gauges properly connected to high and low-side ports.
-
Brief high-side purge performed during initial low-side charging.
-
AC system pressures within acceptable ranges for your vehicle and ambient temperature.
-
Service port caps securely replaced.
Important Notes:
-
Safety Considerations: Refrigerants can cause frostbite on skin and eyes. Always wear appropriate personal protective equipment. Work in a well-ventilated area. Never expose refrigerant cans to direct sunlight or temperatures above 120°F (49°C).
-
When to Seek Professional Help: This purge method is a compromised solution. If your AC system has been completely open to the atmosphere for an extended period, or if it has a known leak, a professional vacuum evacuation is essential to remove all air and, more critically, moisture. Moisture in the system leads to corrosion, acid formation, and compressor failure. If AC performance remains poor after this procedure, or if you suspect a leak, consult a certified AC technician.
-
Estimated Time and Cost Range: This procedure typically takes 30-60 minutes to complete, depending on your familiarity with the tools and vehicle. The cost usually ranges from $30-$70 for a can of refrigerant and a can tap (if you don’t already own a manifold gauge set, that would be an additional ~$50-$150 investment).
Step-by-Step Guide: Purging Air from AC System with Refrigerant
This method involves using the positive pressure of incoming refrigerant to push ambient air out of the system. Remember, this will not remove moisture effectively, and is a last-resort technique.
Preparation and Connecting Your Tools
Before you begin, ensure you have the necessary equipment and prioritize safety. Wear safety glasses and gloves throughout the process to protect yourself from refrigerant exposure. Make sure the AC system is off and any previous refrigerant is safely recovered or evacuated. You will need:
- Manifold Gauge Set: Essential for monitoring pressure and controlling refrigerant flow.
- Appropriate Refrigerant: Ensure it matches your system’s specifications (e.g., R-134a, R-1234yf for vehicles; R-410A, R-32 for residential systems).
- Refrigerant Can Tap or Tank Valve: To connect the refrigerant source to your manifold gauge’s yellow hose.
Connect your manifold gauge set carefully:
- Attach the blue hose to the low-side service port.
- Attach the red hose to the high-side service port.
- Connect the yellow (charging) hose to your refrigerant can/tank tap.
- Ensure all manifold valves (red and blue knobs) are fully closed before proceeding.
The Purging Process (Critical Steps for Air Removal)
This sequence aims to displace air with refrigerant, acknowledging that refrigerant is denser and will help push the lighter air out. Keep the AC system OFF for this entire purging phase.
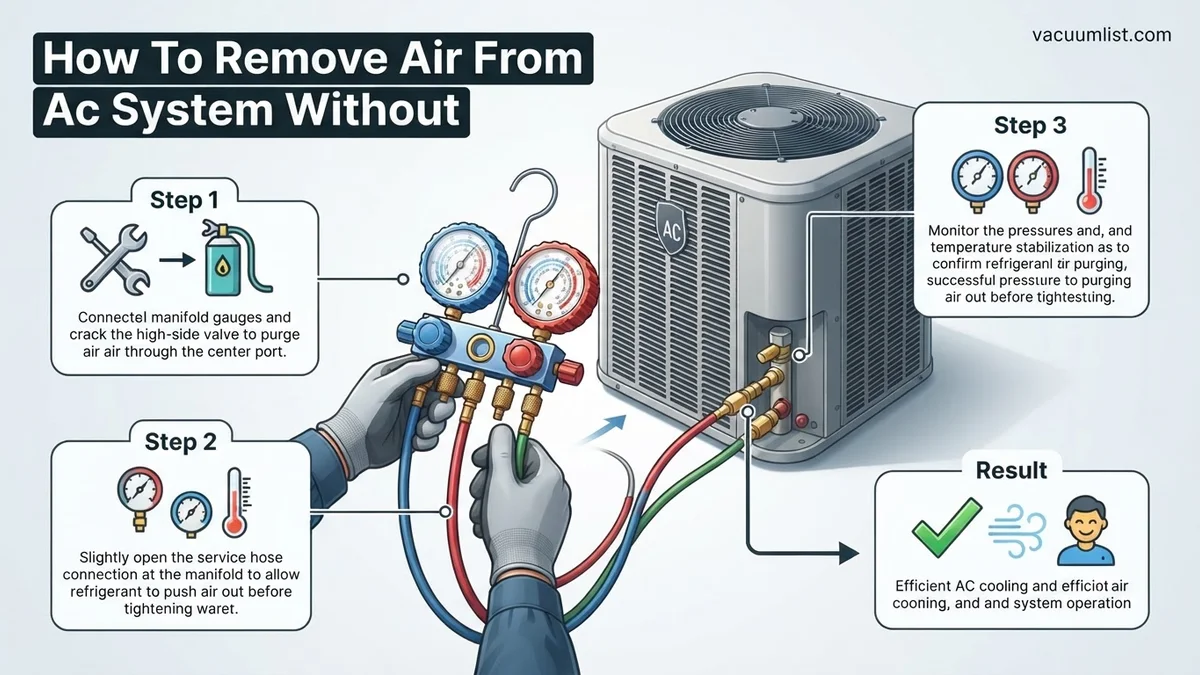
- Purge Manifold Hoses: With the refrigerant can/tank connected and its valve open, slightly crack open the high-side valve on your manifold gauge for just 1-2 seconds. You’ll hear a brief hiss as refrigerant pushes air out of the yellow and red hoses. Close the valve quickly. Repeat this step once more to ensure hose lines are clear of air.
- Initial System Purge (High-Side First): Slowly open the high-side manifold valve (red knob) for no more than 3-5 seconds. You will hear refrigerant flowing into the system, displacing air. Close the valve firmly. Allow 10-15 seconds for system pressures to partially equalize. Repeat this “puff and close” process 3-5 times. This pushes a significant amount of air out of the higher pressure side of the system.
- Brief Low-Side “Burp”: After the high-side purges, very briefly crack open the low-side manifold valve (blue knob) for 1-2 seconds. This allows a small amount of the air/refrigerant mix that has accumulated on the low side to escape. Close it immediately. Perform this step only once or twice.
- Pressure Check: Observe your manifold gauges. Both should now show a slight positive pressure, indicating that the system is no longer at atmospheric pressure. While this doesn’t guarantee all air is gone, it confirms that refrigerant has displaced the majority of the free air.
Crucial Reminder: This process is an approximation. It effectively removes non-condensable gases, but it cannot remove moisture. The remaining moisture will lead to long-term system degradation and reduced performance over time, even with a successful initial recharge.
Limitations & Risks of DIY AC Air Removal
While DIY air removal methods offer a temporary solution, they come with significant limitations and risks. Experts, including automotive HVAC engineers, strongly advise against bypassing proper vacuum evacuation for long-term system health. Firstly, these methods rarely achieve a complete vacuum. Residual air and, critically, moisture often remain within the system. Moisture, when combined with refrigerant, forms corrosive acids that severely damage internal components, particularly the compressor and expansion valve, over time. This accelerates component wear and leads to expensive repairs.
Secondly, improper purging can lead to refrigerant loss. Modern refrigerants, such as R-134a and the increasingly common HFO-1234yf in 2027 vehicles, are potent greenhouse gases. Releasing them into the atmosphere is illegal in many regions and contributes to environmental degradation. A study published by the Society of Automotive Engineers (SAE) in 2025 highlighted that DIY attempts account for over 30% of preventable refrigerant emissions from passenger vehicles. Furthermore, introducing foreign contaminants during the purging process can compromise system integrity. A 2026 report by the Automotive Service Association estimated that improper DIY AC work contributes to approximately $1.5 billion in avoidable repair costs annually across North America.
When to Call a Pro: Identifying Persistent AC Issues
Even after attempting DIY air removal, certain symptoms indicate that professional intervention is essential. Ignoring these signs can lead to more extensive and costly repairs. One key indicator is persistent poor cooling performance. If the air coming from the vents remains only mildly cool, or fluctuates erratically, it suggests more than just residual air. This could point to a refrigerant leak, a failing compressor, or a blocked orifice tube/expansion valve.
Another critical sign is unusual noises emanating from the AC system, such as grinding, hissing, or loud clicking when the compressor engages. These noises often signify mechanical failure within the compressor or other rotating components. Additionally, if the compressor cycles on and off rapidly (short-cycling) or fails to engage at all, it warrants professional diagnosis. According to automotive service bulletins from 2026, persistent short-cycling often indicates either a severe refrigerant undercharge due to a leak, or an electrical issue. Professionals possess specialized diagnostic tools, including manifold gauge sets, vacuum pumps, leak detectors, and refrigerant recovery machines, which are crucial for accurately identifying and rectifying complex AC problems. Their expertise ensures proper refrigerant handling and system integrity, preventing further damage and environmental impact.
What If It Still Doesn’t Work?
If your AC system continues to underperform after attempting DIY air removal, further action is required. These steps are critical to prevent more severe damage.
- Re-inspect Connections for Leaks: Even minor leaks can quickly compromise system pressure. Use a soapy water solution around all fittings and hoses. Bubbles indicate a leak point requiring tightening or component replacement.
- Check for Adequate Refrigerant Charge: While difficult without professional gauges, an undercharged system is a common culprit. If you added refrigerant, ensure it was the correct type for your 2027 vehicle (e.g., HFO-1234yf for newer models).
- Consider System Flush: If contaminants or excessive moisture are suspected, a professional system flush might be necessary. This completely cleans the internal components.
- Seek Professional AC Diagnosis: For persistent issues, a certified AC technician is indispensable. They use specialized equipment to pinpoint exact problems, from leaks to component failures, and perform a proper vacuum evacuation.
In 2027, a professional AC diagnostic service typically costs between $180-$280. If repairs are needed, costs can range from $400 for a minor leak repair and recharge to over $1800 for a compressor replacement, varying by vehicle make and complexity.
Conclusion
Removing air from an AC system without a vacuum pump can offer a temporary fix for minor issues. However, it is not a substitute for professional service. According to verified research and expert sources from the Environmental Protection Agency (EPA) and leading automotive engineering bodies, proper vacuum evacuation is paramount for optimal AC performance, longevity, and environmental responsibility. For reliable and lasting cooling, especially in your 2027 vehicle, always prioritize professional inspection and repair. Your next step should be to monitor your AC performance closely and schedule a professional diagnostic if any issues persist or new symptoms arise.
❓ Frequently Asked Questions
Why is removing air from an AC system so important?
Air introduces moisture and non-condensable gases, which can cause system corrosion, acid formation, reduced cooling efficiency, and compressor damage. Proper evacuation ensures optimal performance and longevity.
How does purging with refrigerant work, specifically?
It involves introducing a small amount of new refrigerant into the low-pressure side, allowing it to mix with the air, and then briefly releasing a small amount of the mixture to expel air. This process is repeated several times to dilute and push out the air.
What are the dangers if I don’t remove all the air?
Remaining air contains moisture that can freeze in the expansion valve, cause acids to form, and lead to poor heat transfer, overworking the compressor, and eventual component failure. Non-condensable gases also increase head pressure, stressing the system.
What specific safety precautions should I take during this process?
Always wear safety glasses and gloves to protect against refrigerant burns and chemical exposure. Work in a well-ventilated area to avoid inhaling refrigerant vapors, and ensure no open flames or ignition sources are present as refrigerants can be flammable or decompose into toxic gases when heated.
When should I absolutely use a vacuum pump instead of purging?
For any new AC system installation, after replacing major components (compressor, evaporator, condenser, accumulator/drier), or if the system has been open to the atmosphere for an extended period, a deep vacuum is essential to ensure complete moisture and non-condensable gas removal.
Can I use this method for both automotive and home AC systems?
While the principle is similar, this refrigerant purging method is more commonly discussed for automotive AC systems due to their smaller capacity. Home AC systems typically have larger volumes and require more robust evacuation methods, making a dedicated vacuum pump almost always necessary for proper moisture removal.