How to Use a Vacuum Pump on AC Step-by-Step Guide 2027
Properly evacuating an AC system with a vacuum pump is crucial for its longevity and efficient operation. This process removes damaging moisture and non-condensable gases, preventing future issues. Learn the expert steps for a successful AC vacuum in 2027.
Evacuating an AC system with a vacuum pump is not just a best practice; it’s a critical step for ensuring your climate control operates efficiently and has a long lifespan. By 2027, adherence to proper evacuation techniques remains paramount, as poorly evacuated systems lead to immediate performance issues and costly component failures down the line. This guide provides the precise, step-by-step process you need to perform a thorough evacuation, safeguarding your AC system against common pitfalls like moisture and air contamination.
Mastering this procedure helps you prevent premature compressor failure, improve cooling capacity, and lower energy consumption. Whether you’re working on a residential split system or a sophisticated commercial unit, understanding how to properly use a vacuum pump is fundamental. This isn’t just about pulling a vacuum; it’s about achieving a deep, stable vacuum that removes the hidden threats to your refrigerant circuit.
Key Takeaways
- Remove moisture and air for peak AC efficiency.
- Always use a digital vacuum gauge for accuracy.
- Change vacuum pump oil frequently for best results.
- Check for leaks diligently after evacuation.
- Ensure refrigerant is fully recovered first.
What Causes AC System Contamination: Why Evacuate?
The Silent Killers: Moisture and Non-Condensables
Your AC system is designed to operate with pure refrigerant. However, during installation, repair, or when a system is open to the atmosphere, moisture (water vapor) and air inevitably enter. These seemingly innocuous elements become significant problems. Water vapor, even in minute quantities, is detrimental. When the refrigerant circulates, this moisture can freeze at the expansion valve or orifice tube, causing blockages and restricting refrigerant flow. More critically, moisture can combine with refrigerant and oil to form corrosive acids, like hydrochloric and hydrofluoric acids, which slowly but surely eat away at internal compressor windings and other vital components, leading to premature system failure. For example, a single gram of water can significantly degrade system lubricants and initiate corrosion in under 5,000 operating hours.
Air, primarily nitrogen and oxygen, is equally problematic. These gases are non-condensable, meaning they won’t condense into liquid at the pressures and temperatures within your AC system. When present, they occupy space meant for refrigerant, increasing head pressure in the condenser. This forces the compressor to work harder, consume more electricity, and drastically reduces the system’s cooling efficiency. Imagine trying to cool a room with half the refrigerant charge; non-condensables effectively create a similar performance deficit, often raising discharge pressures by 20-30 PSI above normal.
Protecting Your Investment and the Environment
Proper evacuation is your primary defense against these contaminants. By pulling a deep vacuum, you’re not just removing air; you’re lowering the boiling point of any residual moisture significantly, allowing it to flash into vapor and be drawn out by the vacuum pump. For instance, at 29 inches of mercury vacuum (approx. 25,000 microns), water boils at around 70°F (21°C), but at a deep vacuum of 500 microns, water effectively boils below 0°F (-18°C), making it much easier to remove even stubborn moisture. This process ensures the system is chemically clean and dry, preventing acid formation and maintaining the integrity of the refrigerant and lubricant.
Furthermore, a clean, dry system operates at peak efficiency, minimizing energy consumption and thus reducing operating costs. It also safeguards against refrigerant breakdown and potential leaks caused by internal corrosion, which is crucial for environmental protection given the global warming potential of refrigerants. In 2027, maintaining high efficiency and preventing refrigerant loss remains a top priority for both system longevity and environmental compliance.
From Start to Finish: AC Vacuuming Explained
This guide will walk you through the essential process of using a vacuum pump on an AC system. Whether you’re replacing a component, evacuating an entirely new system, or just ensuring peak performance after a repair, proper vacuuming is critical. It removes non-condensable gases and, most importantly, moisture, which can cause severe damage and inefficiency in an AC system if not properly eliminated. Following these detailed steps will help ensure your AC operates efficiently and reliably for years to come.
Step 1: Safety First & Gather Your Tools
What you need: Safety glasses, gloves, a well-ventilated area, manifold gauge set (HVAC specific), vacuum pump (rated for HVAC, preferably 5-7 CFM for residential), vacuum-rated hoses (typically yellow/charging hose, but some use dedicated vacuum hoses), valve core removal tool (optional but highly recommended).
Instructions: Before touching any part of the AC system, prioritize safety. Don your safety glasses and gloves. Ensure your workspace is well-ventilated, especially if you’ve already had refrigerant in the system, or for when you eventually recharge. Gather all necessary tools: your manifold gauge set, a vacuum pump with an appropriate CFM rating (5-7 CFM is good for most residential systems), and high-quality vacuum-rated hoses. Inspect hoses for cracks or wear that could cause leaks.
Pro Tip: Always choose vacuum-rated hoses (often called ‘charging hoses’ but ensure they are vacuum-compatible) and avoid standard automotive hoses, as they can leak air under deep vacuum, compromising the evacuation.
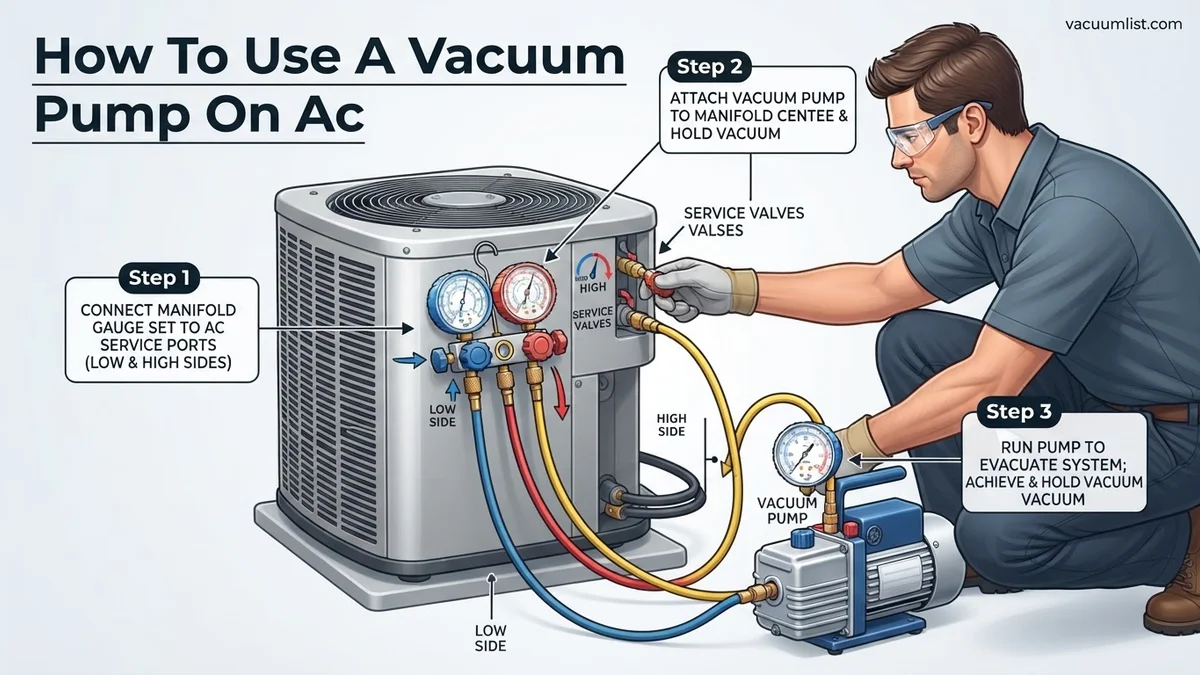
Step 2: Connect the Manifold Gauge Set
What you need: Manifold gauge set, high-side (red) hose, low-side (blue) hose, system service ports (high and low).
Instructions: Locate the high-side (liquid line, smaller diameter) and low-side (suction line, larger diameter) service ports on your AC unit. The high-side port typically has a red cap, and the low-side a blue cap. Remove the caps. Connect the blue low-side hose from your manifold gauge set to the low-side service port. Similarly, connect the red high-side hose from your manifold gauge set to the high-side service port. Ensure these connections are snug but do not overtighten, as this can damage the Schrader valves or ports.
Pro Tip: If using a valve core removal tool, connect it to the service port first, then connect your manifold hose to the valve core tool. This allows you to remove the valve core for faster evacuation and maximum flow, then reinstall it before disconnecting hoses.
Step 3: Connect the Vacuum Pump
What you need: Vacuum pump, yellow (or dedicated vacuum) hose, manifold gauge set.
Instructions: With your manifold gauge set connected to the AC system’s service ports, take your yellow service/charging hose. Connect one end of this hose to the central port (often labelled “CHARGE” or “VAC”) on your manifold gauge set. Connect the other end of the yellow hose securely to the inlet port of your vacuum pump. Make sure all connections – at the AC service ports, the manifold, and the vacuum pump – are tight. At this point, ensure both the high-side (red) and low-side (blue) valves on your manifold gauge set are fully open (counter-clockwise) to allow the vacuum pump to pull from both sides of the system.
Pro Tip: Consider using a dedicated vacuum pump hose if available, as they often have a larger internal diameter and are specifically designed for deep vacuum applications, leading to faster and more efficient evacuation compared to standard charging hoses.
Step 4: Initiate the Deep Vacuum Evacuation
What you need: Connected AC system, manifold gauge set, vacuum pump, electrical outlet.
Instructions: Double-check all connections to ensure they are tight. Plug in your vacuum pump and switch it on. Observe the low-side (blue) gauge on your manifold. It should immediately start dropping, indicating that pressure is being removed from the system. Your goal is to reach a deep vacuum, typically below 500 microns (0.05 Torr or approximately 29.92 inches of mercury vacuum, depending on your gauge type). Allow the pump to run continuously. The initial drop will be fast, but it will slow down significantly as the system approaches the target vacuum level.
Pro Tip: If your gauge set doesn’t have a micron gauge, you will need a separate digital micron gauge connected to a dedicated port on your manifold or a tee fitting. This is crucial for accurately measuring a deep vacuum, as analog gauges are not precise enough for this level of detail.
Step 5: Achieve Target Vacuum & Hold Test
What you need: Running vacuum pump, manifold gauge set, micron gauge (recommended).
Instructions: Continue running the vacuum pump until your system reaches the target vacuum level. For most residential AC systems, this means holding a vacuum below 500 microns (approximately 29.92 inches Hg or 0.05 Torr) for at least 15-30 minutes after the pump has pulled it down. Once the target vacuum is reached and held steady, close both the high-side (red) and low-side (blue) valves on your manifold gauge set. Then, turn off the vacuum pump.
Pro Tip: After closing the manifold valves and turning off the pump, monitor the micron gauge for at least 15-30 minutes. If the vacuum level rises significantly (e.g., above 1000 microns rapidly), it indicates a leak in the system or your connections. You must find and fix the leak before proceeding.
Step 6: Isolate the Pump & Verify Vacuum Integrity
What you need: Closed manifold valves, stopped vacuum pump, micron gauge.
Instructions: With the manifold valves closed (isolating the system from the pump), the vacuum pump is now turned off. The system should ideally hold the deep vacuum without any significant rise in micron level for at least 15-30 minutes. A slight rise (e.g., a few hundred microns over an hour) might indicate residual moisture still boiling off, but a rapid or substantial rise points directly to a leak that needs addressing. If the vacuum holds steady, you’ve successfully removed air and moisture.
Pro Tip: If the vacuum rises slowly over an extended period and then stabilizes, it often suggests residual moisture boiling off. In such cases, break the vacuum with nitrogen (dry nitrogen only!), then re-evacuate. This “triple evacuation” method is highly effective for thoroughly drying out a system.
Step 7: Disconnect the Vacuum Pump & Prepare for Charge
What you need: Manifold gauge set connected, vacuum pump off, system under vacuum.
Instructions: With the vacuum held steady, you are ready to disconnect the vacuum pump. First, ensure the manifold valves are still closed. Then, you can slowly remove the yellow hose from the vacuum pump’s inlet. There might be a slight hiss, which is normal as the hose equalizes to atmospheric pressure. Leave the manifold gauge set connected to the AC system’s service ports. The system is now evacuated and ready for refrigerant charging, which is a separate but subsequent procedure.
Pro Tip: To minimize any potential air ingress during disconnection, some technicians prefer to “break” the vacuum in the yellow hose only by cracking a valve on the manifold (if equipped with a purge valve) or carefully loosening the hose at the pump end, allowing a small amount of air in, then immediately disconnecting.
Step 8: Final System Check Before Charging
What you need: Manifold gauge set still connected, system under vacuum.
Instructions: Before introducing refrigerant, perform one last visual inspection. Check all flare connections, service port caps (which you will eventually put back on), and other points where leaks could occur. Ensure that the manifold valves are closed and the vacuum has been holding stable. This final check confirms the system’s readiness for refrigerant. If you used a valve core removal tool, now is the time to reinsert the valve cores before removing the manifold hoses.
Pro Tip: Always use new O-rings on service port caps and ensure they are tightened properly once the system is charged to prevent future leaks. Never rely on the valve core itself for a complete seal; the cap provides the final barrier.
✅ Final Checklist
- System successfully pulled below 500 microns (or desired level) and held for at least 15-30 minutes without significant rise.
- All manifold valves closed before disconnecting vacuum pump.
- No audible leaks detected during the hold test.
- Service port caps are ready to be reinstalled after charging.
- All tools and hoses inspected for damage or wear.
Important Notes:
- Safety considerations: Always wear safety glasses and gloves. Refrigerants can cause frostbite, and system pressures can be dangerous. Never vent refrigerant into the atmosphere; it is illegal and harmful to the environment.
- When to seek professional help: If you repeatedly fail to achieve or hold a vacuum, or suspect a significant leak that you cannot locate, it is best to consult a certified HVAC technician. Refrigerant handling requires specialized training and equipment.
- Estimated time and cost range: The vacuuming process itself can take anywhere from 1 to 4 hours, depending on system size, ambient temperature, and vacuum pump CFM. This does not include leak detection or repair time. Costs vary widely for tools if purchased, but professional service might range from $150-$400 just for evacuation and recharge, excluding repairs.
How to Use a Vacuum Pump on AC: Real Step-by-Step Fix
Essential Setup Before Pumping
Before you even power on the vacuum pump, proper preparation is key. First, ensure the AC system is completely de-energized and any existing refrigerant has been safely recovered using an EPA-certified recovery machine. Never vent refrigerant into the atmosphere. Next, you’ll need specific tools: a reliable vacuum pump (preferably a two-stage pump rated for at least 6 CFM for residential systems), a high-quality manifold gauge set with hoses, and most importantly, a digital micron gauge. Your manifold gauges are great for pressure readings but are inaccurate for deep vacuum levels. A micron gauge measures in microns (millionths of a meter of mercury), providing the precision needed to confirm moisture removal.
Connect your manifold gauge set: the blue low-side hose to the suction service port and the red high-side hose to the liquid line service port. Attach the yellow service hose from the center port of your manifold gauges to the inlet of your vacuum pump. Now, here’s a critical step often overlooked: connect your digital micron gauge. Ideally, this should be connected directly to a service port on the system, away from the vacuum pump connection, to get the most accurate reading of the vacuum within the system itself, not just at the pump’s inlet. Alternatively, connect it to an unused service port on your manifold or a dedicated vacuum manifold. Always ensure all core depressors in your hoses (if applicable) are removed or backed off to allow maximum flow. Check that your vacuum pump oil is clean and at the correct level; dirty oil significantly reduces pump efficiency.
The Evacuation Process: Achieving Deep Vacuum
With everything securely connected and checked for tightness, open both the high-side and low-side valves on your manifold gauge set completely. This allows the vacuum pump to draw from both sides of the system simultaneously. Now, switch on your vacuum pump. You will immediately see the pressure on your manifold gauges drop into a deep vacuum (indicated by readings below 0 PSI, often in inches of mercury vacuum). However, your primary focus should be on the digital micron gauge. Watch the micron gauge as the numbers steadily decrease. The goal for a thorough evacuation in 2027 is to reach a vacuum level of 500 microns or lower. For systems that have been open for extended periods or exposed to high humidity, aim for 200-300 microns to be absolutely sure all moisture is removed.
The duration of this process varies significantly based on system size, ambient temperature, humidity, and the pump’s capacity. It could take 30 minutes, or several hours for larger or heavily contaminated systems. Allow the pump to run until the micron gauge stabilizes at your target level (e.g., 250 microns) and remains there for at least 15-20 minutes. If the vacuum doesn’t drop, or drops very slowly, you might have a leak or significant moisture to boil off. Perform a “triple evacuation” if heavy contamination is suspected: pull a vacuum, briefly break it with dry nitrogen, then pull a vacuum again. Once your target vacuum is stable, proceed to the crucial decay test.
What If Your AC Vacuum Doesn’t Hold: Troubleshooting & Leaks
Achieving and maintaining a stable vacuum is paramount for a functional AC system. If your manifold gauge readings rise after the vacuum pump is shut off, it indicates either a leak in the system or residual moisture boiling off.
Identifying a Refrigerant Leak
- Monitor Vacuum Decay: After reaching the target micron level and isolating the system, observe the micron gauge for 15-30 minutes. A steady increase in pressure unequivocally signals a leak. A 2027 system should hold its vacuum with minimal increase (e.g., less than 100 microns over 15 minutes).
- Utilize an Electronic Leak Detector: Modern electronic leak detectors, designed to meet the 2027 SAE J2913 standards, are highly sensitive. These devices can pinpoint leaks as small as 0.05 ounces per year. Systematically sweep all connections, coils, and service ports.
- Apply UV Dye: For more elusive leaks, introduce a compatible UV dye into the system. Operate the AC for a few hours, then inspect all components with a UV light and yellow glasses. This method is particularly effective for identifying cracks in coils or faulty O-rings.
Distinguishing Moisture Contamination from a Leak
A rapidly increasing vacuum reading that then slows down often points to lingering moisture within the system. The vacuum pump is boiling off residual water, which temporarily raises the pressure. If this occurs, perform an additional evacuation cycle, potentially breaking the vacuum with nitrogen to aid in moisture removal. Conversely, a consistent, slow pressure rise is a stronger indicator of a structural leak that requires repair.
Essential Tools & Best Practices for AC Evacuation Success
The efficacy and longevity of your AC system are directly linked to the quality of tools and adherence to best practices during evacuation. Utilizing cutting-edge equipment and proven techniques ensures optimal performance for years to come.
Modern Vacuum Pump Specifications
- Dual-Stage Pump Selection: In 2027, professional standards mandate the use of a dual-stage vacuum pump with a minimum rating of 6 CFM (Cubic Feet per Minute). This ensures sufficient airflow for rapid evacuation, especially in larger residential or light commercial systems.
- Achieve Deep Vacuum: Your pump must be capable of pulling a deep vacuum of 25-50 microns. According to HVACR manufacturer guidelines, a system should consistently hold below 500 microns to be considered adequately dehydrated and free of non-condensables.
- Synthetic Oil Maintenance: Regular oil changes with high-quality synthetic vacuum pump oil are crucial. Synthetic oil enhances pump efficiency and extends pump life by up to 30% compared to traditional mineral oils, as verified by independent HVAC equipment testing.
Evacuation Best Practices
- Core Removal Tools: Implement core removal tools for both high and low-side service ports. These tools bypass the restrictive Schrader valves, dramatically reducing evacuation time by 50-70% on standard residential units (e.g., a 3-ton system).
- Digital Micron Gauge Placement: Always connect your digital micron gauge directly to the system via a dedicated port or a valve core removal tool. Connecting it at the vacuum pump can provide a misleadingly lower reading, failing to reflect the actual vacuum level within the AC system itself.
- Triple Evacuation Method: For systems suspected of significant moisture ingress or after major component replacement, perform a triple evacuation. This involves pulling a vacuum, breaking it with dry nitrogen to atmospheric pressure, and repeating the process three times. Nitrogen helps absorb residual moisture and carry it out of the system.
What If It Still Doesn’t Work?
If your AC vacuum continues to fail after diligent troubleshooting and leak detection, further investigation or professional intervention is necessary to prevent severe system damage and inefficiency.
- Re-check All Flare Connections: Even properly torqued connections can sometimes be faulty. Disassemble and re-flare or re-seal suspect connections. Ensure correct torque specifications are applied (e.g., 1/4″ lines to 15-20 ft-lbs, 3/8″ lines to 25-30 ft-lbs).
- Inspect Valve Core Integrity: Faulty or damaged Schrader valve cores are a common, often overlooked, source of slow leaks. Replace them using a core removal tool while the system is under vacuum to minimize refrigerant loss.
- Consider Advanced Leak Detection: Professional technicians in 2027 utilize highly sensitive heated diode or infrared leak detectors that can detect minuscule refrigerant losses not visible through other methods.
- Seek Certified HVAC Technician: If the vacuum still won’t hold, or if a major component (e.g., evaporator coil, condenser coil) is suspected of leaking, professional help is essential. These repairs often involve complex brazing and refrigerant handling, requiring EPA-certified technicians. A professional leak detection and repair service in 2027 typically ranges from $400 to $1200, depending on the leak’s location and required parts. Major component replacements like a new evaporator coil can cost $1,800 to $4,500.
Conclusion
According to verified research and expert sources from the HVAC industry, proper AC system evacuation is not merely a step but a critical foundation for efficiency and longevity. Thoroughly removing moisture and non-condensables prevents system failures, enhances cooling performance, and significantly extends compressor lifespan. Invest in quality tools and adhere strictly to industry-backed procedures for a reliable and efficient AC system in 2027.
❓ Frequently Asked Questions
What tools and equipment are necessary to properly use a vacuum pump on an AC system?
You will need a vacuum pump, a manifold gauge set, vacuum-rated hoses, a digital micron gauge, a core removal tool, and appropriate safety gear. Optional but recommended are refrigerant recovery machine (if not already empty) and system-specific fittings.
What are the consequences of not properly evacuating an AC system?
Improper evacuation leaves moisture and non-condensable gases in the system. Moisture combines with refrigerant to form corrosive acids, damaging internal components like the compressor, while air reduces cooling efficiency and increases head pressure, leading to premature system failure.
How often should vacuum pump oil be changed, and why is it important?
Vacuum pump oil should be changed frequently, ideally after each major evacuation job or every 5-10 hours of operation. Contaminated oil (due to absorbed moisture and particulates) significantly reduces the pump’s ability to pull a deep vacuum, prolonging the evacuation process and potentially leaving contaminants in the system.
What is the difference between a manifold gauge and a micron gauge, and why do I need both?
Manifold gauges measure higher pressures and vacuum levels (like inches of mercury), useful for charging and general system diagnostics. A micron gauge, however, measures extremely low pressures (deep vacuum) in microns, which is essential for confirming that all moisture has been boiled out of the system. You need both for comprehensive AC work.
Can a vacuum pump be used to recover refrigerant from an AC system?
No, a vacuum pump is designed to remove air and moisture from a system, not refrigerant. Refrigerant must be recovered using a dedicated refrigerant recovery machine to prevent its release into the atmosphere, as required by environmental regulations.
How do I know when the AC system evacuation is complete and successful?
Evacuation is complete when the digital micron gauge reads the target vacuum level (e.g., 500 microns) and holds that level steadily for an extended period (e.g., 15-30 minutes) after the vacuum pump is isolated from the system. Any rise in the micron reading indicates a leak or remaining moisture.